English
Acer LCD Monitor Quick Start Guide (QSG)
Important safety instructions
Please read the following instructions carefully.
1. Cleaning the LCD display screen: first, ensure that the power adapter you are using matches electrical standards for your region.
• Turn off the LCD monitor and unplug the power adapter.
• Spray a solvent-free cleaning solution onto your rag and gently wipe the screen.
•
Never spill any liquid directly onto or into the screen or its case.
•
Do not use any ammonia- or alcohol-based cleaners on the LCD monitor screen or case.
• Acer will not be liable for damage resulting from use of any ammonia or alcohol-based cleaners.
2. Do not place the LCD display near a window. Exposure to rain, moisture, or direct sunlight can cause serious damage to the device.
3. Do not press on the LCD screen. Excessively forceful pressing can cause permanent damage to the display.
4. Do not remove the case or attempt to repair the machine by yourself. All maintenance tasks should be performed by an authorized
technician.
5. Store the LCD display in a room with a temperature between -20°C-60°C (-4°F-140°F). Permanent damage may result if the LCD
display is stored outside of this range.
6. Unplug the monitor's power adapter immediately and contact an authorized technician if:
• The signal cable between the monitor and the computer is worn or damaged.
• Liquid spills onto the LCD display or the display is exposed to rain.
• The LCD monitor or case is damaged.
Attaching the monitor base
1. Unpack the monitor base and place the base on a smooth work surface.
2. Unpack the monitor.
3. Attach the monitor stand arm to the base.
• Make sure the base snaps into the monitor stand arm. (Selected models only)
• Use a screwdriver to turn the black screw to secure the arm to the display. (Selected models only)
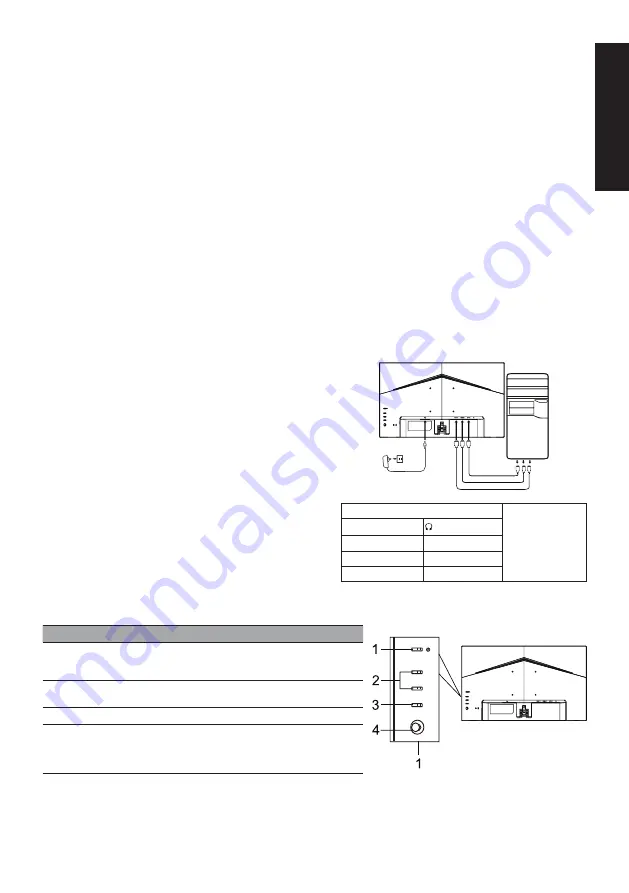
Connect the monitor to your computer
1. Turn off your computer and unplug the power cord.
2. 2-1 Connect Video Cable
a. Make sure both the monitor and computer are powered-OFF.
b. Connect the VGA cable to the computer. (Optional)
2-2 Connect HDMI Cable (Only HDMI-input model) (Optional)
a. Make sure both the monitor and computer are powered-OFF.
b. Connect the HDMI cable to the computer.
2-3 Connect DP Cable (Only DP-input model) (Optional)
a. Make sure both the monitor and computer are powered-OFF.
b. Connect the DP cable to the computer.
3. Connect the Audio cable (only Audio input model) (optional)
4. Connect the USB Type C Cable (only USB Type C input model)
(Optional)
5. Insert the monitor power cable into the power port at the back of the
monitor.
6. Plug the power cords of your computer and your monitor into a near
by electrical outlet.
7. Select Power-off USB charge ON/OFF to enable/disable Power-off
USB charge function. (Optional)
HDMI 2
HDMI 1
DP
~
Note: The location and
names of the sockets
on the monitor may
vary according to
monitor model, and
some sockets may
not available for some
models.
HDMI (optional)
(optional)
VGA IN (optional)
USB (optional)
AUDIO IN (optional)
DP (optional)
AUDIO OUT (optional) USB Type C (optional)
External control
No. Item
Description
1
Power button/indicator
Turns the monitor on/off. Blue indicates
power on. Amber indicates standby/
power saving mode.
2
Hotkey 1, 2 buttons
Press to activate user defined hotkey
function.
3
Input button
Press to toggle input sources.
4
Navi/OK button
Press to activate the OSD menu, then
use it as directional key to highlight the
desired function. Press it again to enter
a selection.
Summary of Contents for PG Series
Page 1: ...PG series PG241Y...
Page 2: ......
Page 40: ......
Page 41: ......
Page 105: ...Product Information for EU Energy...
Page 113: ...PG241Y PG241Y ACER...
Page 114: ......
Page 115: ......
Page 116: ......


