background image


4.    How to Use 


    User Guide 


Page 4-21 


4.1.7.3


Expansion 

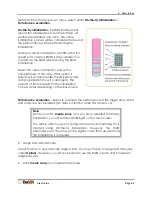
Expansion adds spare disks or new hard drives to an existing array. This is no need to 
create a new array or stop an array; you may add new disks online while the array is in 
use. Expansion can enlarge the capacity and frequency of an array. Although you may 
still access the array while doing Expansion, its performance is affected considerably. 
You may check the progress of Expansion in the main view.   
 
Example: 


Note 

The new hard drive must larger than existing drives of array. 

 
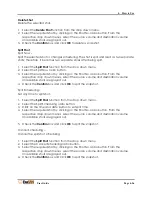
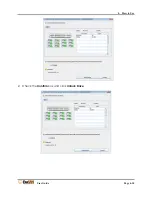
Follow the steps below to select an array to expand. 
 
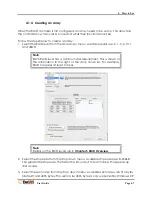
1.


Select the array to add additional drives to, and select the number of drives to be 
added. A “+” sign appears above the drives to be added. 

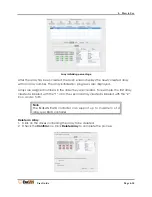
2.


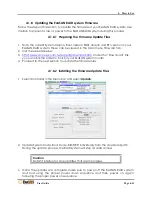
Check the 

Confirm

 box and click 

Expand Array


Summary of Contents for ExaSAN A12S2-PS

Page 1: ...SAN A12S2 PS User Guide Support Host Bus Adapter PCIe 2 0 Z1M G2 Support Host Convertor Thunderbolt2 0 to PCIe2 0 C1M G2 Support Switch System PCIe 2 0 SW08 Q4 SW16 SWF16 Accusys Storage Ltd Version V...

Page 2: ...add DAS and SAN log file path V1 4 02 04 2013 Modify page1 8 add the power convertor to the packing list and accessory list Modify page1 12 the LED status of HDD tray when the HDD is expanded or migr...

Page 3: ...ent Disks technologies and RAIDGuard X ExaSAN s RAID management software If you are new to RAID and RAIDGuard X this guide will help you become familiar with these technologies and assist you in setti...

Page 4: ...ents of this manual are copyrighted by Accusys Inc The information contained herein is the exclusive property of Accusys Inc and shall not be copied transferred photocopied translated on paper film el...

Page 5: ...5 1 1 3 6 Rail and Rail Extender 1 5 1 1 4 Key Features 1 5 1 2 Unpacking the System 1 7 1 2 1 What Is In Your Order 1 7 1 2 2 Checking the Equipment You ll Need 1 7 1 2 3 Unpacking 1 7 1 3 What s in...

Page 6: ...ExaSAN RAID system driver in Windows 3 14 3 3 3 Confirm LEDs on HBA 3 14 3 4 Create Array 3 15 3 4 1 Check on new Volume in Disk Utility of MacOS 3 15 3 4 2 Check on new volume in Disk Management of...

Page 7: ...Files 4 31 5 RAID Overview 5 1 5 1 How RAID Works 5 1 5 2 Data Storage Methods 5 1 5 2 1 Data Striping 5 1 5 2 2 Data Mirroring 5 1 5 2 3 Data Parity 5 2 5 3 RAID Levels 5 2 5 3 1 RAID 0 Striping 5 2...

Page 8: ...1 Introduction User Guide 1 Introducing ExaSAN PCIe 2 0 Storage System...

Page 9: ...0MB s giving PCIe 2 0 x4 storage systems a 20Gb bandwidth and PCIe 2 0x8 a 40 Gb bandwidth The ExaSAN total solution including its complete line up of rack mount system tower systems PCIe switch syste...

Page 10: ...he workgroups Figure 2 below depicts a standard ExaSAN system solution architecture Figure 2 1 1 2 What is the ExaSAN A12S2 PS Solution The ExaSAN A12S2 PS is a 2U12Bay disk array system designed for...

Page 11: ...s HDDs are not included See Section 1 1 3 2 for considerations concerning HDDs Further note that a QSFP Host Bus Adapter is packaged with the PCIe RAID system In a DAS Direct Attached Storage SAN Stor...

Page 12: ...les A 2m QSFP Copper Cable is included in your Accusys RAID disk system package It is used to connect the host systems to the storage system Use the copper cable for distances up to 5 meters Optional...

Page 13: ...res Below are the key features of the system They are the reasons why ExaSAN is your top RAID solution for a power user working on high end personal work 1 Host Interface PCI Express Gen2 5Gb S x4 tra...

Page 14: ...ization mode to smooth the performance of sequential 5 Management Java based GUI cross platform executable Enclosure components monitoring and control via GUI LED indicator for RAID enclosure status E...

Page 15: ...system solution your order includes everything described in Section 1 3 Note that there are generic system components and accessories required by the ExaSAN solution architecture but they are not sol...

Page 16: ...t or the inside flap of the box and your original purchase order You should have the items as described in the sections below Contact your Accusys System Integrator Value Added Reseller or Accusys Cus...

Page 17: ...rays with a total of 12 disk trays 1 4 SAS JBOD Expansion The SAS JBOD Expansion is sold separately from the A12S2 PS The SAS JBOD expansion uses 2U 12 drive rack mount chassis similar to the A12S2 PS...

Page 18: ...on 1 Controller A Status Steady Blue indicates the controller A is working normally Flashing Blue indicates the host is accessing Steady Red indicates the controller A has failed Flashing Red Other er...

Page 19: ...button will turn off the system beeper when beeper is sounding If another abnormal event occurs the beeper will alarm again If you want to disable the beeping all the time please use GUI of the RAID s...

Page 20: ...Disk 10 Disk 2 Disk 5 Disk 8 Disk 11 Disk 3 Disk 6 Disk 9 Disk 12 1 5 1 4 Disk Tray Disk Status LED 1 LED 2 Disk Online Steady Green Disk Fail Steady Red No Disk Steady Red Disk Lock Steady Green Disk...

Page 21: ...ing Drives Rotating Green Red Original Drives Steady Green Migrating Drives Original Drives Migrating Drives Rotating Green Red Original Drives Steady Green Migrating Drives Original Drives Migrating...

Page 22: ...ly Steady Red LED indicates that a fan module has failed 4 Heartbeat LED Indicates the controller status Flashing Green indicates the controller is active LED is off if controller is inactive 5 Termin...

Page 23: ...ower supply is working normally Steady Red LED indicates the power supply has failed 11 Power Supply AC In Connects to a power cable and power source 12 Power supply switch Switches the power on or of...

Page 24: ...OD 6 Right SAS port Cascade upstream to RAID or JBOD system 7 Cooling fan 2 Prevents the disk array from overheating Steady Green LED indicates the fan modules are working normally Steady Red LED indi...

Page 25: ...ollow diagram when connecting up to 3JBOD to a single RAID system Insure that the mini SAS cable is on the expansion port EXP port on the RAID storage when connecting to the right SAS port on the JBOD...

Page 26: ...in question is set to On position In this state the card is ready for DAS direct connection with the ExaSAN A12S2 PS Solid amber indicates the jumper pin in question is set to 1 position In this state...

Page 27: ...1 Introduction User Guide Page 1 19 indicates a link with trouble 4 Access LED Indicator Flashing blue while there are data access activities with the connected device...

Page 28: ...2 Preparation User Guide 2 Preparing to Install ExaSAN A12S2 PS...

Page 29: ...rds by their edges and avoid touching chips and connectors 2 2 Choosing the Location for the System The ExaSAN A12S2 PS is designed as a rack mount system Depending on where your rack mount is located...

Page 30: ...the power needs of your components 5 Make sure that the power outlets for all hardware components are grounded according to local and national standards Consult an electrician if you need assistance...

Page 31: ...3 Installation User Guide 3 Installing the ExaSAN A12S2 PS...

Page 32: ...e properly connected follow the instructions in section 3 3 1 Powering On to turn the components on in the prescribed order 3 1 1 Installing Disk Drives Follow the steps below to install your HDDs Ref...

Page 33: ...patible with both PCIe 1 1 and 2 0 standards only the latter is recommended due to performance consideration Caution PCIe slots on some motherboards are for graphics cards only Check with the motherbo...

Page 34: ...ocate the available PCIe slot remove the blank plate if one is present save the screw for later use 5 Position the connector of the card over the slot insert the connector into the slot press gently b...

Page 35: ...e connector is securely plugged when you hear a click If you need to unplug the cable pull the ring on the connector firmly until it is detached from the port Note that the QSFP used in the photo illu...

Page 36: ...stalling the rail on A12S2 PS System Your disk array is designed to be mounted in 2U slot on a standard 19 inch rack The ExaSAN A12S2 PS is shipped with the controller installed and ready to be mounte...

Page 37: ...ting points on the rails 2 Attach the rails and adjust the length to fit the rack 3 Secure the rails with two nuts and bolts on both the front and back of the rack 4 Tighten the locking screws on the...

Page 38: ...ew short beeps generated from the RAID disk system during this process You may ignore them as they are designed for Accusys internal diagnostic purpose only 3 Turn on the host server Caution It is imp...

Page 39: ...N product or Accusys FAE Dept see Appendix C Customer Service and Technical Support for more information Note For Mac Windows platform Executing installer package to install driver and GUI at the same...

Page 40: ...uld select the adequate packages on the menu list during installation Check Development Tools Then click Optional Packages to select all packages when you install your Linux OS 1 Copy the ExaSAN RAID...

Page 41: ...t to start the driver automatically please put the compiled driver ACS6x ko to directory as follows cp ACS6x ko lib modules uname r kernel drivers scsi For RHEL CentOS etc depmod a For SLES OS vi etc...

Page 42: ...UI Server Linux zip GC location ExaSAN model GUI Client x x x zip 2 Create folder Accusys and unzip GS GC files to subfolder GS and GC 3 Perform GS open a terminal console and enter the following comm...

Page 43: ...your Java version is earlier than 1 6 please go to www java com to upgrade If version is ok please enter the following commands cd Accusys GC x x x x x x java jar RAIDGuardX jar Now you can add contro...

Page 44: ...nfirm the driver has been properly installed with the following steps 1 Click on About This Mac and lick on the More Info button then Click on the System Report button 2 MacOS recognize ExaSAN as Fibr...

Page 45: ...e HBA is listed with the ACS6x identifier actual name may vary as Storage Controllers device manager in Windows platform Caution If you see the HBA listed as an unknown device under Windows follow the...

Page 46: ...rray Make sure LUN mapping refer to Section LUN mapping is setup and then volume should be appeared on OS now enjoy the high speed access to new ExaSAN Volume 3 4 1 Check on new Volume in Disk Utility...

Page 47: ...4 How to Use User Guide 4 Using RAIDGuard X...

Page 48: ...lled on which host directly connected to RAID system Note RAIDGuardX Server is default installed in ExaSAN Switch therefore in the SAN environment you can run RAIDGuardX Client alone to manage RAID co...

Page 49: ...Update RAID controller firmware System Code Boot Code etc Dump controller log Download the event log for troubleshooting Help Search Search keyword in RAIDGuard X Help Center Displays the help for RA...

Page 50: ...eference Drive Lag Proof Enable Disable NCQ mode Enable Disable SMART Mode Enable Disable Beeper Enable Disable Equalization Enable Disable Cache of controller and drives can be enable disable MISC fo...

Page 51: ...ardX Client locally 2 SAN Clicking Manually Add Controller in controller tab to add remotely Following steps for add controller in detail 1 DAS add controller locally 1 Click Add Controller to display...

Page 52: ...sh adding the controller Note To remove a controller from RAIDGuardX list select a controller and then click the Remove Controller button to remove the controller from the table When the popup window...

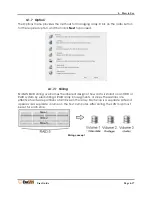
Page 53: ...peed and reliability One half the total capacity of drives Sum of RAID 1 member sets When configuring RAID you may take the follow items into consideration 1 Are you using a DAS or SAN environment 2 D...

Page 54: ...D level has a minimum disk requirement This is shown in the information to the right of the drop down list For example RAID 5 requires at least 3 drives Note Details on the RAID levels are in Chapter...

Page 55: ...For other OSs please select 512 bytes default 4 Click on the drives to be added to the array You can also click on Select all spare drivers Note Unselected drives will be set to Hot Global spare driv...

Page 56: ...nization how it is arranged The amount of time required for the initialization process varies depending on the disk volume Performance evaluation Select to evaluate the performance of the target array...

Page 57: ...d Arrays are assigned numbers in the order they are created For example the first array created is labeled with the 1 icon the second array created is labeled with the 2 icon and so forth Note The Exa...

Page 58: ...Click Remove to delete e mail addresses from the list Click Send Test Email to check that the e mail is working SMTP Setting Mail Server Name Enter the address of the mail server From Email Address E...

Page 59: ...perform well DLP concept In the event of performance degradation or delay of a single drive due to aging the ExaSAN RAID system reads both data and parity stripes concurrently It bypasses the slow rea...

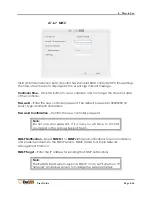
Page 60: ...sequences of the two hard disks are the same 1 2 3 4 However the access sequence in NCQ mode may vary to improve the performance Note If Equalization mode is enabled NCQ is automatically turned off 4...

Page 61: ...eeper option is enabled the system will sound an audible alarm in the event of an error Users can respond to the error promptly and carry out troubleshooting If the error indicated by the Beeper alarm...

Page 62: ...e able to constantly write data to the RAID storage without long latency Read Pre fetch Identifies sequential access patterns and aggressively pre fetches patters into cache From the drop down list ch...

Page 63: ...0000 8 zeros Type another 8 characters Password Confirmation Confirm the new controller password Note Do not lose your password If it is lost you will have to contact your agent or the Accusys Support...

Page 64: ...7 1 Slicing ExaSAN RAID slicing overcomes the inherent design of how data is stored on an HDD or RAID system by subdividing a RAID array into segments or slices These slices are effective hardware pa...

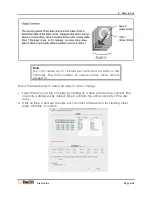
Page 65: ...t exceed 16 Follow the steps below to select an array to slice or merge 1 Select the array to slice or merge by clicking on a drive with an array number The capacity is displayed By default Slice 0 co...

Page 66: ...ide Page 4 19 3 Click on the slice to create and use the slider bar or buttons to adjust the size Click OK to confirm 4 Check the Confirm box and click OK Note Slices must be adjusted in order for exa...

Page 67: ...ay If Assign LUN automatically is not selected you need to assign the LUN manually using LUN map If the slice has been partitioned you need to set its LUN Map Note One slice can only be assigned one L...

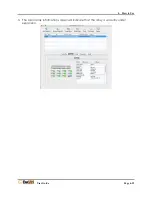
Page 68: ...f an array Although you may still access the array while doing Expansion its performance is affected considerably You may check the progress of Expansion in the main view Example Note The new hard dri...

Page 69: ...4 How to Use User Guide Page 4 22 3 The Main array information screen will indicate that the array is currently under expansion...

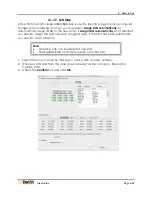
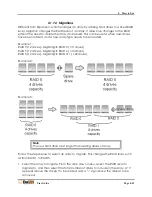
Page 70: ...1 RAID 5 12 drives Migrating RAID 0 11 drives RAID 5 12 drives Migrating RAID 6 13 drives RAID 5 12 drives Migrating RAID 0 1 22 drives Example 2 Example 3 Note The new hard drive must larger than ex...

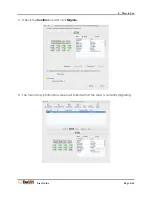
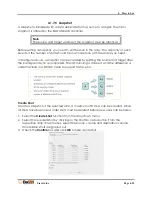
Page 71: ...4 How to Use User Guide Page 4 24 2 Check the Confirm box and click Migrate 3 The main array information screen will indicate that the array is currently migrating...

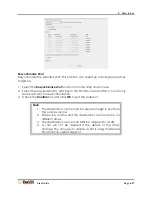
Page 72: ...ated by splitting the source and target after the background sync is completed The I O mirroring is stopped and the difference is under tracking in a bitmap table to support fast re sync Create Shot C...

Page 73: ...volume and destination volume Unavailable shots are grayed out 4 Check the Confirm box and click OK to split the snapshot Split Scheduling Set any time to split shot 1 Select the Split Shot function...

Page 74: ...tton You can only select split shot for resynchronization 3 Check the Confirm box and click OK to split the snapshot Note 1 The destination volume must be equal or larger in size than the source volum...

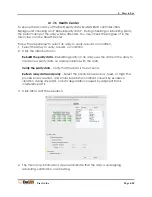
Page 75: ...d or condition 2 Click the radio button to Rebuild the parity data Rebuilding parity on an array uses the data on the array to create new parity data no repair problems with the data Verify the parity...

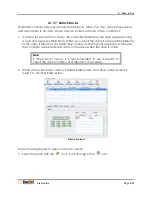
Page 76: ...the drive it will be added directly to the array if there has not been drive access during the locked period Otherwise the controller will rebuild parity data on the drive when the drive is online Not...

Page 77: ...4 How to Use User Guide Page 4 30 2 Check the Confirm box and click Unlock Drive...

Page 78: ...www accusys com tw support download htm Under the Download link you can click the folder to look for your ExaSAN system model 4 Proceed to the next section to update the firmware files 4 1 8 2 Instal...

Page 79: ...5 RAID User Guide 5 RAID Overview...

Page 80: ...ting is mainly RAID 1 and RAID 5 which will be discussed in details later in this chapter Once you have defined a group of drive modules as a RAID set the controller groups those drives into logical d...

Page 81: ...level 1 mirroring has been used for Metadata LUN because of its simplicity and high levels of reliability and availability Mirroring uses two drives each drive stores identical data RAID 1 provides ve...

Page 82: ...D 6 provides protection against data loss during an array rebuild when a second drive is lost a bad block read is encountered or when a human operator accidentally removes and replaces the wrong disk...

Page 83: ...Appendices User Guide Page 1 Appendices...

Page 84: ...cases the HDD is the cause Since the A12S2 PS is a highly efficient product there is extreme demand placed on each HDD As a result it is strongly recommended to use the newest enterprise level HDD 5 Q...

Page 85: ...tential of security breaches in the system It does that by automatically enabling a feature called User Account Control UAC When UAC is enabled the RAIDGuard X server can not detect the controller and...

Page 86: ...tch mode for the SW04 08 c Please check if the installer and the driver have been installed correctly If the installation has completed and the error still persists it may be a compatibility issue Sen...

Page 87: ...mail alerts to Option Set the Slice expansion migration health disk locking LUNs and take a snapshot of the array Option Menu Icons Slicing an array into several parts LUN Map Assign a LUN to a slice...

Page 88: ...support our support staff might ask for your system log file for troubleshooting purpose Go to the ExaSAN switch GUI select the Event Management icon Follow instructions there to download the log fil...

Page 89: ...Appendices User Guide Page 7 CAUTION RISK OF EXPLOSION IF BATTERY IS REPLACED BY AN INCORRECT TYPE DISPOSE OF USED BATTERIES ACCORDING TO THE INSTRUCTIONS...

Reviews: