background image


9


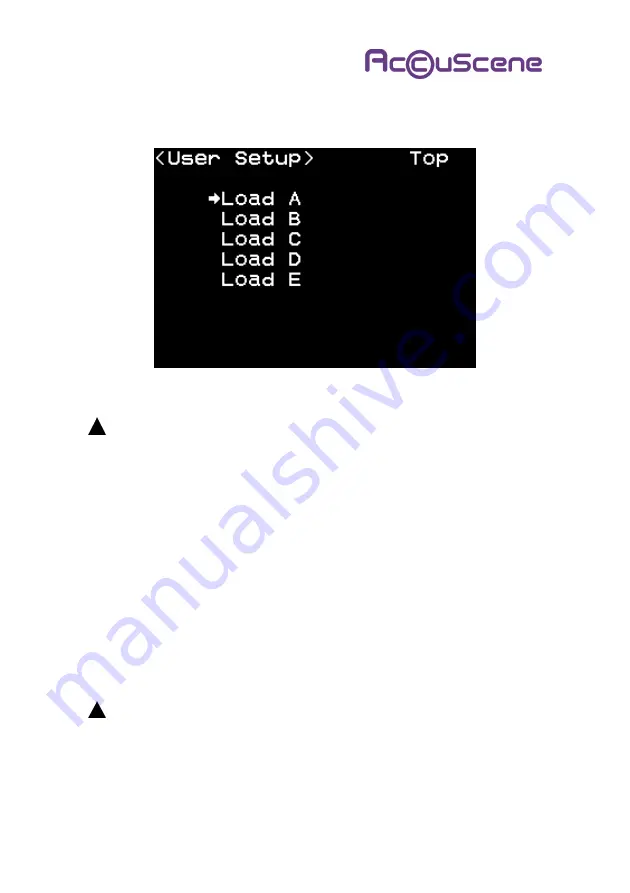
been selected, push the Menu control to load that setup.  Exit 

the  on-screen  display  by  rotating  the  Menu  control  to  select 

‘Top’ and push it to complete the process. 


Figure 2 User Setup Recall – On-Screen Display 


Loading  a  User  Setup  permanently  overrides  the  current 

Viewfinder options and settings. 

5.1.3  Peaking 

Rotate the PEAKING control to highlight fine detail  within the 

video image (‘peaking’), to assist focus adjustment. 

5.1.4  Contrast  

Rotate  the  CONTRAST  control  to  increase  or  decrease  the 

intensity  of  the  video  image  to  suit  ambient  light  conditions 

(Figure  3).    Intensity  steps  are  approximately  one-tenth  stop.  

The  Contrast  range  is  deliberately  wide  to  allow  operation  in 

direct  sunlight.    At  maximum  intensity  (Contrast  =  +1.0)  the 

video image is excessively bright for indoors use.  


Excessive  image  intensity  may  lead  to  eye  fatigue  and 

temporary loss of colour sensitivity. 


Prolonged  exposure  to  excessive  image  intensity  may  be 

harmful.    AccuScene  Corporation  Ltd.  accepts  no  liability 

for damage or loss resulting from inappropriate use. 

Summary of Contents for VF1280S Mk II

Page 1: ...Scene Corporation Ltd August 2005 VF1280S Mk II High Resolution Colour Viewfinder System USER MANUAL AccuScene Corporation Limited Unit 4 Dunfermline Business Centre Izatt Avenue DUNFERMLINE KY11 3BZ Scotland U K ...

Page 2: ... Setup 11 5 1 8 Display Aspect Sony only 11 5 1 9 Zebra Sony only 11 5 1 10 Tally 12 5 2 Eyepiece Controls 12 5 2 1 Focus Adjustment 12 5 2 2 Demist heater 12 6 ON SCREEN MENU 13 6 1 Main Menu 13 6 2 User Setup Menu 14 6 3 LED Setup Menu 15 6 4 VF IND Menu 16 6 4 1 Matrix Normal state 16 6 4 2 Gamma Normal state 17 6 5 Matrix Menu 17 6 6 Gamma Menu 19 6 7 Diagnostics Menu 20 6 7 1 Test Signals 20 ...

Page 3: ...g colour using the Colour Matrix 34 ILLUSTRATIONS Figure 1 Viewfinder and eyepiece controls 8 Figure 2 User Setup Recall On Screen Display 9 Figure 3 Brightness and contrast controls 10 Figure 4 On Screen Menu Main Menu 13 Figure 5 User Setup Menu 14 Figure 6 Confirmation Box No 14 Figure 7 Confirmation Box Yes 15 Figure 8 LED Setup Menu 15 Figure 9 VF IND Menu 16 Figure 10 Matrix Menu 17 Figure 1...

Page 4: ...4 Figure 16 Video image a Colour Mode b Y Monitor Mode 26 Figure 17 On Screen Indicators 29 Figure 18 CIE Colour Chart 36 Figure 19 Colour Matrix 36 TABLES Table 1 On Screen Indicators 30 ...

Page 5: ... In this manual comment preceded by LV not critical and is included for information or clarification only 2 OPERATING GUIDELINES The VF1280S Mk II Viewfinder is designed only to be used as described in this manual Do not use for any other purpose Protect the Viewfinder from dust rain spray and direct sunlight Do not immerse in water Do not lift or move the Viewfinder by its cable this does not sup...

Page 6: ...Viewfinder to stabilise typically in about 20 minutes to half an hour Stop down the camera lens to exclude light Perform auto black calibration on the camera Either set the camera to show colour bars or leave the lens stopped down Enter the Matrix Menu Section 6 5 to ensure that default or your special colour space is selected Enter the Viewfinder Gamma Menu Section 6 6 to ensure that Rec709 Gamma...

Page 7: ...deo 1280 h x 720 v active pixels Contrast ratio 200 1 typical Viewfinder Latency 50mSec Action mode 23 98 PsF Exposure Meter Custom function using pseudo colours Weight 2kg 4 5lb nominal Dimensions 295 l x 90 h x 91 d mm Input Voltage 9 5 min 12V nom 17 max Vdc Power 10W at nominal input voltage Environment Min air temperature 0C 32 F Max air temperature 40C 104 F Shade unit from direct sunlight P...

Page 8: ...er options and settings Section 6 1 using the MENU control and switch The Viewfinder on screen menu does not provide access to the camera on screen menu system which may be accessed using the camera controls 5 1 2 User defined setups User defined setups can be loaded from non volatile memory by rotating the Menu control knob when no other on screen menu is currently displayed Section 6 An on scree...

Page 9: ...tment 5 1 4 Contrast Rotate the CONTRAST control to increase or decrease the intensity of the video image to suit ambient light conditions Figure 3 Intensity steps are approximately one tenth stop The Contrast range is deliberately wide to allow operation in direct sunlight At maximum intensity Contrast 1 0 the video image is excessively bright for indoors use Excessive image intensity may lead to...

Page 10: ...ls within the input video image at 1 1 pixel resolution for 1080 v images corresponding to a magnification factor of 2 25 times the active video image Correspondingly for 720 60 P images a central area is magnified by a factor of 2 This may for instance assist critical assessment of the central part of the input video image Push the switch down to MOMENT to enable Magnify mode momentarily while th...

Page 11: ...esponding User Setup Loading a User Setup permanently overrides the current Viewfinder options and settings 5 1 8 Display Aspect Sony only Display borders and aspect boxes are controlled via camera controls on the Viewfinder Push the switch up to turn the Safe Area Boundary display On or Off Push the switch down to turn the Aspect display On or Off 5 1 9 Zebra Sony only Zebra threshold is controll...

Page 12: ...ate the lens barrel to adjust focus Mark personal focus adjustment on the white band against the white reference mark using a chinagraph or similar pencil 5 2 1 Focus Adjustment The eyepiece can accommodate a dioptre range of approximately 1 5 to 4 5 to compensate for the user s eyesight Since there is no compensation for astigmatism the user may wish to continue to wear prescription lenses which ...

Page 13: ...st C and Brightness B controls Figure 4 On Screen Menu Main Menu Push the MENU switch down On Off to access the On Screen Menu and to switch it off Rotate the MENU control to scroll through On Screen Menu options and to adjust settings Press the MENU control to select options or settings Push the MENU switch up Cancel to undo changes Menu options and settings are saved permanently when the On Scre...

Page 14: ... 5 within the User Setup Menu Figure 5 User Setup Menu Rotate then press the MENU control to select Save User Setup A B C D or E within the User Setup Menu A dialogue box Are you sure Figure 6 appears because saving a User Setup permanently erases the previously stored setup Figure 6 Confirmation Box No Press the MENU control to cancel the action and return to the User Setup Menu OR Rotate then pr...

Page 15: ...he setup is complete Loading User Setup A or B within the User Setup menu has the same effect as selecting User Setup A or B within the five choices A B C D E available within the User Defined Setups Section 5 1 2 or using the A B switch Section 5 1 7 6 3 LED Setup Menu On screen indicators Section 7 may be activated or hidden within the LED Setup Menu Figure 8 Figure 8 LED Setup Menu Rotate the M...

Page 16: ...ure 9 VF IND Menu Rotate the MENU control to select individual on screen indicators within the VF Menu Press the MENU control to activate or de activate the selected condition 6 4 1 Matrix Normal state The Matrix indicator Normal state can be defined as one of five user defined stored colour matrix settings Section 6 5 If any other Matrix setting is in use this results in the VF indicator being sh...

Page 17: ...the Viewfinder video image may be altered using the Matrix Menu Values of the weighting factors within the Colour Matrix Figure 10 may be set between 0 Off and 100 Maximum See Appendix Section 13 1 for a detailed description of the operation of the Colour Matrix The default weighting factors shown in Figure 10 leave input video data unaltered Adjustment of the colour matrix is recommended only for...

Page 18: ...sired store Save 1 5 within the Matrix Menu then press it to save the current Matrix in the store selected A dialogue box Are you sure Figures 6 and 7 appears because saving a Matrix permanently overrides the current contents of that store Rotate then press the MENU control to select YES to save the Matrix or to select NO to return to the Matrix Menu Previously saved Matrices may be loaded from th...

Page 19: ...oses via the Gamma Menu Figure 11 It is possible to load and select alternative pre computed arbitrary Gamma functions in the form of 10 bit look up tables by special arrangement with AccuScene Figure 11 Gamma Menu Rotate the MENU control to select one of the Gamma functions within the Gamma Menu then press it to select the desired Gamma function The current Gamma function is indicated in inverse ...

Page 20: ... levels and restore a default setup Figure 12 Diagnostics Menu 6 7 1 Test Signals Test Signals internally generated within the Viewfinder are accessed within the Diagnostics Menu These may be useful for Brightness and Contrast adjustment in given ambient light conditions Rotate then press the MENU control to select Test Signals within the Diagnostics Menu Rotate then press the MENU control to sele...

Page 21: ...t pattern In the latter case determine which of the areas of the test pattern corresponds to nominal black as captured through the lens Critical adjustment of Y offset is best accomplished using Y Monitor Section 6 8 This is not the case for Pr and Pb offset adjustments which must be undertaken with Colour mode selected Section 6 8 Switch the viewfinder to Y Monitor mode Section 6 8 Y offset adjus...

Page 22: ...ortion of the video image is mostly black with some purple noise Before adjusting Pb and Pr offsets restore the viewfinder to Colour mode Section 6 8 Pb and Pr offset adjustment method Rotate then press the MENU control to select Pb or Pr within the Diagnostics Menu The parameter changes to inverse text to indicate it is selected Adjust Pb or Pr offset by rotating the MENU control Pb Rotate the ME...

Page 23: ...previously stored analogue video input offset adjustments with default values For correct operation user adjustment of these is required after Factory Reset Rotate then press the MENU control to select YES to continue with a Factory Reset or to select NO to return to the Diagnostics Menu 6 8 Configuration Menu Display modes and Viewfinder orientation are selected within the Configuration Menu Figu...

Page 24: ...to view low frame rate 23 98 24 or 25 PsF progressive format input video Video is displayed at three times input frame rate for flicker free images suited to performing lighting motion capture or other setup checks In PsF mode the on screen indicators Section 7 are displayed above and below the active video image PsF mode removes video flicker leaving Motion judder especially visible This is inher...

Page 25: ...w the Viewfinder to provide simultaneous real time exposure and focus feedback to the camera operator Figure 15 Exposure Meter Colours When Y Monitor is selected colours shown in Figure 14 are superimposed on the active video image to show intensity within the image Figure 16 The central 70 IRE range between 20 and 90 IRE is shown in monochrome As lighting aperture and shutter speed are adjusted c...

Page 26: ...ive Gamma With reference to Figure 16 shades of dark blue and turquoise are used to indicate the darker intensities between 0 and 19 IRE Yellows oranges and reds are used to indicate lighter intensities between 89 and 108 IRE Hard saturation over exposure is visible in the background shown as magenta Small areas of pink are visible in the face showing normal exposure of skin around the chin Highli...

Page 27: ...ution are made prior to this correction Therefore Y Monitor offers useful feedback regarding near saturation in terms of IRE value not necessarily corresponding to lens stops or specific exposure levels depending on the camera Gamma setting 6 8 2 Mono Mode The Viewfinder normally generates colour images using a sequence of red green and blue images at high frame rate In Mono mode the colour conten...

Page 28: ...ideo image reappears after a short period The current frame mode is indicated in inverse text Little difference may be observed between PsF and I modes depending on video image content An example of a pair of input video formats demonstrating the difference is 25p 50i If the source is in 50i mode and the Viewfinder is set to PsF mode Jaggies may appear on moving edges within the video image These ...

Page 29: ...ibed in Table 1 are shown above and below the active video display to provide information about the status of the camera and the Viewfinder Figure 17 PE BATT TEMP REC TALLY VTR VF PE BATT TEMP REC TALLY VTR VF Figure 17 On Screen Indicators Indicators may be hidden from view or configured using On Screen Menus Sections 6 3 and 6 4 The Temperature Indicator cannot be hidden ...

Page 30: ...ng is being applied to the image Viewfinder Setting Change VF Orange Indicates Viewfinder setting is different from that of active user setup Camera Setting Change Orange Indicates camera setting is different from that of active user setup Matrix Orange Indicates non standard matrix is being applied to the image Magnify Orange Indicates Viewfinder image contains central 1280 h by 720 v pixels with...

Page 31: ...witch ON small aperture in lower surface of the Viewfinder with a toothpick or similar Switch on power to the Viewfinder while holding the Reset switch ON Care is required to avoid loss of power during the entire upgrade process If a software upload is interrupted the Viewfinder will not operate until completion of the upload restart process described above followed by successful software upload 9...

Page 32: ...ils to operate properly and AccuScene support is required the User should note the circumstances preferably by email to support accuscene com before calling AccuScene including the Viewfinder serial number a contact email address User name and telephone number to allow the AccuScene support team to return the contact Support services may be chargeable by AccuScene Corporation Ltd at its sole discr...

Page 33: ...d permanently during operation of the AccuScene VF1280S High Resolution Colour Viewfinder These will be inspected to determine validity of a Warranty claim 12 DISCLAIMER AccuScene Corporation Ltd AccuScene operates a policy of continuous development AccuScene reserves the right to make changes and improvements to any aspects of the product described in this document without prior notice Under no c...

Page 34: ...re set to 100 The normal setting for the I factors is 100 When working with FilmStream video from a Thomson Viper camera the Green gain within these images is substantially higher than the gain of Red and Blue channels To view natural colour images this normally requires compensation to restore colour balance This correction could be achieved using the RGB Colour Matrix alone but the results could...

Page 35: ...ata to the most extreme display colour gamut possible with Red Green and Blue being represented by pure Rp Gp and Bp respectively The effect of adding Rp in the Viewfinder representation of Green Figure 19 is to make Green appear more yellow within the Viewfinder display If plotted on a CIE Colour Chart Figure 18 this representation of Green would move downwards towards Rp from the position of Gp ...

Page 36: ...0 1 0 2 0 3 0 4 0 5 0 6 0 7 0 8 x y Blue LED Green LED Red LED Rec 709 CIE Spectral locus 1931 Figure 18 CIE Colour Chart Matrix Top R G B R 64 5 0 G 33 91 0 B 2 0 84 I 100 100 100 Load 1 2 3 4 5 Save 1 2 3 4 5 P 0 C 1 0 B 0 Figure 19 Colour Matrix ...

Reviews: