2-2
Installing the RG230
2
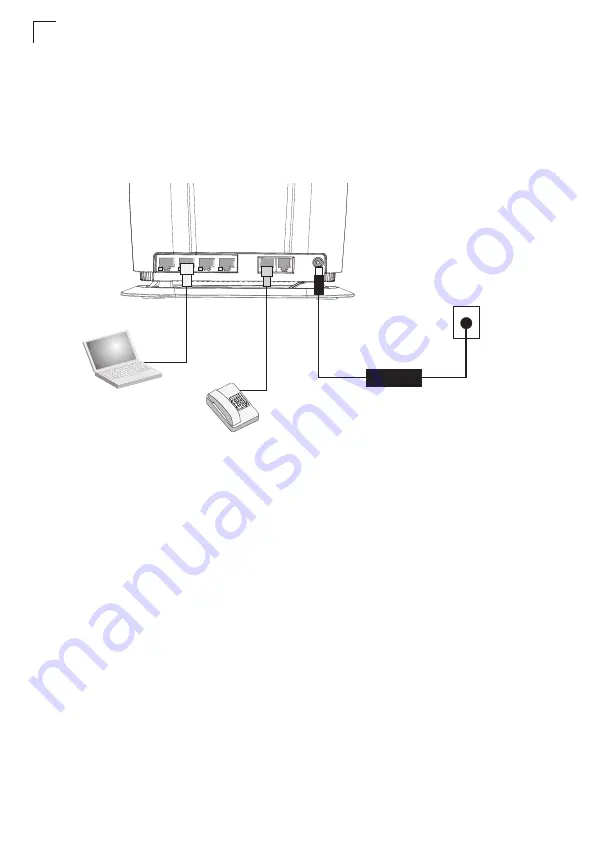
Cable Connections
The RG230 is a plug-and-play device, so once it has been connected to your PC
and powered up, it is fully operable.
Functioning as a gateway, the unit routes traffic between a WiMAX service
provider’s base station and PCs or notebooks in the local network.
Figure 2-1 RG230 Connections
To connect the RG230, follow these steps:
1.
Power on the RG230 by by first connecting the AC power adapter to the unit’s
power socket, and then connecting the adapter to an AC power source.
Caution:
Use ONLY the power adapter supplied with the RG230. Otherwise, the
product may be damaged.
2.
Observe the Indicator LEDs. When you power on the RG230, verify that the
Power LED turns on and that the other LED indicators start functioning as
described under “RG230 Hardware Description” on page 1-2.
3.
Connect Category 5 or better Ethernet cables from the RG230’s LAN ports to
the network ports of your PCs. Alternatively, you can connect the LAN ports to
an Ethernet switch or other devices. Make sure the length of each cable does
not exceed 100 meters (328 ft).
If your PCs are powered on, the RJ-45 LAN port LEDs on the RG230 should
turn on to indicate valid links.
Notebook Computer
AC Power Adapter
AC Power Outlet
PHONE 1
PHONE 2
LAN 1
LAN 2
LAN 3
LAN 4
DC IN
2A
10-19V
Regular Phone
Summary of Contents for RG230
Page 1: ...RG230 WiMAX 802 16e Self Install Residential Gateway User Guide...
Page 2: ......
Page 4: ...RG230 E072009 CS R02 149100001700W...
Page 12: ...viii Table of Contents...
Page 21: ...RG230 Hardware Description 1 7 1 Figure 1 4 Base of the RG230 Reset Button...
Page 22: ...Introduction 1 8 1...
Page 26: ...2 4 Installing the RG230 2...
Page 32: ...Initial Configuration 3 6 3...
Page 40: ...System Settings 4 8 4...
Page 52: ...Gateway Configuration 5 12 5...
Page 56: ...WiMAX Settings 6 4 6...
Page 72: ...Cables and Pinouts C 4 C...
Page 84: ...Glossary Glossary 6...
Page 87: ......


