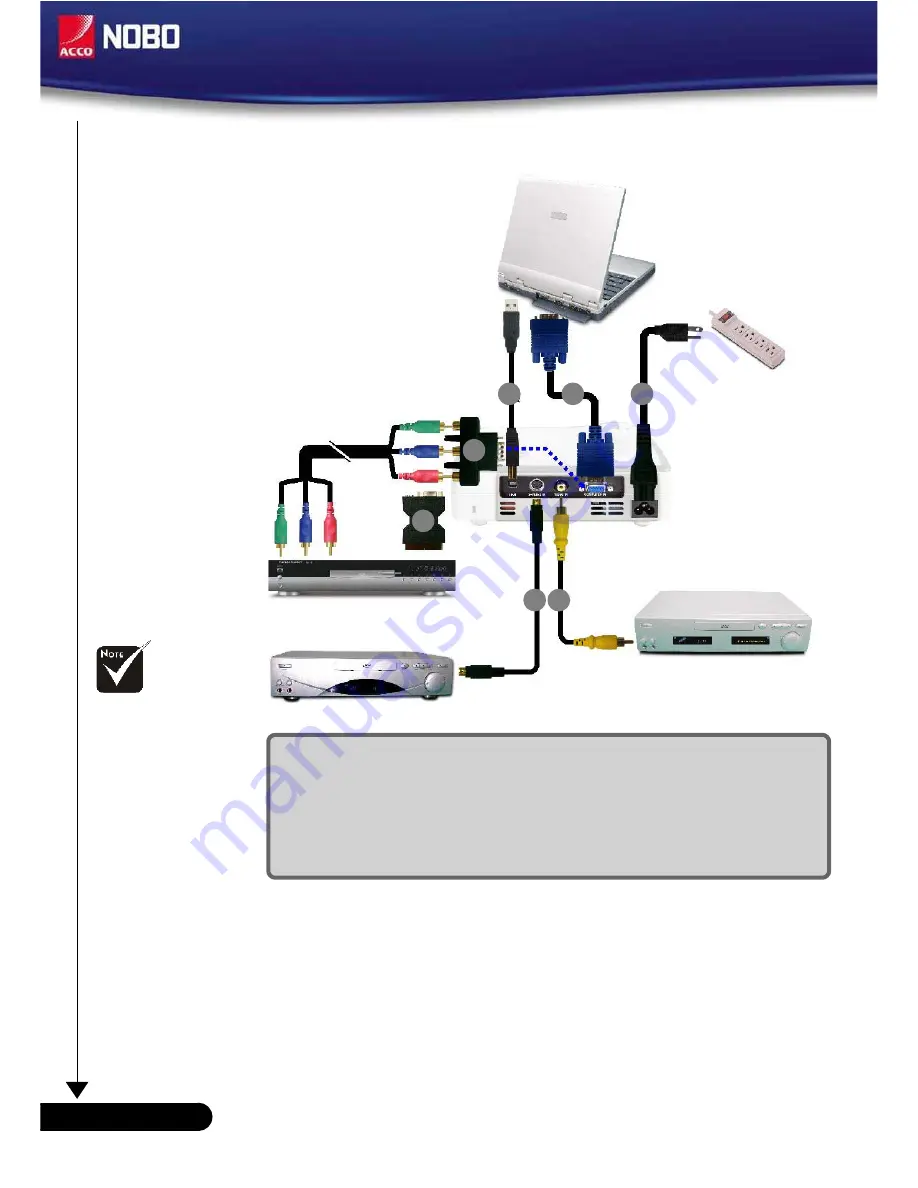
background image

10

English ...

7

2

1

3

5

4

RGB

™

Due to the differ-
ence in applica-
tions for each
country, some
regions may have
different
accessories.

1. ............................................................................................................. Power Cord
2. .............................................................................................................. VGA Cable
3. ......................................................................................... Composite Video Cable
4. ................................ SCART RGB/S-Video Adaptor (For European Use Only)
5. .................................................................... S-Video Cable (Optional Accessory)
6. .......................................................................... USB Cable (Optional Accessory)
7. ..................................... D-15 to RCA Adapter for YPbPr (Optional Accessory)

USB

6

Connecting the Projector

™

To ensure the projector works well with your computer, please
set the display mode of your graphic card less than or equal to
1024 X 768 resolution. Make sure the timing of the display mode is
compatible with the projector.  Refer to the “Compatibility Modes”
section on page 31.

S-Video Output

Video Output

DVD Player, Settop Box,

HDTV receiver

Installation

Summary of Contents for NOBO

Page 1: ...he Projector 11 Powering On the Projector 11 Powering Off the Projector 12 Warning Indicator 12 Adjusting the Projected Image 13 Adjusting the Projector Image Height 13 Adjusting the Projector Zoom Fo...

Page 2: ...HU WR SDJH DUQLQJ KHQ VZLWFKLQJ WKH SURMHFWRU RII SOHDVH HQVXUH WKH SURMHFWRU FRPSOHWHV LWV FRROLQJ F FOH EHIRUH GLVFRQQHFWLQJ SRZHU DUQLQJ 7XUQ RQ WKH SURMHFWRU ILUVW DQG WKHQ WKH VLJQDO VRXUFHV DUQL...

Page 3: ...being used for a long period of time Don t Block the slots and openings on the unit provided for ventilation Use abrasive cleaners waxes or solvents to clean the unit Use under the following condition...

Page 4: ...and HDTV compatible 480i p 576i p 720p 1080i Multi Auto functions Auto detection Auto image and Auto saving the adjustments Full function remote with mouse control and laser pointer User friendly mult...

Page 5: ...tact your dealer immediately if anything is missing Carrying Case Documents User s Guide Quick Start Card Warranty Card SCART RGB S Video Adaptor For European Use Only Due to the differ ence in applic...

Page 6: ...Control Panel 2 Zoom Lever 3 Focus Ring 4 Zoom Lens 5 Lens Cap 6 Elevator Foot 7 Elevator Button 8 IR Receivers 9 Connection Ports 10 Power Socket Main Unit Product Overview 8 2 4 3 6 7 1 9 5 10 1 8 I...

Page 7: ...Panel 1 Temp Indicator LED 2 Power Indicator LED 3 Lamp Indicator LED 4 Power Standby 5 Menu On Off 6 Re Sync 7 Keystone Correction 8 Four Directional Select Keys 9 Source 10 Enter 2 1 3 4 5 7 8 9 7...

Page 8: ...oduction Connection Ports 1 IR Receiver 2 Power Socket 3 PC Analog signal SCART RGB HDTV Component Video Input Connector 4 Composite Video Input Connector 5 S Video Input Connector 6 USB Input Connect...

Page 9: ...Laser Pointer 3 Laser Indicator LED 4 Laser Button 5 Auto Image 6 Enter 7 Freeze 8 Power 9 Source 10 Menu 11 Four Directional Select Keys 12 Keystone Correction 13 Mouse Right Click 14 Mouse Left Clic...

Page 10: ...6 USB Cable Optional Accessory 7 D 15 to RCA Adapter for YPbPr Optional Accessory USB 6 Connecting the Projector To ensure the projector works well with your computer please set the display mode of yo...

Page 11: ...The startup screen will display for 10 seconds and the Power LED will turn green 4 Turn on your source computer notebook video player etc The projector will detect your source automatically If you con...

Page 12: ...center Powering Off the Projector 1 Press the Power Standby button to turn off the projector lamp you will see a message as below on the on screen display 2 Press the Power Standby button again to con...

Page 13: ...e image height To raise the image 1 Press the elevator button n 2 Raise the image to the desired height angle o then release the button to lock the elevator foot into position 3 Use p to fine tune the...

Page 14: ...32 350 0 x 262 5cm 157 52 x 118 14 400 0 x 300 0cm 196 88 x 147 66 500 0 x 375 0cm Min WxH 25 36 x 19 02 64 4 x 48 3cm 50 72 x 38 04 128 7 x 96 5cm 84 48 x 63 36 214 6 x 160 9cm 118 24 x 88 68 300 4 x...

Page 15: ...menu To exit OSD press Menu again Keystone Adjusts image distortion caused by tilting the projector 8 degrees Four Directional Select Keys Use to select items or make adjustments to your selection En...

Page 16: ...s Hide again to restore the displayed image Laser Button Aim the remote at the viewing screen press and hold this button to activate the laser pointer Freeze Press Freeze to pause the screen image Mou...

Page 17: ...o select any item in the main menu While making a selection on a particular page press or Enter key to enter sub menu 3 Use keys to select the desired item and adjust the settings by key 4 Select the...

Page 18: ...18 English User Controls Menu Tree...

Page 19: ...al OSD menu Use the or Colour Setting Colour Setting Adjust the Red Green Blue Yellow Cyan and Magenta colours for advanced adjustment of the individual colours key to select your preferred language P...

Page 20: ...arts of the picture Adjusting the contrast changes the amount of black and white in the image Press the to decrease the contrast Press the to increase the contrast White Intensity Use the white peakin...

Page 21: ...s the to decrease the amount of colour in the image Press the to increase the amount of colour in the image Sharpness Adjusts the sharpness of the image Press the to decrease the sharpness Press the t...

Page 22: ...on Vertical Position Press the to move the image down Press the to move the image up Degamma This allows you to choose a degamma table that has been fine tuned to bring out the best image quality for...

Page 23: ...the projector reverses and turns the image upside down at same time You can project from behind a translucent screen with ceiling mounted projection Keystone Correct image distortion caused by tiltin...

Page 24: ...e menu transparency on the display screen Reset Return the adjustments and settings to the factory default values Execute Returns the settings for all menus to factory default values Cancel Cancels th...

Page 25: ...show or to hide the warning message when the changing lamp message is displayed The message will show up 30 hours before end of life ECO Mode Choose On to dim the projector lamp which will lower powe...

Page 26: ...press Re sync on the control panel If you are using a PC For Windows 3 x 1 In the Windows Program Manager double click the Windows Setup icon in the Main group 2 Verify that your display resolution se...

Page 27: ...KH 1RWHERRN RU 3RZHU RRN FRPSXWHU LV QRW GLVSOD LQJ D SUHVHQWDWLRQ I RX DUH XVLQJ D 1RWHERRN 3 6RPH 1RWHERRN 3 V PD GHDFWLYDWH WKHLU RZQ VFUHHQV ZKHQ D VHFRQG GLVSOD GHYLFH LV LQ XVH DFK KDV D GLIIHUH...

Page 28: ...an t select 4 3 aspect ratio type on your DVD player please select 4 3 aspect ratio in the on screen menu Problem Image is reversed Select Management Projection from the OSD and adjust the projection...

Page 29: ...29 English Appendices Problem Message Reminders Standby Replacing the lamp...

Page 30: ...rning To reduce the risk of personal injury do not drop the lamp module or touch the lamp bulb The bulb may shatter and cause injury if it is dropped 1 3 4 2 Lamp Replacing Procedure 1 Switch off the...

Page 31: ...75 46 9 SVGA 800 x 600 85 53 7 VESA XGA 1024 x 768 60 48 4 VESA XGA 1024 x 768 70 56 5 VESA XGA 1024 x 768 75 60 0 VESA XGA 1024 x 768 85 68 7 VESA SXGA 1152 x 864 70 63 8 VESA SXGA 1152 x 864 75 67 5...

Reviews: