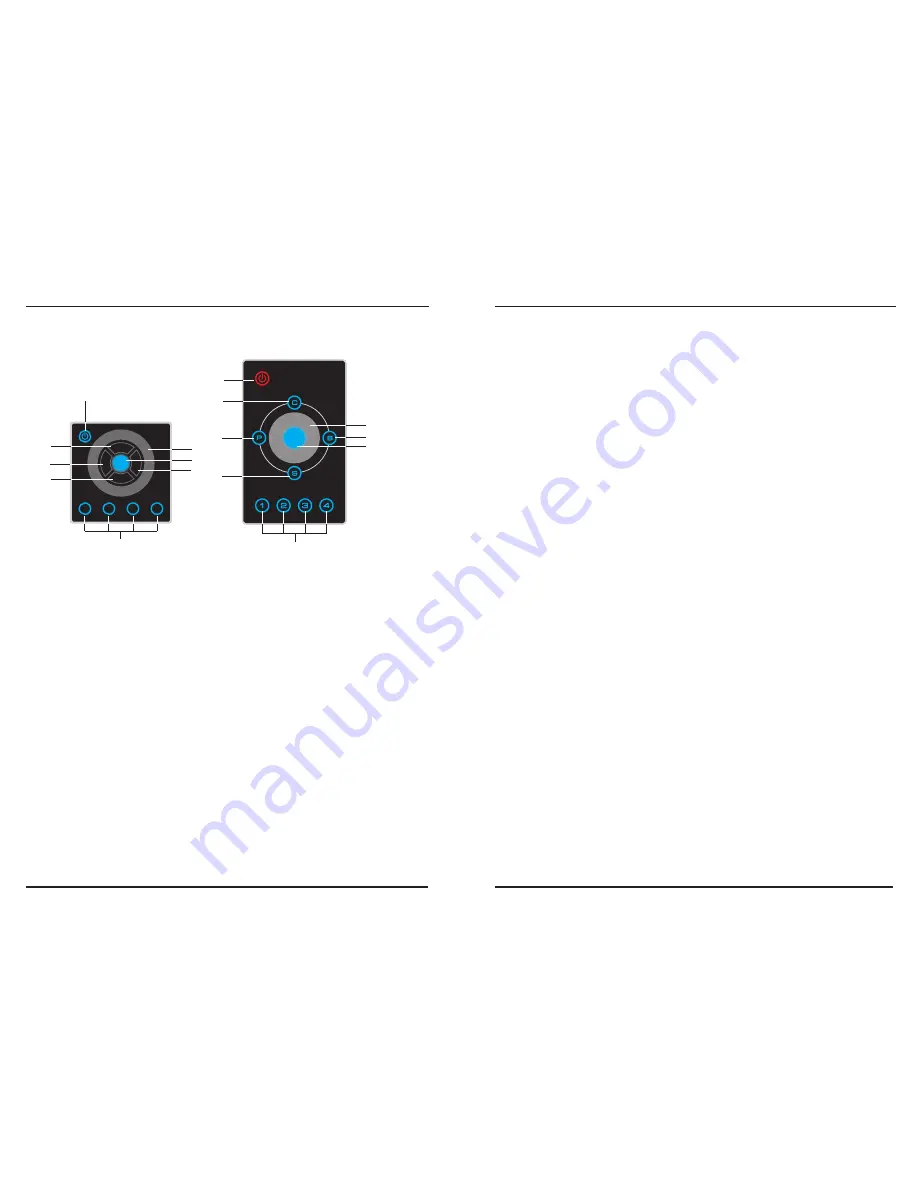
background image

C

P

B

S

1

2

3

4

1. Power key

Used to power on/off ART-4.

7. Touch toggle

Used to adjust color, brightness and speed, and select built-in programs.

5. B key

(brightness)

Used to adjust brightness.

2. C key

(color)

Used to select color.

3. P key

(program)

Used to select Built-in program.

4. S key

(speed)

Used to adjust speed.

6. Output Indicator

Used to display the current output.

8. Figure keys (1~4)

Used to record scene and color, as well as set fadetime.

Page 2

ART-4 User Instruction

Control Panel and Functions

Figure 1

1

2

3

4

5

6

7

8

1

5
6

7

4

2

3

8

ART-4 (EU)

ART-4 (US)

Operation Guide

Each figure key can have a color, or a

, or both elements recorded.

scene

6.1 Recording SCENE

Up to 4 scenes can be recorded and played back in this mode. Each figure key
corresponds to one scene. The procedure to record a scene is described below:

Touch

enable Auto Mode, the key clicks and the LED

indicator lights up.

"P" or "S" key to

Repeat step a~d to save more scenes to the other 3 figure keys.

All indicators flash momentarily once to indicate the current parameters
(including the built-in program and the value of speed and brightness) have
been recorded and saved into the key.

Touch any of the figure keys to which you wish to record the scene, and hold
on for more than 2 seconds.

a.

b.

c.

d.

Rotate the touch toggle to select the built-in program or adjust the speed.

e.

Touch "P" or "S" key to enable Auto Mode. Then touch the corresponding button
of 1~4 to raise the scene which has been stored in it. The LED indicator lights
up and it starts to display the recorded scene.

6.2 Playback SCENE

* NOTE:

6.3 SCENE Record Lock/Unlock

To unlock scene record, touch "P" key and "S" key and hold on for about 10
seconds until all keys flash once.

To lock scene record, touch "S" key and "P" key simultaneously and hold on for
about 10 seconds. At this time, the "S" key is not valid. Besides, the figure
keys1~4 can play back saved scenes only, but can not record scenes.

6. SCENE

Page 7

ART-4 User Instruction

Summary of Contents for ART-4

Page 1: ... All rights reserved Any improvement and changes to specifications design and this manual may be made at any time without prior notice INSTRUCTIONS MANUAL Please read this manual carefully and thoroughly before operating this unit C P B S 1 2 3 4 ...

Page 2: ...etting Fadetime for Color Exchange 6 6 1 Recording SCENE 7 6 2 Playback SCENE 7 6 3 SCENE Record Lock Unlock 7 Page 9 ART 4 User Instruction Physical Dimensions EU version Technical Specification Power Supply Loading Housing DMX out Power in PWM out Operation Temperature Storage Temperature Dimensions Weight DC 12 24V Polycarbonate Black White Gray 4 pin green terminal 6 pin green terminal 0 degC ...

Page 3: ...nt one During the process of data sending those four keys will light in the sequence and this process will take 10 seconds The devices will back to the normal working state after the data sending is completed In the status of online operation touch a color figure 1 4 or program 1 4 of any an on line ART 4 all the on line devices will trigger the same function Thank you for purchasing our digital p...

Page 4: ...r lights up P or S key to Repeat step a d to save more scenes to the other 3 figure keys All indicators flash momentarily once to indicate the current parameters including the built in program and the value of speed and brightness have been recorded and saved into the key Touch any of the figure keys to which you wish to record the scene and hold on for more than 2 seconds a b c d Rotate the touch...

Page 5: ...e recorded color 5 1 Recording Color 5 2 Playback Color 5 3 Setting Fadetime for Color Exchange Touch C key and hold on for 5 seconds till all LED indicators flash once Then release the key and the C key flashes repeatedly Different keys represent different fadetime The table2 details the fadetime information The existing mode ends and changes to normal mode automatically All indicators flash mome...

Page 6: ...time 3 Brightness 2 Built in Program The process of selecting the built in programs produces clicks and each click will activate one program Hold on pressing P key for about 1s to enable built in Program Menu the key clicks and the indicator is lit Then rotate the touch toggle to select a desired built in program There are 10 built in programs plus an Auto Program for user selection Auto Program i...

Reviews: