Access Dinghies Liberty Operation & Safety Manual Download Page 19

Page 19 

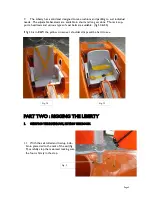
the console starboard side close above the battery compartment 


8.4     If components are swamped remove and dry them first if necessary, then spray with 

“Corrosion Guard” 


8.5     Remove the inspection ports to ventilate the buoyancy compartment when the boat is 

packed away each day. 


8.6     When the boat is stored for extended periods, remove (all) the electrics completely, ser-

vice them and store in a dry place. 


8.7     If the boat is usually sailed manually, remove the electrics till they are needed again, closing 

all the holes with rubber bungs. 


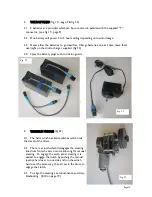
8.8     If the main sheet winch fails to work when activated first check the plug leads.  If all seems 

OK next listen at the control box to hear if the relays are clicking. If they are the problem may 

be the blown fuse taped onto the side of the mainsheet motor which is in the circuit to protect 

the components if the sheet winch motor is stalled and overloaded. Remove the winch, re-

move the tape and replace the 10 amp x 12 volt fuse. 


8.9     If the MO switch fails to engage and disengage the jib winch it is most probably dirty termi-

nals in the 9 pin joystick connectors.  Clean with a Do not spray the 9 pin connectors with 

corrosion guard as the MO switch works with mille amps and corrosion guard will inhibit a 

good contact.  


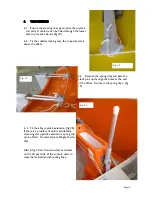
8.10   Adjusting the steering lines. To align the steering, engage the clutch, rotate the drum from 

lock to lock, then stop it at what you estimate to be the mid point.  There are steering line ad-

justments at the tillers and at the joystick.  Adjust the lines so that the joystick, tillers and the 

winch drum are all central. When you run the motor look for the tillers to oscillate evenly 

port and starboard, and that the joystick oscillates correspondingly.  If not adjust the lines till 

they are. 


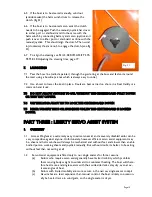
8.11   If the sheet is accidentally run through the winch, remove the winch, rotate the threaded 

rod to release the rocker until the sheet can be fed back around the drum, then re-tension the 

sheaves by rotating the rod.  Reinstall the winch.  If the rope slips it could be that more sheave 

tension is needed, so adjust the threaded rod, or possibly the glass beads are worn.  Contact 

us in this event. 


8.12     Changing between manual and servo a assist systems.  

(a)  If you wish to sail the boat manually and adjust the sheets by hand, wind the sheets 

out of the winches leaving a tail of about half a meter outside the winches.  This will 

leave the full length of the sheets available for manual operation. 

(b)  To change back to servo assist winch operation reverse the above process and wind 

the sheets in on the winches leaving about half a metre outside the camcleats.  This 

will leave all the sheet available for servo use. 

(c)   To align the main and jib sheet winches to work in sinc refer to Part Two – Rigging 

the Liberty, 3 Setting up main and jib sheets. 


The Recommendations relating to corrosion should be taken very seriously and apply to any en-

vironment, but the warmer and more humid your climate the more vigilant you will have to be. 

IF YOU SAIL IN SALT WATER YOU SHOULD TAKE THESE RECOMMENDATIONS VERY  

SERIOUSLY. 

Summary of Contents for Liberty

Page 1: ...Page 1 Access Dinghies LIBERTY OPERATIONS SAFETY MANUAL ...

Page 2: ... Some PFD s provides buoyancy to help you float with your head above the water All sailors and volunteers should wear a PFD at all times whilst on or near water PFD s are subject to normal wear and tear Each one should be checked regularly and if in doubt about its serviceability it should be replaced If they become wet from salt water they should be hosed down with fresh water and allowed to dry ...

Page 3: ...he 303W fig 2 or a 2 part double ended mainsheet fig 3 one end go ing to a servo assist sheet winch and the other through a conventional swivel deadeye camcleat for manual operation fig 4 Both these ends pass through a double block attached to the boom about 400mm back from the mast see fig 4 3 A boom vang is fitted which prevents the boom skying when running in fresh to strong winds see fig 4 Fig...

Page 4: ...f the console fig 6 5 The jib is self tacking with a diagonal strut between the clew and a claw at the mast which holds the jib flat and prevents twisting as the sheet is eased fig 7 view 6 The jib sheet is 2 part which gives the option of one end going to a servo assist winch and the other down to the camcleat on the starboard side of the consol for manual operation fig 8 shows the jib sheet winc...

Page 5: ...drests and various types of seat belts are available fig 34 35 If fig 34 is in B W the yellow cross over shoulder straps will be hard to see PART TWO RIGGING THE LIBERTY 1 STEPPING THE MAINMAST FITTING THE BOOM 1 1 With the sail rolled and tied up bob bin in place tied to the tack of the sail fig 9 carefully step the mainmast making sure the foot is firmly in the step Fig 34 Fig 35 Fig 9 ...

Page 6: ...ind in fresh to strong winds not to flatten the mainsail when going to windward see fig 4 page 3 1 7 If the boat is to be sailed manually and has a 3 part sheet fitted to the boom use the following procedure a Unravel the sheet clear any twists and shackle its block onto the traveler and rig as per fig 2 page 3 b Pass the live end of the sheet through the deadeye and camcleat on the console and ti...

Page 7: ...ull sail is not needed at this time release the outhaul and pull the port side reefing line till its knot stops stops at the starboard side cleat the reefing line on the port side aft of the console then haul on and cleat the outhaul fig 12 reefing lines 2 STEPPING THE FOREMAST 2 1 Before stepping the mast unroll the sail fit the claw and strut then attach the strut to the claw with the stainless ...

Page 8: ...esuming the jib sheet block is shackled to the bottom hole of the clewboard feed the sheet through the block and down through the deckeye to the turning block then thru the deadeye and the cam cleat then tie a stopper knot in its end see fig 8 page 4 fig 9 page 5 2 6 At the bow is the Jib Strut Downhaul free it and attach its plastic hook to the lug on the front of the claw fig 13 page 7 2 6 Pull ...

Page 9: ...m 3 2 Presuming the boat is servo assist equipped it will be necessary to set up the main and jib sheet winches to work in sync Commence by installing the batteries and connecting the joy stick fig 17 showing battery with Y connector going forward around front of the centreboard case to second bat tery See fig 26 on page 10 for a typical joy stick controller Plug the joystick into the 9 way yellow...

Page 10: ...hould be about 200mm outboard from the mainmast 3 6 If the jib sheets in hard first press the MO switch to disengage the jib sheet winch and use the joystick to further adjust the main sheet 3 7 If the main sheets in first either a un plug the main sheet winch the white plug is under the console on the starboard side of the centerboard case and then using the joystick wind in more on the jibsheet ...

Page 11: ...9 The idea is not to flatten the sail along the boom as it should have enough slack to form a gentle curve fig 36 fig 37 5 REEFING AND FURLING THE JIB 5 1 Un cleat the jib sheet and downhaul before attempting to reef 5 2 Use the port reefing line to reef the starboard to unreef 5 3 Remember to cleat the reefing line after reefing use the clamcleat on the console port side or the sail will unroll 5...

Page 12: ...pring clips and pass the clevis pins up through the holes at the end of the tillers Re insert the spring clips fig 19 6 4 Fit the alloy joystick extension fig 20 If there is a problem of sailors accidentally removing this joystick extension a spring clip can be fitted Contact Access Dinghy for de tails Also in fig 20 are the two white camcleats on the aft port side of the console used to cleat the...

Page 13: ...IZE 7 4 USE THE LONG ALLOY PIN TO LOCK THE CENTREBOARD DOWN 7 5 NEVER USE SEAT BELTS OR HARNESSES UNLESS THE CENTREBOARD IS LOCKED DOWN PART THREE LIBERTY SERVO ASSIST SYSTEM 1 OVERVIEW 1 1 Access Dinghies are extremely easy to sail servo assist and a severely disabled sailor can be very competitive against anyone Unfortunately however efficient servo assist equipment may be sheet and helm winches...

Page 14: ...lkhead via a 32mm single hole rubber bung its yellow 9 pin plug connecting to the joy stick 2 The smaller of the 2 aft leads plugs into the helm winch lead black plugs which should always be hanging on a hook just aft of the starboard side inspection port 2 2 These plugs except the yellow 9 way joystick plugs should be sprayed with corrosion guard particularly the blue battery plug which is the on...

Page 15: ... 3 4 Spray the battery plugs with corrosion guard 4 THE HELM WINCH fig 23 4 1 The helm winch has limit switches which limit the travel of the tillers 4 2 There is a clutch which disengages the steering line drum from the servo motor allowing for manual steering To engage the servo assist steering it is easiest to engage the clutch by pushing the manual joystick hard over to one side and run the wi...

Page 16: ...mploys a friction drum similar to the mainsheet winch 6 2 If the jib sheet slips re tension the drum by adjusting the tension spring nyloc nut and lock nut on port side of winch drum shaft or the rubber bands are giving in sufficient tension Replace the rubber bands if they are perished or broken The rubber bands will soon to be replaced with springs 6 3 The jib sheet tail should be tied off at th...

Page 17: ...fig 29 where severe quadriplegia prohibits the use of a joy stick Each sailor requires a personal module to guard against spread of infec tion This is an unnecessary added ex pense which can be avoided for most sailors who are better off using a joy stick c Paddle switches great for people with severe CP and the like who have difficulty with fine finger movements and insufficient control of their ...

Page 18: ... 3 There are 3 types of MO Switches a Finger controlled latched press button fig 26 page 17 b Magnetic reed switch latched activated by a magnet attached to finger cheek or other moving body part fig 28 page 17 c Sip or puff latched switch fig 29 page 17 NB Latching means the winch stays on when the switch is activated and must be pressed again to stop it Momentary switches are only on while being...

Page 19: ... There are steering line ad justments at the tillers and at the joystick Adjust the lines so that the joystick tillers and the winch drum are all central When you run the motor look for the tillers to oscillate evenly port and starboard and that the joystick oscillates correspondingly If not adjust the lines till they are 8 11 If the sheet is accidentally run through the winch remove the winch rot...

Page 20: ...he locking pin be in serted whenever the boat is used Invariably people sailing the electric boat need to be strapped into it Never strap someone into a boat unless the centreboard locking pin is inserted through the c b handle Locking the keel Insert the long aluminium pin through the c b handle and into the drilled hole in the console Push the pin right in so that only the knot at the end of the...

Page 21: ...unication to the shore In all planing powerboats a kill cord should be fitted and used All persons in the safety boat must wear an approved buoyancy aid All safety boat personnel should be instructed on how to reef sails If an Access Dinghy needs to be towed it is safer and easier to tie the dinghy close along side and remove the rudder blade so that the dinghy cannot be steered in the wrong di re...

Reviews: