background image

Ap1400 Installers’ Guide Page 13 of 16 


12  PAPER 

 
Pressing the paper feed button when the printer is idle, or in spool mode, advances paper at typically 
60 mm per second.  However, the feed button has additional functions:  
 
"Double-clicking" the button:  

(i.e. pressing and releasing twice in quick succession just like a PC mouse)


in idle mode, prints a demo/test message including the firmware version, encoded 


calibration data, and the full character set;   


in spool mode, or having been out of paper, prints any stored data and enters idle mode. 

 
Some of the functions of the paper feed button can be invoked or disabled under control of the host. 
 

12.1  LOADING PAPER 

 
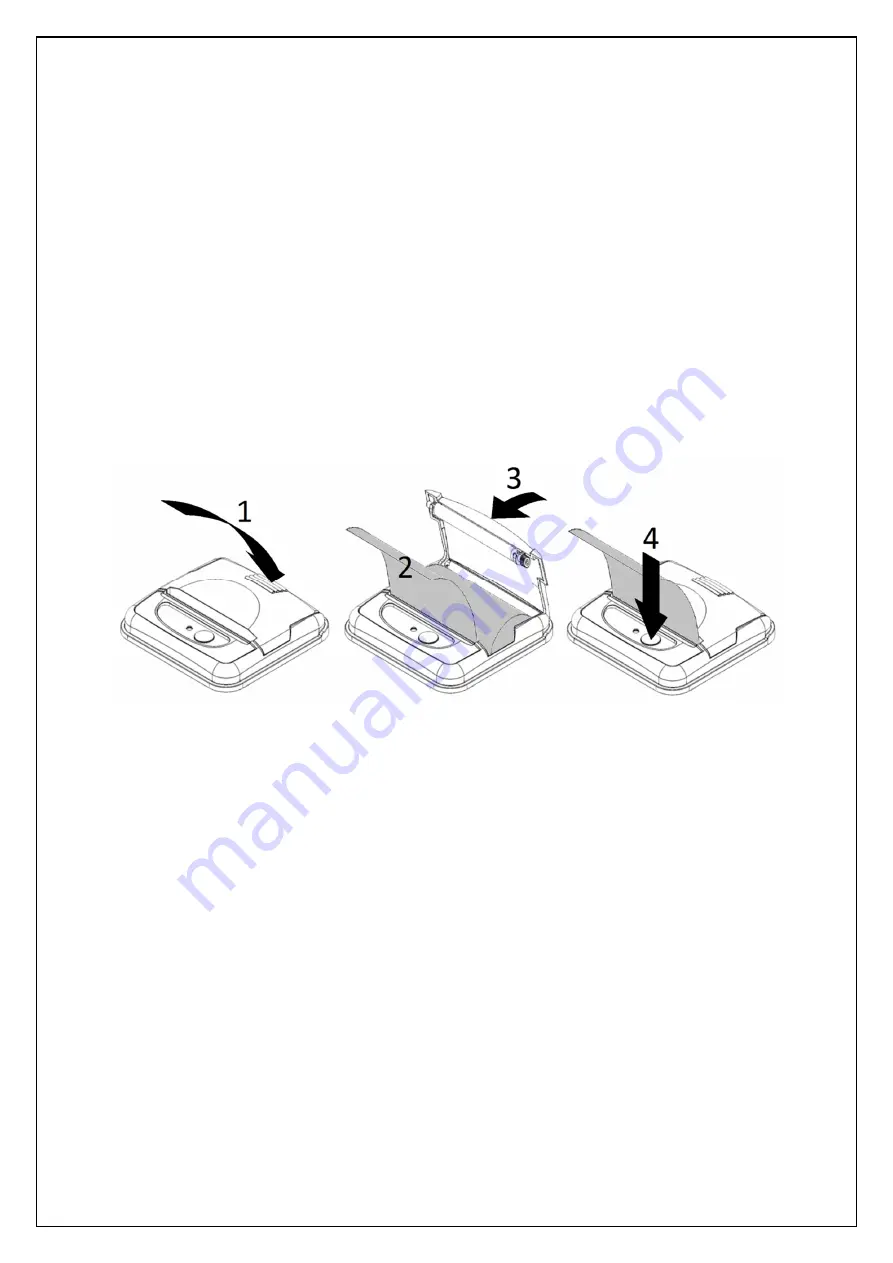
The procedure for loading paper is as follows: 
 

1.  Press the lid in towards the panel. 
2.  Unwind a small amount of paper from the roll and Insert the Paper Roll into the Printer. 
3.  Close the Lid, and the paper is loaded. 
4.  After loading, check that the paper is straight and advances properly, and tear off any excess 

by pulling the paper sharply towards you across the serrated tear bar.  In the event of a jam or 
other paper loading problem, release the lid and straighten the paper before closing again. 


Paper rolls must be 57.5 ± 0.5 mm wide, 36 mm maximum diameter, and have the thermally sensitive 
coating on the outside.   The printer can accept rolls which are coreless or wound on a core. Suitable 
rolls are available as ASL Product Code: 


A05836TPR1 Thermal Paper Roll (36 mm dia, 13.5 m long approx) 


12.2  PAPER OUT AND HEAD UP SENSORS 

 
A reflective optical Paper Out sensor within the mechanism detects an out-of-paper condition, and/or 
senses black marks to register with pre-printed forms.  A mechanical Head Up sensor detects when 
the lid is open. 
 
By default, the printer enters Spool mode automatically if either sensor becomes active.  The printer 
will automatically exit spool mode, and print any stored data, when new paper is loaded and the lid 
closed.  This behaviour may be modified. Please refer to the Programmers’ Guide for details of how to 
configure these functions. 


Summary of Contents for Ap1400

Page 1: ...perts in Small Printer Solutions Installer Guide Ap1400 Thermal Printer Able Systems Limited Denton Drive Northwich Cheshire CW9 7TU England Tel 44 0 1606 48621 Fax 44 0 1606 44903 Web www able system...

Page 2: ...SUPPLY ARRANGEMENTS 6 8 CONNECTION GUIDE 7 8 1 J4 RS232 DATA 7 8 2 J3 POWER 8 8 3 J2 USB DATA 8 8 4 CHASSIS EARTH STRAP 8 9 UNIT DIMENSIONS 9 10 MECHANICAL FIXINGS 9 10 1 BACK FIXING 9 10 2 FRONT FIXI...

Page 3: ...AND DISCLAIMER Copyright subsists in all Able Systems intellectual property including controller firmware embedded software and circuit diagrams pin connection lists and application data No warranty...

Page 4: ...a and power connections are enclosed by the equipment they are mounted in and are no more than 3m long 5 ORDERING PART CODES OPTIONS AND ACCESSORIES The following table details full Able Systems part...

Page 5: ...ed host equipment present the same output signal when they go to sleep The Ap1400 can be set to ignore this condition as detailed in the Programmer s Guide but even then this type of host behaviour ma...

Page 6: ...is Input Voltage Range 4 5V to 8 5V without any internal voltage or reversal protection Supply Current Requirement 100mA Printer in Idle Mode typical 3A average Printer Printing 10A peak Printer Prin...

Page 7: ...232 DATA J4 Mating Connector Manufacturer Molex Part Number 51065 0500 Crimp Part Number 0502128000 Pin Ap1400 Function Ap1400 Input Output Standard PC D9 Pin 1 RX data i p 3 2 Printer Wake i p 4 3 Pr...

Page 8: ...the wiring diagram below 8 3 J2 USB DATA The Ap1400 supports full speed USB 2 0 connections to the Mini USB B port J2 A standard USB A to Mini USB B lead can be obtained from Able by ordering part num...

Page 9: ...ns 10 1 BACK FIXING 1 Prepare the panel aperture as described below 2 Fit the printer into the panel using M3 machine screws being careful not to screw more than 5mm in to the Ap1400 3 Open the lid of...

Page 10: ...crewdriver 2 Prepare the panel aperture as described below 3 Fit the printer to the panel and fix in place using two self tapping screws as shown above 3mm max included in Ap1400KIT 4 Fit a paper roll...

Page 11: ...n and its retention when the paper compartment is opened The printer can therefore be mounted horizontally or angled to the limits shown below Should you wish to use the Ap1400 in orientations that ex...

Page 12: ...phics patterns are decoded It responds to the paper feed button in the normal way and can also produce a demonstration print see below 11 2 SPOOL MODE In spool mode data is received and stored but not...

Page 13: ...traight and advances properly and tear off any excess by pulling the paper sharply towards you across the serrated tear bar In the event of a jam or other paper loading problem release the lid and str...

Page 14: ...No light indicates that the unit is off LED Pattern Table Pattern Power Status Buffer Mode Constant Green OK Normal Fast Flashing Green OK Spool Long Green Short Red Low Voltage Normal Short Green Sho...

Page 15: ...le timeout delay 14 2 SPOOL MODE Spool mode is can be entered by a command from the host Paper Out condition or Head Up condition being sensed an error condition e g head over temperature power supply...

Page 16: ...NICAL SUPPORT In the meantime if more information is required please contact Technical Support Support Able Systems com Or call 44 0 1606 48621 and select option 4 for Technical Support End Copyright...

Reviews: