background image

Elite Hydraulic Spreader Setup Guide 

ABI

(Absolute Innovations, Inc.)         -          

855-211-0598        -           www.abisupport.com

         Page | 5  


SPECIFICATIONS: 


Model 

3H 

6H 

# Of Horses 

Up To 6 

Up To 20 

Capacity 

37 cu. Ft. Heaped 

72 cu. ft. Heaped 

Overall Length 

93” 

93” 

Overall Width 

57” 

98” 

Overall Height 

60” 

61” 

Loading Height 

Adjustable 36” – 41”  

Adjustable 37” – 42” 

Frame Construction 

A36 

” 2x3 Tube Steel 

A36 

” 2x3 Tube Steel 

Bin Construction 

12 gauge steel 

12 gauge steel 

Body Finish 

Powder Coated 

Powder Coated 

Chain 

# 50  

# 50 

Drive 

Hydraulic Motor 

1,800 psi continuous 

2,400 psi max 

 Set of 9’ Hoses w/quick 

connect 

Hydraulic Motor 

1,800 psi continuous 

2,400 psi max 

Set of 9’ Hoses w/quick 

connect 

Hydraulics Needed 

1 Set of ports @ 1,200 psi min. 

1 Set of ports @ 1,200 psi min. 

Ground Clearance 

8” 

9” 

Front Stabilizer 

2,250 lbs. Pivot-Skid Jack 

2,250 lbs. Pivot-Skid Jack 

Wheel Assembly 

20”x5” Foam Filled Tires 

4.80-12 4-ply 

Replaceable Hubs & Bearings 

22”x7” Air Filled Tires 

B78-13st 2-ply 

Replaceable Hubs & Bearings 

Total Shipping Weight 

850 lbs. 

1,000 lbs. 

Power Required 

17 hp - 350 cc 

25 hp - 450 cc 

Warranty 

1 Year Limited 

1 Year Limited 

Summary of Contents for 3H

Page 1: ...ABI Absolute Innovations Inc 1320 Third Street Osceola IN 46561 855 211 0598 www abiattachments com Elite Hydraulic Spreader Setup Guide THIS MANUAL MUST BE READ AND UNDERSTOOD BEFORE DELIVERY ...

Page 2: ...w abisupport com Page 2 TABLE OF CONTENTS Introduction 3 4 Specifications 5 Safety 6 7 Operation 8 Unpacking Set up 8 9 Before First Use 10 Vehicle Size 10 Attaching to Tow Vehicle 11 12 Loading the Spreader 13 How To Control Material Flow 14 Storage 14 Maintenance Lubrication 15 16 ...

Page 3: ...n the ABI Support page at www abisupport com and send our Customer Service Department an email regarding any issue you may be experiencing with the Elite Spreader To the Operator The information presented in this manual will prepare you to operate the Elite Spreader in a safe and knowledgeable manner Operating the Elite Spreader in a proper manner will provide a safer working environment and creat...

Page 4: ...onments that may have buried obstacles Stay well and clear of all moving parts Keep all limbs clear of attachments when making adjustments with all hydraulically operated attachments Use caution when operating the ELITE SPREADER in icy wet or snowy condition Do not use the ELITE SPREADER on highways or public thoroughfares The ELITE SPREADER is designed for off road use only Always follow Tractor ...

Page 5: ...r Coated Powder Coated Chain 50 50 Drive Hydraulic Motor 1 800 psi continuous 2 400 psi max Set of 9 Hoses w quick connect Hydraulic Motor 1 800 psi continuous 2 400 psi max Set of 9 Hoses w quick connect Hydraulics Needed 1 Set of ports 1 200 psi min 1 Set of ports 1 200 psi min Ground Clearance 8 9 Front Stabilizer 2 250 lbs Pivot Skid Jack 2 250 lbs Pivot Skid Jack Wheel Assembly 20 x5 Foam Fil...

Page 6: ...es and immovable objects like large rocks stumps or steep inclines that could upset the tractor or cause damage to the spreader Keep hands feet and clothing clear of the spreaders moving parts Do not wear loose clothing near the spreader as it might catch on moving parts Replace the chain shield after lubrication or repairs for your protection It is your responsibility to ensure it is installed at...

Page 7: ...com Page 7 SAFETY Decals are needed for safety If they are faded or missing please request replacements from Absolute Innovations Inc Location of Safety Decals The decal shown above is found in the three locations shown below Located on chain shield Located on front of bin Located on back of bin ...

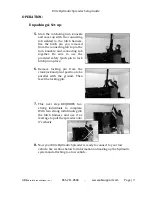
Page 8: ...pped with a lift gate to lower the spreader to the ground Another option is a ramp or dock Without any of these options you will not be able to safely offload the spreader 2 Once the spreader is safely on level ground inspect the spreader for signs of shipping damage If damage is found note such damage on the paperwork offered to you by the freight truck driver Also it is possible that the shippin...

Page 9: ...Be sure to use the provided safety lynch pin to lock hitch pin in place 6 Remove locking pin from the crank jack and pivot position to be parellel with the ground Then reset the locking pin 7 This next step REQUIRES two strong individuals to complete With two strong individuals grab the hitch harness and use it as leverage to pull the spreader onto it s wheels 8 Now your Elite Hydraulic Spreader i...

Page 10: ...need to replenish some hydraulic fluid to the tractor after setup Vehicle Size Just because a small tractor may be able to pull a loaded spreader it may not be heavy enough to safely operate on hills Always use a tractor that is heavier than the loaded spreader when operating on inclines to provide sufficient traction and braking Attaching to Tow Vehicle After you have completed the Unpacking Setu...

Page 11: ... spreaders hitch to the tractors drawbar You may need to move the spreaders hitch around a few inches by hand to get perfect alignment 5 The image shown to the right illustrates proper connection Be sure to reinsert the safety lynch pin into the hitch pin 6 With the spreader and tractor securely connected turn the crank jack until it no longer touches the ground Then remove the locking pin pivot t...

Page 12: ...ll not allow you to operate backwards so it does not matter which hose goes into either port 9 With both hoses securely connected to the hydraulic ports Ensure everyone stands clear start up your tractor and run the hydraulics in both directions You will notice only one direction works Allow the hydraulics to operate for a few seconds this will fill the hoses and motor with hydraulic fluid You may...

Page 13: ...g the stalls and then change to a tractor with hydraulics before spreading 2 Loading w Muck Bucket You may choose to load the spreader by picking your stalls into a muck bucket then loading into the spreader bin We have made this process a little easier by creating a step on the back of the spreader to give you more leverage Please use proper lifting techniques when lifting a muck bucket We also r...

Page 14: ...terial raise your gear and lower your throttle To spread the hydraulic lever must be held in the on position To stop spreading simply let go and the lever with spring back to off STORAGE Preparing the Elite Hydraulic Spreader for Storage If the spreader is to be stored and will not be operated for some length of time take the following steps to insure long life and trouble free startup for the nex...

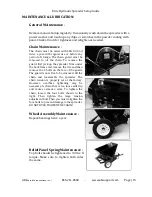
Page 15: ...first jack up the spreader from under the back frame rail remove the tire and then remove the 4 bolts on the face of the guard The guard is now free to be removed Oil the chain and reassemble the spreader The chain tension is properly set at the factory However overtime tightening may be necessary A chain that is too loose will slip and causes excessive wear To tighten the chain loosen the four bo...

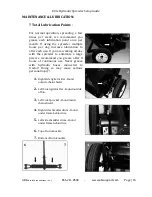
Page 16: ...h use If you are working all day with the spreader to eliminate a large pile we recommend you grease after 8 hours of continuous use Never grease with hydraulic hoses connected to tractor Doing so may cause serious personal injury 1 Right Side Agitator Bar Found outside chain shield 2 Left Side Agitator Bar Found outside of bin 3 Left Side Sprocket Found inside chain shield 4 Right side shredder d...

Page 17: ...17 If you have any other questions about your Elite Hydraulic Spreader please feel free to contact our Customer Support staff at 855 211 0598 You can also check out our support page at www ABIsupport com for more information and videos on your Elite Hydraulic Spreader or any of our other quality products ...

Reviews: