background image

Commissioning

Operating Instructions VER:1.0

8

Pos: 35 /CNDEX/01 Heading/1. Heading/Heading_Commissioning @ 57\mod_1487828936105_15.docx @ 751257 @ 1 @ 1

7

Commissioning

Pos: 36 /CNDEX/01 Heading/1.1.1 Heading/Heading_Volume setting @ 57\mod_1487752846570_15.docx @ 750674 @ 3 @ 1

7.1.1  Volume 

setting

Pos: 37 /CNDEX/08 Commissioning/Volumen setting_HSM36-GU @ 62\mod_1498197885038_15.docx @ 793347 @  @ 1

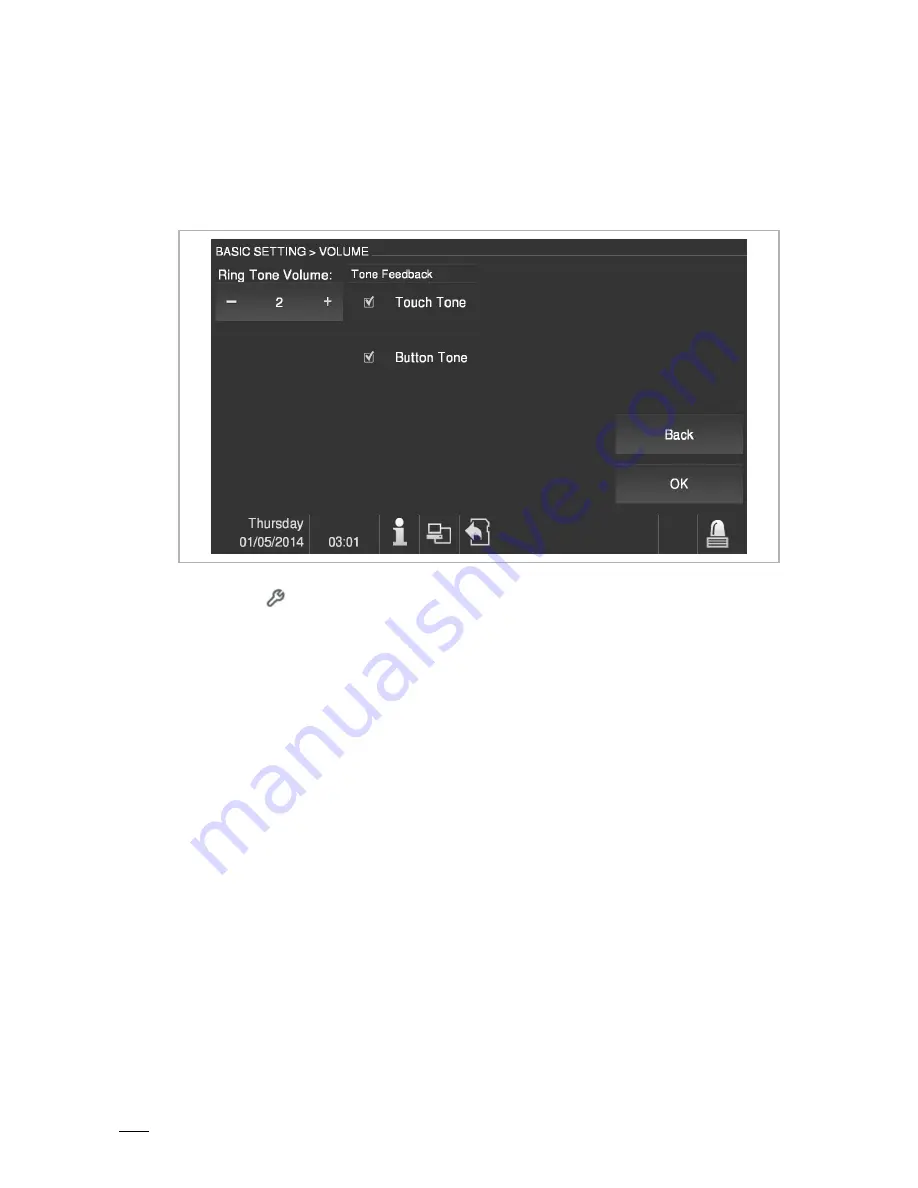
Fig. 

2: 

Volume 

setting

  Press the   button to open the "Basic setting" interface.


Select "Volume" in the left list, and then click “Adjust“ to enter setting interface.

On this page,

Click on "+" and "-" to adjust the "Ring tone volume".

Tick the "Touch Tone" box to enable the touch tone. (Enable by default)

Tick the "Button Tone" box to enable the button tone. (Enable by default)

Click "OK" to save your settings.

Pos: 38 /CNDEX/99 Auxiliary tools/++++++++++++++  page break +++++++++++++++ @ 57\mod_1487814735946_0.docx @ 750979 @  @ 1

Summary of Contents for Welcome IP HSM36-GU

Page 1: ...Pos 2 CNDEX 00 Title 00_Title HSM36 GU 63 mod_1500517322745_0 docx 800527 1 2TMD041700D0045 01 08 2017 Operating Instructions ABB Welcome IP Guard unit HSM36 GU Ende der Liste für Textmarke Titel ...

Page 2: ...ound setting 9 7 1 3 Display setting 10 7 1 4 Date and time setting 11 7 1 5 Language setting 12 7 2 Change emergency unlock password 13 7 2 1 Resetting to factory default 14 7 2 2 Firmware update 15 8 Operation 16 8 1 Standby interface 16 8 1 1 Calling a resident 16 8 1 2 Calling a guard unit 17 8 1 3 Emergency unlock 18 8 1 4 Call record 19 8 1 5 Alarm record 20 8 2 Incoming call 21 8 2 1 Incomi...

Page 3: ...1 Heading 1 Heading Heading_Safety 56 mod_1487743565314_15 docx 749894 1 1 2 Safety Pos 11 CNDEX 00 Warning Warning_Electric voltage_Dangerous currents 56 mod_1487741007782_15 docx 749637 1 Warning Electric voltage Dangerous currents flow through the body when coming into direct or indirect contact with live components This can result in electric shock burns or even death Disconnect the mains powe...

Page 4: ...B devices 62 mod_1496803248336_15 docx 786222 2 1 4 1 ABB devices Pos 20 CNDEX 00 Warning Txt_ABB devices_Environment 56 mod_1487743585555_15 docx 749915 12 1 All packaging materials and devices from ABB bear the markings and test seals for proper disposal Always dispose of the packing materials and electric devices and their components via an authorized collection facility or disposal company ABB...

Page 5: ... docx 792589 1 Fig 1 Control elements No Function 1 7 touch screen 2 Power indicator Always on after being activated 3 Alarm indicator Always on after arming and flashes in case of an alert 4 Mute indicator Always on after the mute function is enabled 5 Setting button 6 Monitor button 7 Increase brightness button 8 Reduce brightness button 9 Unlock button 10 Communication button 11 SD card slot 12...

Page 6: ...management of outdoor stations and gate stations 7 digital colour touch screen for clear images and active colour Friendly and intuitive graphic user interface easy to learn and use Video door communication function to implement door communication with visitors residents and caretaker center and between the management center and residents Surveillance from outdoor station gate station residential ...

Page 7: ...data_HSM36 GU 62 mod_1497856872365_15 docx 792629 1 Designation Value Operating voltage 27 VDC Standby current 100 mA Operating current 270 mA Ambient temperature 25 70 Display size 7 Resolution 1024 600 px Dimension 332 mm 239 mm 127 mm Ringing duration 30 s Call duration 120 s Monitoring duration 15 s Tab 2 Technical data Pos 33 CNDEX 99 Auxiliary tools page break 57 mod_1487814735946_0 docx 750...

Page 8: ...men setting_HSM36 GU 62 mod_1498197885038_15 docx 793347 1 Fig 2 Volume setting Press the button to open the Basic setting interface Select Volume in the left list and then click Adjust to enter setting interface On this page Click on and to adjust the Ring tone volume Tick the Touch Tone box to enable the touch tone Enable by default Tick the Button Tone box to enable the button tone Enable by de...

Page 9: ...d in the left list and then click Adjust to enter the setting interface On this page you can set different ringtones for calls from different stations such as outdoor station guard unit or other devices There are five built in ringtones for you to select and you also can click Select Ringtone to import ringtones from an SD card only mp3 and wav are available We suggest you to put ringtones into a ...

Page 10: ...utton to open the Basic setting interface Select Display in the left list and then click Adjust to enter the setting interface On this page Click on and to adjust the brightness Click on Calibration to calibrate the screen 5 positions will be displayed on the on the screen for you to click one by one Tick the Automatic fullscreen box to enable the automatic fullscreen when a call comes Click OK to...

Page 11: ...en click Adjust to enter the setting interface On this page Select the time format in the drop down list of Time format Select the date format in the drop down list of Date format Click on and of Time to set the time press and hold and to speed up the digital adjustment Click on and of Date to set the date press and hold and to speed up the digital adjustment Tick the Time sync box to sync the tim...

Page 12: ...427 1 Fig 6 Language setting Press the button to open the Basic setting interface Select Languages in the left list and then click Adjust to enter the setting interface On the page of language settings select a language you want and then click OK to save The first time power is applied to the guard unit or after resetting to factory default you can also select the language directly Pos 50 CNDEX 99...

Page 13: ... GU 62 mod_1498460169118_15 docx 793567 1 Fig 7 Change emergency unlock password Press the button to open the Basic setting interface Choose Change Emergency Unlock Password on the left list and then click Adjust to enter the setting interface Enter the current emergency unlock password in the pop up window and then enter a new password two times to enable the new emergency unlock password Pos 53 ...

Page 14: ...ocx 793587 1 Fig 8 Resetting to factory default Press the button to open the Basic setting interface Select Reset factory default in the left list and then click Adjust to enter the setting interface Enter the password in the pop up window and then click OK default password is 345678 Click Yes in the pop up Confirmation window Resetting to factory default won t clear existing text information and ...

Page 15: ...8 1 Fig 9 Firmware update Press the button to open the Basic setting interface Select Firmware update on the left list and then click Update to enter updating The guard unit will detect the updating software in the SD card automatically Click Confirm in the pop up Confirmation window If there is no SD card inserted or there is no update software this function will be not available Pos 59 CNDEX 99 ...

Page 16: ...x 793648 2 1 8 1 Standby interface Pos 63 CNDEX 01 Heading 1 1 1 Heading Heading_Call a resident 62 mod_1498465428946_15 docx 793739 3 1 8 1 1 Calling a resident Pos 64 CNDEX 09 Operation Call a resident_HSM36 GU 62 mod_1498465491779_15 docx 793760 1 Fig 10 Calling a resident In standby mode enter the Building no Room no and then click on to initiate a call Pos 65 CNDEX 99 Auxiliary tools page bre...

Page 17: ...77880_15 docx 793780 3 1 8 1 2 Calling a guard unit Pos 67 CNDEX 09 Operation Call a guard unit_HSM36 GU 62 mod_1498465930402_15 docx 793801 1 Fig 11 Calling a guard unit In standby mode enter the Guard unit no and then press to initiate a call Pos 68 CNDEX 99 Auxiliary tools page break 57 mod_1487814735946_0 docx 750979 1 ...

Page 18: ...nlock Pos 70 CNDEX 09 Operation Emergency unlcok_HSM36 GU 62 mod_1498466515146_15 docx 793842 1 Fig 12 Emergency unlock In standby mode press the button enter the unlock password in the pop up window to unlock all gate stations and outdoor stations the default unlock password is 201608 Pos 71 CNDEX 99 Auxiliary tools page break 57 mod_1487814735946_0 docx 750979 1 ...

Page 19: ...3862 3 1 8 1 4 Call record Pos 73 CNDEX 09 Operation Call record_HSM36 GU 62 mod_1498466953637_15 docx 793883 1 Fig 13 Call record In standby mode click to read the call logs Select a log click Call back to call back click Details to read the call details Pos 74 CNDEX 99 Auxiliary tools page break 57 mod_1487814735946_0 docx 750979 1 ...

Page 20: ...ecord 62 mod_1498467458233_15 docx 793903 3 1 8 1 5 Alarm record Pos 76 CNDEX 09 Operation Alarm record_HSM36 GU 62 mod_1498524074025_15 docx 794387 1 Fig 14 Alarm record In standby mode click to read the alarm history Pos 77 CNDEX 99 Auxiliary tools page break 57 mod_1487814735946_0 docx 750979 1 ...

Page 21: ...ton again or hang up the phone receiver to terminate the call During the call press the button to unlock the default lock During the call press to transfer to the hands free call During hands free call pick up the receiver to transfer to the receiver call During ringing of the guard unit press to unlock the default lock 1 The name of calling device 2 Remaining duration of the call 3 Adjust the vol...

Page 22: ...l forwarding Pos 83 CNDEX 09 Operation Call forwarding_HSM36 GU 62 mod_1498527424485_15 docx 794531 1 Fig 16 Call forwarding When a call comes from the outdoor station press to enter the call transfer interface enter the indoor station no and click OK to initiate the transfer Pos 84 CNDEX 99 Auxiliary tools page break 57 mod_1487814735946_0 docx 750979 1 ...

Page 23: ...ting_HSM36 GU 62 mod_1498526784516_15 docx 794448 1 If a second call is received during a call 2 images are displayed on the screen Fig 17 Call waiting 1 To take the second incoming call The first call will be terminated 2 To reject the second incoming call 3 To release the door for the second call Tab 4 Description Pos 87 CNDEX 99 Auxiliary tools page break 57 mod_1487814735946_0 docx 750979 1 ...

Page 24: ...Surveillance of outdoor station In standby mode enter the Gate station number or Unit no outdoor station no and then press to initiate surveillance of the gate station or the outdoor station During surveillance press the button to unlock the default lock Click on to unlock the second lock you should first enable the second lock setting During surveillance click on to take a snapshot manually Durin...

Page 25: ...Operation Operating Instructions VER 1 0 25 ...

Page 26: ...EX 09 Operation Surveillance of IP camera_HSM36 GU 62 mod_1498534168861_15 docx 794592 1 Fig 19 Surveillance of IP camera In standby mode press to enter the surveillance interface During surveillance click the button to enter the download interface Click o Download list to download the IP camera list of the guard unit Pos 94 CNDEX 99 Auxiliary tools page break 57 mod_1487814735946_0 docx 750979 1 ...

Page 27: ...o the contents of this document without prior notice The detailed specifications agreed to at the time of ordering apply to all orders ABB accepts no responsibility for possible errors or incompleteness in this document We reserve all rights to this document and the topics and illustrations contained therein The document and its contents or excerpts thereof must not be reproduced transmitted or re...

Page 28: ... P O Box 325841 Riyadh 11371 T 966 1 1484 5600 F 966 1 1206 7609 ABB Thailand Ltd 161 1 SG Tower 1st 4th Floor Soi Mahadlekluang 3 Rajdamri Road Lumpini Pathumwan Bangkok 10330 Thailand T 66 2 6651 000 F 66 2 6651 043 ABB Russia Ltd 3121 Wiring Accessories 30 1 bld 2 Obrucheva str RU T 7 495 777 2220 F 7 495 777 2220 ABB Korea Ltd Oksan Bldg 10th Fl 157 33 Samsung dong Gangnam gu 135 090 Seoul Kor...

Reviews: