


Operation Manual / Power2 550-M / High-pressure stage
Figures
© Copyright 2022 ABB. All rights reserved.
HZTL4058_EN
Revision F
March 2022
Figures
Fig. 1: Layout and function ............................................ 7
Fig. 2: Layout of the high-pressure stage ................. 8
Fig. 3: Function of the high-pressure stage.............. 9
nhibitor (VCI)................... 12
Fig. 5: Package with hygrometer................................ 13
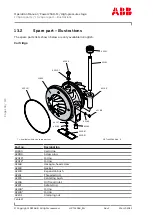
High-pressure stage ........................................... 18
Fig. 7: Rating plate ........................................................ 19
Fig. 8: Location of Power2 HP rating plate ............. 20
Fig. 9: Attachment of loads on the crane hook ....... 21
Fig. 10: Attachment angle............................................ 21
Fig. 11: Swivel lifting eye (example) .......................... 30
Fig. 12: Transport.......................................................... 30
Fig. 13: Removing the high-pressure stage.............. 31
Fig. 14: Loosening the clamping nut ......................... 32
Fig. 15: Removing the high-pressure stage.............. 33
Fig. 16: Gaskets in the slots of the bearing casing 34
Fig. 19: Steps for fastening the high-pressure stage .
37
Fig. 20: Steps for fastening the high-pressure stage .
38
Fig. 22: Tightening pressure screws......................... 40
Fig. 23: Oil monitoring ................................................. 45
Fig. 25: Noise insulation, bellows ............................... 51
Fig. 26: Bellows ............................................................. 60
Fig. 27: Load/time chart ............................................. 63
Fig. 28: Wet cleaning operation................................. 64
Fig. 29: Swivel lifting eye (example)........................... 77
Fig. 30: Weights of the assemblies........................... 78
Fig. 31: Removing the gas outlet casing ................... 79
Fig. 32: Removing the air inlets................................... 80
Fig. 33: Removing the compressor casing................ 81
Fig. 34: Removing the cartridge group ..................... 83
Fig. 35: Removing the gas outlet flange / nozzle ring.
84
Fig. 36: Nozzle ring compression PD ......................... 85
Fig. 37: Installing the gas outlet flange / nozzle ring ..
86
Fig. 38: Installing the cartridge group....................... 87
Fig. 39: Installing the compressor casing ................. 88
Fig. 40: Installing the air inlet...................................... 89
Fig. 41: Installing the gas outlet casing..................... 90
Fig. 42: Measuring clearances N and R ...................... 91
Fig. 43: Measuring clearance A and B ........................ 92
Fig. 44: Overview of tightening torques ................... 93
Fig. 45: Attaching a cover plate .................................. 96
Fig. 46: Cover plate drawing........................................ 97
Fig. 47: Figure for cover plate, slots for O-rings ..... 98
Page
117
/
119
Page
117
/
119


