background image

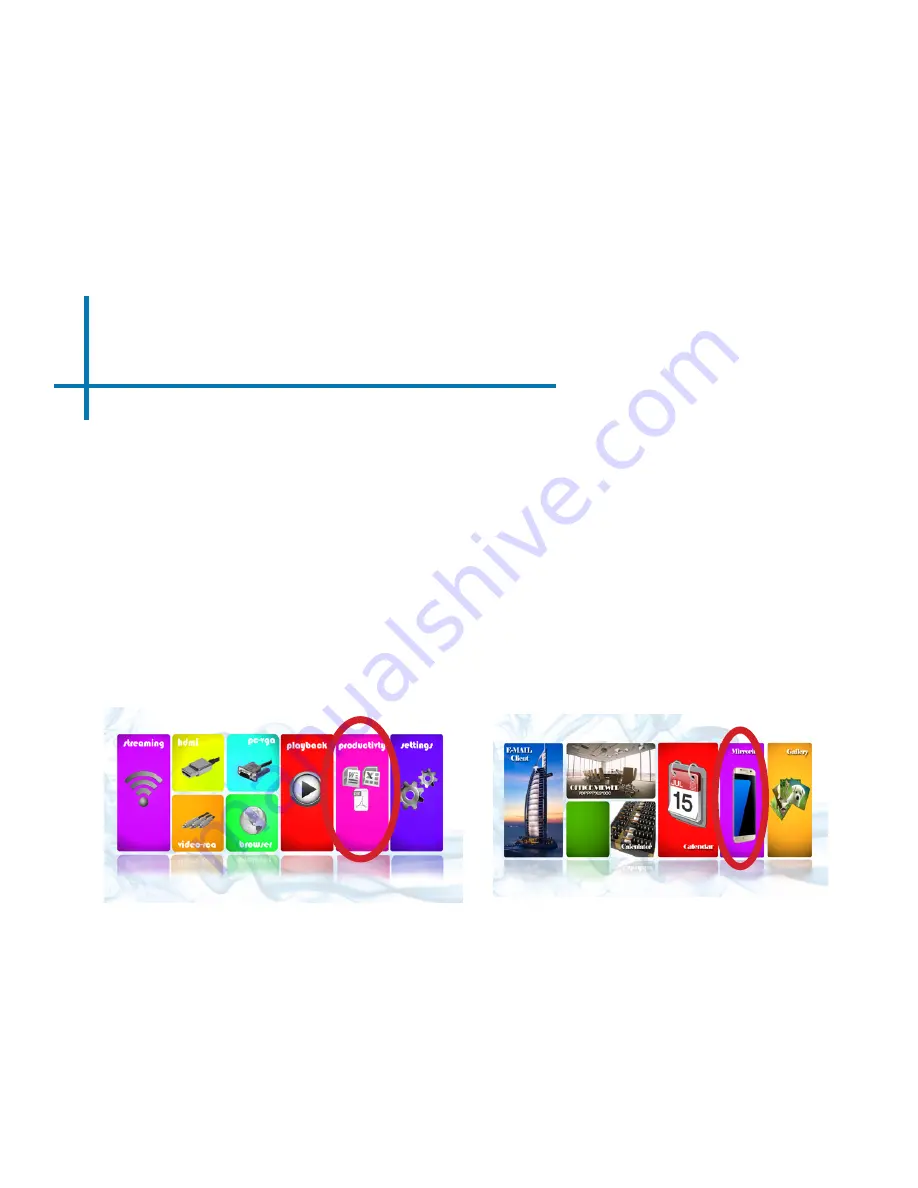
Smartphone Mirroring

The P700 Pro employs a “HappyCast” smartphone mirroring system that is 

compatible with both Apple Airplay as well as Android systems.

Mirroring with an iPhone or Apple Device:

• 

Select the “Productivity” icon (Fig. 2.3) 

• 

Select the “Mirroring” option (Fig. 2.4)

• 

The application will open and next step will be to activate Airplay on your 

iPhone or Apple device.

Fig. 2.3

Fig. 2.4

37

Summary of Contents for P700 PRO PICO PROJECTOR

Page 1: ...aaxa TECHNOLOGIES User Guide ...

Page 2: ...se the projected LED image to your eyes or the eyes of others DO NOT block or restrict airflow from ventilation holes as this may cause the projector to overheat Keep the projector and charger away from any heat sources Caution for Headphone Use Prolonged use at high volume may impair your hearing High volume during walking or driving may cause distractions and result in injury or death ...

Page 3: ...ading External Content Video Player Menu Playing 3D Videos Viewing Pictures Viewing 3D Pictures Viewing Productivity Docs Smartphone Mirroring Connecting to Wi Fi Streaming Applications Connecting to Bluetooth Chapter 3 Settings Menu Application Manager Bluetooth Networks System Settings System Update Language Projector Settings About Other Applications Keystone Chapter 4 Technical Details Trouble...

Page 4: ...P700 Pro at a Glance Chapter 1 Power Switch Micro SD Card Slot HDMI Port USB Port Main Unit Front Back VGA Port Power Button Focus Adjustment AV Port Headphone Out Power Port 1 ...

Page 5: ...e Input Exit Back Direction Pad Both the keypad and remote can be used to navigate through the menus The Main Menu Navigation on the remote functions exactly the same as the directional pad on the P700 Pro unit The remote control has additional functions inaccessible by the onboard keypad On Off LED Lights OK Main Menu Navigation Keystone Main Menu Keystone Volume Up Volume Down Remote Enable 3D B...

Page 6: ...r various circumstances the actual accessories may be different from those shown in the pictures above Additional accessories are available for purchase at www aaxatech com Tripod Remote Power Adapter VGA Cable A V Cable ...

Page 7: ...utton on the keypad and hold for 2 3 seconds to start the projector 4 Powering ON the projector Chapter 2 Powering OFF the projector Standby Mode 1 To transition to STANDBY mode press the power button twice on the keypad or the remote control 2 The optical engine should power off and the fan should stop spinning The projector is now in STANDBY mode and can be turned on using the remote control Not...

Page 8: ...row Distance Units Inches 20 30 40 50 60 70 80 90 Diagonal Size Units Inches 19 29 38 48 57 67 76 86 Spin the focus wheel up or down until the image becomes clear Focus Adjustment Throw Distance Chart Throw Ratio 1 2 Projection Angle 100 Offset minimum throw distance 20 inches ...

Page 9: ...6 External Inputs and Outputs ...

Page 10: ...os from YouTube Netflix Vevo and more Playback View files from external devices such as microSD card and USB Productivity Brings up E mail Client Office Viewer Calculator Calendar Gallery and Smartphone Mirroring Settings Brings up Application Manager Network Settings Bluetooth Settings Language Settings System Update and Projector Settings HDMI Brings up connec tion via HDMI PC VGA Brings up con ...

Page 11: ...accessed with a mouse by clicking the up arrow at the bottom of the screen and may be closed by clicking the down arrow The Pop Up Menu allows the user to access Main Menu Open Applications Adjust Volume and 3D Capabilities UP arrow to bring up Pop Up Menu Pop Up Menu ...

Page 12: ...MI 9 Connect one end of the HDMI Cable to your computer s HDMI port Step 1 Step 2 Step 3 In the Main Menu select the Inputs icon and then the HDMI Connect the other end of the HDMI Cable to your P700 Pro s HDMI port Select HDMI icon ...

Page 13: ...ress Windows P to toggle through display settings Select either Duplicate or Extend de pending on your viewing option NOTE different operating sys tems may differ Step 5 1 Right click on computer desktop and select Screen Resolution 2 Display Properties window will pop up and select the Advance Display Settings 3 Please make sure the Multiple displays has the Du plicate these displays option selec...

Page 14: ... P700 Pro Check with your phone manufacturer 11 Step 1 In the Main Menu Turn on your multimedia device The projector should automatically detect a Blu Ray player or HDMI video source as 1920x1080p reso lution This resolution includes overscan which means that the edges of the display will be cutoff You may adjust accordingly to your devices best output resolution Select HDMI icon Step 2 Resolution...

Page 15: ...or control menu by clicking on the up arrow on the bottom of the screen requires mouse Then click the 3D button and select the 3D content 12 Step 1 In the Main Menu Step 2 Select HDMI option 3D Video can be played through the 3D compliant HDMI port First con nect your 3D output device for example Blu Ray player to the projector 3D Menu ...

Page 16: ...puter via VGA 13 Connect one end of the VGA Cable to your computer s VGA Port Step 1 Step 2 Step 3 In the Main Menu Select the PC VGA Icon Connect the other end of the VGA Cable to your P700 Pro s VGA port Select VGA icon ...

Page 17: ...ess Windows P to toggle through display settings Select either Duplicate or Extend de pending on your viewing option NOTE different operating sys tems may differ Step 5 14 1 Right click on computer desktop and select Screen Resolution 2 Display Properties window will pop up and select the Advance Display Settings 3 Please make sure the Multiple displays has the Du plicate these displays option sel...

Page 18: ...Connecting to Composite Video 15 Connect the 3 5mm Composite A V Cable to the back of the P700 Pro Connect the composite end of the AV Cable Red White Yellow to your own male AV cable Step 1 Step 2 ...

Page 19: ...Video Cont Some smartphones require video out capabilities to be displayed with the P700 Pro Check with your phone manufacturer for details 16 In the Main Menu Turn on your multimedia device Select Video RCA Icon Step 3 Step 4 ...

Page 20: ...g External Content 17 The P700 Pro can read files directly from both a Micro SD Card and USB Drive Supported file types include MP3 WMA OGG WAV JPG AVI MKV BMP GIF XLS PPT DOC PDF TXT up to 32 GB up to 32 GB ...

Page 21: ...hown in picture Gently slide the SD card until it clicks into place Review the Specifications section of this manual to read about the supported file formats How to insert your USB Drive Slide your USB Drive into the USB port on the back of the P700 Pro as shown in picture Gently slide the drive until it cannot go in any further up to 32 GB up to 32 GB ...

Page 22: ...y connected to access the file Andy s First Birthday avi Patrcia s Graduation avi Family Outing 2016 avi Grandpa s 80th Birthday avi Playback Menu Once your microSD Card or USB Drive is inserted into the projector the microSD Card or USB Drive Storage Menu will load automatically Video can be played by clicking the video and selecting the Video Player The Playback Menu may also be accessed from th...

Page 23: ...o Search for Videos highlight the video camera icon on the left side of the Streaming submenu Fig 2 2 Otherwise scroll through the files by using the up down key and highlight desired file Fig 2 1 Fig 2 2 Andy s First Birthday avi Patrcia s Graduation avi Family Outing 2016 avi Grandpa s 80th Birthday avi Andy s First Birthday avi Patrcia s Graduation avi Family Outing 2016 avi Grandpa s 80th Birt...

Page 24: ...ns on the remote or access the submenu and adjust through the volume icon Further controls are available in the video player submenu which is accessed through the OK button Jump 5 secs backward Jump 5 secs forward OK OK Enter Video Player Submenu To open hide the video playback menu use the OK and Back Buttons on the projector ...

Page 25: ... clicking OK or double clicking on the video The video submenu allows the following functions i Next Previous Video Play the next previous video ii Fast Forward Rewind iii View Playlist iv Video Information v Video Configuration 1 3D Setting 2 Subtitles 3 Breakpoint Play 4 Video Track vi Repeat vii Volume ...

Page 26: ...tween Close In ner and External 23 Video Player Menu Inner the subtitles are hardcoded into video External a seperate subtitle file which links to the video is within the USB drive or SD Card 1 On the Submenu click the replay icon 2 An A B Section Repeat screen will pop up 3 Turn On the Section Replay 4 Set the starting point by clicking Set starting point A 5 Set the ending point by clicking Set ...

Page 27: ...ve Shutter 3D devices These videos are typically labelled 3D 3D videos are typically played in right left or top bottom content so on a non 3D device the video will appear to be split in half 3D capable devices will then combine in the video for true 3D mode 24 ...

Page 28: ...Playback submenu As the video begins to play select the Source button on the keypad or remote control to convert the content into 3D mode The video will now appear fuzzy This means the video is now in 3D mode Put on the Active 3D glasses and they should auto matically sync to the content 25 ...

Page 29: ...ble with Active Shutter TVs They are available for purchase online and through the P700 Pro Accessories section Activating 3D Mode After selecting the Source button you can choose either left or right format or up or down format depending on how your 3D content looks 26 ...

Page 30: ...enu See section 4 To sort for Pictures highlight the Camera Photo icon on the left Otherwise scroll through the files by using the up down key and highlight the desired file While the Picture is playing bring up the submenu by clicking OK or double clicking on the picture 27 ...

Page 31: ... slide show playback To exit the Photo Sub Menu press the Back button To navigate the playback menu use the directional buttons on the navigation pad or remote to highlight the option you wish to choose Move selection left Move selection right OK Move to the next picture Move to the previous picture ...

Page 32: ...e photo submenu by clicking on OK or double clicking the picture The photo submenu allows the following functions i Next Previous picture ii Play Stop iii Zoom in Zoom out iv Rotate counter clockwise Rotate clockwise v Picture information vi Set picture as background vii 3D mode ...

Page 33: ...manually control the slideshow 1 After selecting the photo you wish to be displayed you can press Play to start the slideshow as outlined in the previous FAQ 2 To manually control the slideshow you must stop the slideshow with the Stop button 3 You may use either the controls on your remote or on top of the projector itself to flip through the pictures in the current playlist 4 You can change the ...

Page 34: ...Viewing 3D Pictures 31 To view pictures select a picture via the Playback submenu While the Picture is playing click the Source button and turn on the 3D mode depending on which format you have ...

Page 35: ...y Documents 32 Microsoft Office and Adobe PDF Documents Microsoft Office and Adobe PDF Documents can be viewed with the document viewer To access the document viewer select Productivity from the Main Menu Main Menu Screen ...

Page 36: ...g Productivity Documents Cont Productivity Screen Office Viewer Application Documents from the microSD Card and USB Drive may be viewed Documents from Dropbox with accounts connected may be viewed Supported file formats include DOC XLS PPT PDF Some file versions may not be compatible and file names must be alphanumeric only Note While some Cloud Storage features may work this functionality is not ...

Page 37: ...34 Step 1 Open Office Viewer Viewing Productivity Documents Cont Step 2 Select Source ...

Page 38: ...er guide please visit our FAQ section or search online for Kingsoft WPS Office Viewer user guide Need help with the document viewer Please e mail us at pro_support aaxatech com Step 3 Highlight the Productivity File and click OK Step 4 The file should display automatically ...

Page 39: ...nt The onboard e mail client allows users to save their email account and view emails Typical configuration settings can usually be found through your web hosts FAQ section Calculator A basic function calculator mouse is required to operate 36 ...

Page 40: ...ompatible with both Apple Airplay as well as Android systems Mirroring with an iPhone or Apple Device Select the Productivity icon Fig 2 3 Select the Mirroring option Fig 2 4 The application will open and next step will be to activate Airplay on your iPhone or Apple device Fig 2 3 Fig 2 4 37 ...

Page 41: ...and it will mirror the Apple device Adjust the settings in the App if necessary Turning on Airplay Swipe up on your iPhone and to access the Airplay option as shown above Select Airplay and turn it on it will show you the Happy Cast connecition just select it and make sure the mirror ing is switched on 38 ...

Page 42: ...or the Android phone Adjust the settings in the app if neces sary Downloading HappyCast App Please vist this URL http www aaxat ech com happycast apk on your android phone to download Happy Cast After finishing installing on the phone please open the Happy Cast App and connect to the projector s Happy Cast connection 39 ...

Page 43: ... to Wi Fi Select the Settings icon Fig 2 5 Select the Network Settings option and navigate to your Wi Fi network and click on it to connect A window will appear and ask for a password please type it in and when finished press Connect and the projector will connect to your Wi Fi Fig2 6 Fig 2 5 Fig 2 6 ...

Page 44: ...gs Submenu Settings Network Settings Step 2 Turn Wi Fi radio to On by highlighting and toggling the Wi Fi Button under Wi Fi setting Step 3 Select the appropriate Router Step 4 Enter the router password in the password selection by pressing OK It is recommended that the automatic IP address acquisition be turned on Troubleshooting 1 Unable to connect a Check Security Settings WPA WPA2 PSK b Check ...

Page 45: ...or additional information and firmware updates Main Menu Screen Streaming applications are accessible after Wi Fi internet service is established Most applications require a log in account It is highly recommended to use a mouse to access streaming content The keypad remote control may not be compatible with app updates Applications with the mouse icon require the use of a mouse to navigate correc...

Page 46: ...ication Manager Update Required If an update is required you may be able to obtain it from the product website through Browser in the Main Menu Poor Video Playback Possible Causes Poor Wi Fi Connection Too many open applications Too many Bluetooth devices Device Strain Try reducing brightness to Standard or Eco mode ...

Page 47: ...2 7 Select the Bluetooth Settings option and navigate to your Bluetooth Device and click on it to connect Fig 2 8 The projector features a Bluetooth radio BT The Bluetooth radio is designed to connect Bluetooth enabled devices typically either a Bluetooth Mouse or Bluetooth Speaker The projector supports one Bluetooth device at a time Fig 2 7 Fig 2 8 ...

Page 48: ... the power switch to be turned ON Other devices have a bluetooth icon that is pressed to make the device discoverable Step 4 If your device does not pop up automatically click on Scan for Devices Step 5 Highlight your device and click OK to connect Your device should show connecting If a PIN is asked try 0000 or 1234 these are the standard PIN codes If this does not work check with your device man...

Page 49: ...ting It takes 10 15 seconds for BT devices to connect discon nect from the system Failure to wait for this time could result in an improper connection Check to ensure device is connected in the BT submenu If the Bluetooth device does not automatically reconnect please go to the Bluetooth settings and press on the device to reconnnect to it If the device still does not reconnect please press on the...

Page 50: ...ting Settings on the main menu Application Manager Network Settings Bluetooth Settings System Settings System Update Projector Settings About Language Settings Within the Settings Menu there are eight submenus that allow you to customize your P700 Pro Chapter 3 ...

Page 51: ...reset remove existing apps 1 Clearing the App Data Cache Clearing the App cache is sometimes necessary to remove corrupted information and reset old logins 2 Force Stop If an application is misbehaving use this function to stop the application 3 Uninstall Use this function to uninstall unwanted applications 4 Move to SD Card This feature is disabled and unsupported ...

Page 52: ...t The time the projector will timout when trying to search for a Bluetooth device Scan for Devices Will scan for any nearby Bluetooth device Network Settings Please see Connecting to Wi Fi section Page 40 Network status Shows the info and status of your Wi Fi connec tion Wi Fi setting Where you will find the list of available Wi Fi connec tions nearby Wi Fi Direct This feature has been disabled ...

Page 53: ...em Settings Desktop Settings Application Manage Net and Location Settings Bluetooth Settings Language input Settings Date time Settings System Update About All settings can be found through System Settings ...

Page 54: ...ount Clears system and application data and settings Sets the projector settings back to factory Language Settings Selecting a Language The projec tor supports 10 different language settings These languages include English Spanish German French Italian Additional languages are available through custom firmware Input Method The input method is a standard AOSP English keyboard Other input methods ar...

Page 55: ...e vents A tripod is highly recommended DO NOT block vents while operating in Bright mode Projection This submenu allows the selection of different viewing orienta tions as a result of either rear projection or upside down inverted mounting Keystone Correction Please see Keystone Adjustments on page 53 Aspect Ratio This submenu allows to change the aspect ratio and Left_ Right contrast and Up_Down ...

Page 56: ...About Models Shows the projector model name System version Shows the Android OS version Software Version Shows the current software version ...

Page 57: ...ns There may exist different firmware versions to support different appli cations Please e mail AAXA Technologies or check our FAQ section for more information 52 Need help Please e mail us at pro_support aaxatech com ...

Page 58: ...r the image before it reaches the projection lens The result is a squared image even at an angle What is Keystoning Keystoning occurs when a projector is aligned non perpendicularly to a screen or when the projection screen has an angled surface The image that results from one of these misalignments will look trapezoidal rather than square 53 ...

Page 59: ...ad on the top of the P700 Pro until the keystone effect corrects and the picture turns into a square projection If the image looks trapezoidal with the top larger as pictured right go to Projector Settings and click Key stone Correction On the Keystone Correction screen press the right but ton on the remote or on press the top button on the directional pad on the top of the P700 Pro until the keys...

Page 60: ...on an even plane with the screen NO SYNC NO SIGNAL Troubleshooting 1 Be sure to setup the computer to enable a video signal output On some laptops this is done by pressing and holding Function F5 key If using the P700 Pro as an external monitor on Windows based systems this can be done by selecting extend my desktop to this monitor The native resolu tion of the P700 Pro projector is 1280x800 Depen...

Page 61: ...er button needs to be pressed for a full 3 seconds Try holding the power button until the optical engine turns on NO PICTURE FILE NOT SUPPORTED Possible Causes Solution The video source is not properly connected or selected Check the video source signal to ensure that it is properly connected Select the current input source by choosing the input desired from the main menu Incorrect file extension ...

Page 62: ...ge Wi Fi Bluetooth 650 Lumens 1920x1080 1080P 1280x800 WXGA 2000 1 16 9 Manual Focus 10 150 inches Triple RGB LEDs with Vibrant Color Technology Life 20 000hrs Composite A V VGA mini VGA HDMI 3 5 mm audio jack MicroSD Card Slot 32GB maximum 5 Pin USB 2 0 Full Size 32GB maximum 6 9 x 3 8 x 1 5 1 37lbs MP3 WMA OGG WAV AVI BMP JPG TXT MKV GIF XLS PPT DOX PDF 3D Active Shutter Technology 4 4 4 KitKat ...

Page 63: ...58 Notes ...

Page 64: ...Please direct all customer service inquiries to AAXA Technologies Inc 1541 Parkway Loop Suite F Tustin CA 92780 714 957 1999 info aaxatech com ...

Reviews: