background image

66

AastraLink RP System Administrator Guide

Resetting Your AastraLink RP Solution

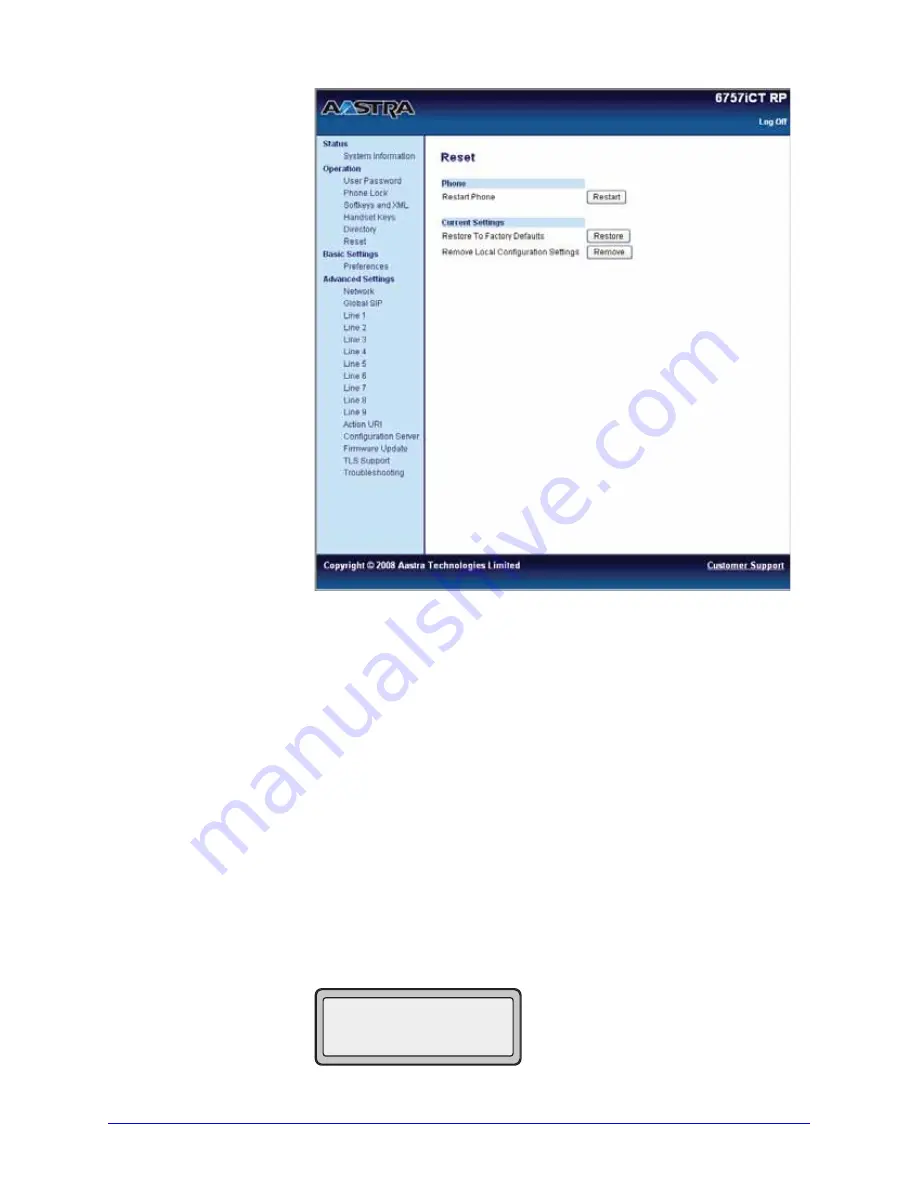
The Reset window opens in the Aastra Web UI.

3.  Consider whether you want to remove the local configuration settings, or restore 

all factory default settings.

• To remove the local configuration settings click Remove.

• To restore all factory default settings click Restore.

Note: Clicking either Remove and Restore will permanently remove all settings 
modified through the phone interface or Aastra Web UI. Clicking Restore will also 
disconnect the phone from the Response Point system, although the phone settings 
will remain in Response Point.

4.  A message will display, indicating successful completion of your choice and 

instructing you to restart the phone. Click 

Reset

 to continue.

5.  In the Reset Window, click 

Restart

 to restart your Aastra RP Phone.

If you chose to restore all factory default settings, the phone displays "Waiting 
Assignment..." To reconnect the phone to the Response Point system, follow 

Editing a 

Phone

 on page 31. To remove the phone from your system with the factory settings intact, 

instead disconnect the phone and follow 

Removing a Phone

 on page 32.

If you chose to remove local configuration, the phone will still be connected to Response 
Point, and display the user and extension idle screen.

John Burns

103

Sat Jun 8  2:55p

1

Summary of Contents for 6753I

Page 1: ...03 6757i CT RP 6753i RP CT Cordless 6751i RP Go odbye Servi ces Ho ld Redia l De lete Save Speaker Mute Go odbye Ho ld Redia l Mute Op tions Line 1 Line 2 Mute Line 1 Line 2 Line 3 Go odbye Ho ld Red...

Page 2: ......

Page 3: ...istribute transcribe translate or reduce to electronic medium or machine readable form or language derive source code without the express written consent of the Seller and its Suppliers or disseminate...

Page 4: ......

Page 5: ...g a Phone 31 Removing a Phone 32 Voice Services 34 Adding Gateways Analog Phone Services 34 Adding VoIP Phone Services 36 Editing Voice Services 37 Removing Voice Services 37 Advanced Administrator Op...

Page 6: ...Solution 60 Base Unit and Software Upgrades 60 Phone and Gateway Upgrades 61 Resetting Your AastraLink RP Solution 65 Factory Defaulting Aastra RP Phones 65 Microsoft Utilities 67 Troubleshooting Solu...

Page 7: ...540 Gateway Installation Guide AastraLink RP Solution Quick Start Guide Aastra 6751i RP 6753i RP and 6757i CT RP Phone Installation Guides AastraLink IP Phone User Guide The AastraLink RP 500 Base Un...

Page 8: ...raLink IP Phone User Guide describes how to use the features of the different Aastra RP phones from basic calling to advanced phone features These guides along with release notes and other documentati...

Page 9: ...u time otherwise spent looking up numbers Voice activated dialing call handling and voicemail retrieval are powered by robust Microsoft Response Point software AastraLink RP Solution Feature Response...

Page 10: ...phone user s individual PC It allows each phone user in the Aastralink RP Solution to specify individual user preferences such as their nicknames directory listing voicemail options and call forwardin...

Page 11: ...aLink 500 Base Unit should be installed following the instructions given in the AastraLink 500 Base Unit Installation Guide or AastraLink RP Solution Quick Start Guide The AastraLink 500 Base Unit may...

Page 12: ...ust be turned on for auto discovery to succeed RP Phones Any combination of Aastra phone models 6751i RP 6753i RP and 6757i CT RP works with the AastraLink RP Solution Aastra 6751i RP Phone Aastra 675...

Page 13: ...d be installed following the instructions given in the phone installation guide for the correct model The Aastra RP phones can be set up and connected to the LAN initially or can be connected when pro...

Page 14: ...r s computer do the following Note Administrator should only be installed on one computer connected to the same LAN as all phones base units and gateways 1 Insert the AastraLink RP system CD that was...

Page 15: ...Notice screen opens 2 Review the emergency considerations listed and click OK The Select the base unit screen opens Note If no base units are listed ensure your base unit is turned on and wait 30 seco...

Page 16: ...e Note If you ever forget your password you can reset the AastraLink RP 500 Base Unit password using the Microsoft Utility provided See Resetting the AastraLink RP 500 Base Unit Password on page 67 To...

Page 17: ...ote If you do not have the Assistant software installed on your computer see the AastraLink IP Phone Users Guide for installation instructions Starting Assistant Once you have installed the Assistant...

Page 18: ...Point Assistant Note You can only log on to Microsoft Response Point Assistant once your extension number has been assigned You can now change your personal phone settings by clicking Settings See the...

Page 19: ...t of the users and extension numbers as you assign them This is especially useful when configuring phone models with multiple lines or adding users to several phones or user groups Adding Users When y...

Page 20: ...fying a different name for the computer generated speech or by recording a sound file of your own through the phone handset The words that the Automated Receptionist will use to confirm a caller s req...

Page 21: ...Use computer generated speech Response Point automatically uses Microsoft Anna to record your sound files If this text to speech program is not available Response Point chooses another Microsoft TTS p...

Page 22: ...once more to finish editing the user Using a Prerecorded Sound File You may use an existing sound file if you prefer The sound file needs to be recorded in a sound recording application such as Window...

Page 23: ...0 When you are satisfied with the recording click OK Note If you select a file that is not a sound file in the right format an error message will be displayed Click OK to return to the Specify Spoken...

Page 24: ...leave the company or you have made multiple entries for one phone user Note You cannot remove users if they are assigned to a phone You must first edit the phone to remove the user from it and then r...

Page 25: ...gure Phone Wizard To add a phone in Administrator do the following 1 Click the Phone System button 2 In the Tasks pane under Phones click Add Phone The Configure Phone wizard opens 3 Confirm that the...

Page 26: ...rce then plug it back in After plugging in the phone you may need to wait at least sixty seconds before the phone is initialized and ready to be configured 5 Click Next to display the Who will receive...

Page 27: ...elected To change any of the information displayed on the phone screen see Editing a Phone on page 31 Adding Multiple Line Phones Multiple line phones allow you to assign different users to different...

Page 28: ...to the LAN Unplug the phone from the power source then plug it back in After plugging in the phone you may need to wait at least sixty seconds before the phone is initialized and ready to be configure...

Page 29: ...on the Web UI interface see Using the Aastra Web UI on page 56 To activate additional phone lines on the WebUI using the Administrator software do the following 1 From within the Administrator softwar...

Page 30: ...the Bottom Keys tab lower 6 programmable keys or Top keys tab upper 6 programmable keys 3 For the chosen key set the Type to Line and make sure the number in the Line column matches the line you assig...

Page 31: ...et the Type to Line Make sure the number in the Line column matches the line you assigned in the Administrator software Note Model 6753i CT RP allows up to 6 lines in total 2 on the keypad and 4 on th...

Page 32: ...e this phone page change the name if you want to do so 6 Click Finish 7 When the configuration process is complete click Close The changes you have made will display on the phone screen once it has fi...

Page 33: ...do the following 1 Click the Phone System button 2 In the Tasks pane under Phones click Remove Phone The Select the phone you want to remove list opens 3 Click the phone that you want to remove then c...

Page 34: ...ink RP 540 Gateway which translates the analog signal coming from the landline phone line to the AastraLink RP Solution Likewise it takes the outgoing digital signals from the phone system and transla...

Page 35: ...trator Guide 35 Voice Services 3 Click the Analog Service option and click OK The Configure Analog Phone Service wizard opens 4 Click Next and select the phone line adapter AastraLink RP 540 Gateway y...

Page 36: ...ses the prefix 8 7 Click Next and enter a name for your gateway Ensure that the name you choose distinguishes the AastraLink RO 540 Gateway from others on the network 8 Click Finish to complete config...

Page 37: ...lick Finish to complete the configuration of your VoIP phone service Editing Voice Services Once a voice service analog or VoIP is configured it can be edited as required using the Administrator softw...

Page 38: ...tion window opens Ensure you have selected the voice service you want to remove and click Yes Note Once you remove a voice service you cannot undo your action and the settings for the removed service...

Page 39: ...zone for the base unit if necessary and specify whether you want to manually or automatically adjust the time for changes such as daylight savings Note When you confirm the changes that you want to m...

Page 40: ...nents such as phones will take a few minutes to change Configuring the Email Server Configuring an email server allows you to set up voicemail so that voice messages can be sent as attachments via ema...

Page 41: ...you received it 7 Double click the WAV file to hear your test message Note If you do not receive the email message with attached voicemail file check the event log to see if there was a failure in co...

Page 42: ...e the configuration Using an external music source for Parked Call Music To configure external music to play while a call is parked do the following 1 Use an appropriate cable to connect your radio CD...

Page 43: ...box Note Voicemail settings can also be changed by users through the Assistant software Using the Automated Receptionist Incoming calls may be routed directly to one or more phones or answered by the...

Page 44: ...e available to outside callers Configuring the Automated Receptionist To configure Automated Receptionist properties using Administrator do the following 1 Click the Call Routing button 2 In the Tasks...

Page 45: ...re finished specifying the prompt click OK 8 When you re satisfied with both the welcome greeting and opening prompt click OK in the Configure Automated Receptionist Properties dialog box Configuring...

Page 46: ...he Bypass Receptionist Likewise you might see conflicts because an outside number has been designated for External Access 5 Click OK to complete the configuration Using a Receptionist or Operator If y...

Page 47: ...can edit the user properties of the receptionist so that calls are forwarded to another employee or to the Automated Receptionist when that person can t answer the phone Using an Operator An operator...

Page 48: ...ed Receptionist This user conceptually represents all of the people who perform the role of receptionist Then assign the Receptionist user to the phone of each person who performs that role and set th...

Page 49: ...le Receptionist from the list 3 Click OK in the Choose How to Answer Calls dialog box 4 Place a test call to your office Each of the phones that you edited should ring when the call arrives Call Histo...

Page 50: ...ou need to ask users to delete some or all of their voice messages or contacts Base Unit Storage Limits There is a minimum of 75 MB free space maintained at all times on the base unit If the base unit...

Page 51: ...This warning opens in both Administrator and Assistant and the questions answered here may help explain any concerns you have about the security of information on your base unit What information is s...

Page 52: ...y applies if the phone system administrator configures Response Point to send voice messages as email attachments Where is this information stored All data is stored on the physical device which is wh...

Page 53: ...Tasks pane under Backup click Create Backup 3 Enter a name location and description for you backup in the Create Backup dialog box and click OK Restoring a Backup If required you can restore your phon...

Page 54: ...nings and information about activity on the base unit For example you can see when an internal error occurred or when a restore or upgrade action was completed You can also see when an employee attemp...

Page 55: ...y typing in the phone s IP address directly Finding Your Phone s IP Address Using Administrator To find the IP address of your phone from within the Administrator software do the following 1 From with...

Page 56: ...wser do the following Open your web browser enter the phone s IP address or host name into the address field and press Enter Proceed to step 5 on page page 57 for username and password information Use...

Page 57: ...og opens 4 Click Advanced to open the Aastra Web UI in your web browser The password window opens 5 At the prompt enter your username and password and click OK Note For an administrator the default us...

Page 58: ...e Lock Allows you to assign an emergency dial plan to the phone lock the phone to prevent any changes to the phone and to prevent use of the phone and reset the user password Keypad Speed Dial model 6...

Page 59: ...st be assigned through the Web UI and phones must be reset for the new lines to take effect See the AastraLink RP Phone User Guide for more details Action URI Supports an advanced XML interface for en...

Page 60: ...then connects to the base unit for the first time The base unit was upgraded from another computer other than the one on which this copy of Administrator is currently running Depending on the situati...

Page 61: ...the Phone System button 2 Click Upgrade Device Firmware under the heading Other 3 Click Browse to find the upgrade package on your computer A table displays detailed information about the upgrade pack...

Page 62: ...er A table displays detailed information about the upgrade package you selected including the new version number the release date of the package and the number of your devices that apply to this upgra...

Page 63: ...grades To activate a manual firmware download you need to use a TFTP server and need the updated firmware file for your model of Aastra RP Phone Note This procedure allows you to download the phone_mo...

Page 64: ...phone model st that you want to download to your IP phone in the File Name field For example 6753irp st Note This file name must match the actual name of the firmware file residing on your configurat...

Page 65: ...a Web UI Restore to Factory Defaults Remove Local Configuration Settings The Restore to Factory Defaults option resets the factory defaults for all of the phone settings and local configuration Perfor...

Page 66: ...m although the phone settings will remain in Response Point 4 A message will display indicating successful completion of your choice and instructing you to restart the phone Click Reset to continue 5...

Page 67: ...utomatically execute the utility You should use a USB drive with an activity light that indicates when the drive is being accessed so that you can monitor the progress of long running utilities Also m...

Page 68: ...SystemInfo txt If the message in the file indicates that the information was not extracted follow the instructions described in the file and repeat this procedure starting with step 1 6 Share the file...

Page 69: ...r software problems You can try the following Log on again to see if the error has cleared Restart the computer on which Administrator is running and try logging on again Install Administrator on anot...

Page 70: ...log again to see if the message is gone Why can t I record sound files with my phone using Administrator If you are unable to record sound files with your phone using Administrator your firewall migh...

Page 71: ...an see it on the Phone System page To do this go through the Configure Phone Wizard changing nothing and click Finish at the end For more information see Editing a Phone on page 31 I can see the Aastr...

Page 72: ......

Page 73: ...tal or consequential damages including but not limited to loss damage or expense directly or indirectly arising from the customers use of or inability to use this telephone either separately or in com...

Page 74: ......

Page 75: ...inistrator about 10 adding multiple line phones 27 adding phones 25 adding users 19 automated receptionist advanced features 44 basic features 43 bypass receptionist 45 configuring 44 greeting and pro...

Page 76: ...sic default 42 external 42 setting 41 call routing 43 computer requirements 10 computer generated speech 20 D date 39 date and time 39 E editing users 23 editing voice services 37 email server configu...

Page 77: ...lation 7 installation summary 12 IP addresses Administrator 55 phone interface 55 manual upgrading 63 programmable lines 29 removing local configuration 65 67 resetting 65 67 restoring factory default...

Page 78: ...rator Guide V voice recognition 9 voice services about 34 removing 37 voicemail email 43 greeting 43 setting options 43 storage 50 storage time 52 VoIP voice services adding 36 VoIP adding 36 W warran...

Page 79: ......

Page 80: ...e Troubleshooting section and still have problems please visit our Web site at www aastra com or call 1 800 574 1611 for technical assistance Microsoft Response Point is a trademark of Microsoft Corpo...

Reviews: