background image

Model 6751i IP Phone User Guide


85

Additional Features

Display DTMF Digits

A feature on the IP phones allows users to enable or disable DTMF (dual-tone multi-frequency) 

digits to display to the IP phone when using the keypad to dial, or when dialing from a speeddial 

key.

DTMF is the signal sent from the phone to the network that you generate when you press the 

phone’s touch keys. This is also known as “touchtone” dialing. Each key you press on your phone 

generates two tones of specific frequencies. One tone is generated from a high-frequency group of 

tones and the other from a low frequency group.

If you enable the Display DTMF Digits parameter, the digits you are dialing from the keypad or 

from a speeddial key display to the IP phone’s LCD display. This parameter is disabled by default 

(no digits display when dialing).

You can enable the "Display DTMF Digits" parameter using the Aastra Web UI.

Configuring Display of DTMF Digits

Use the following procedure to configure the display of DTMF digits on the IP phone.
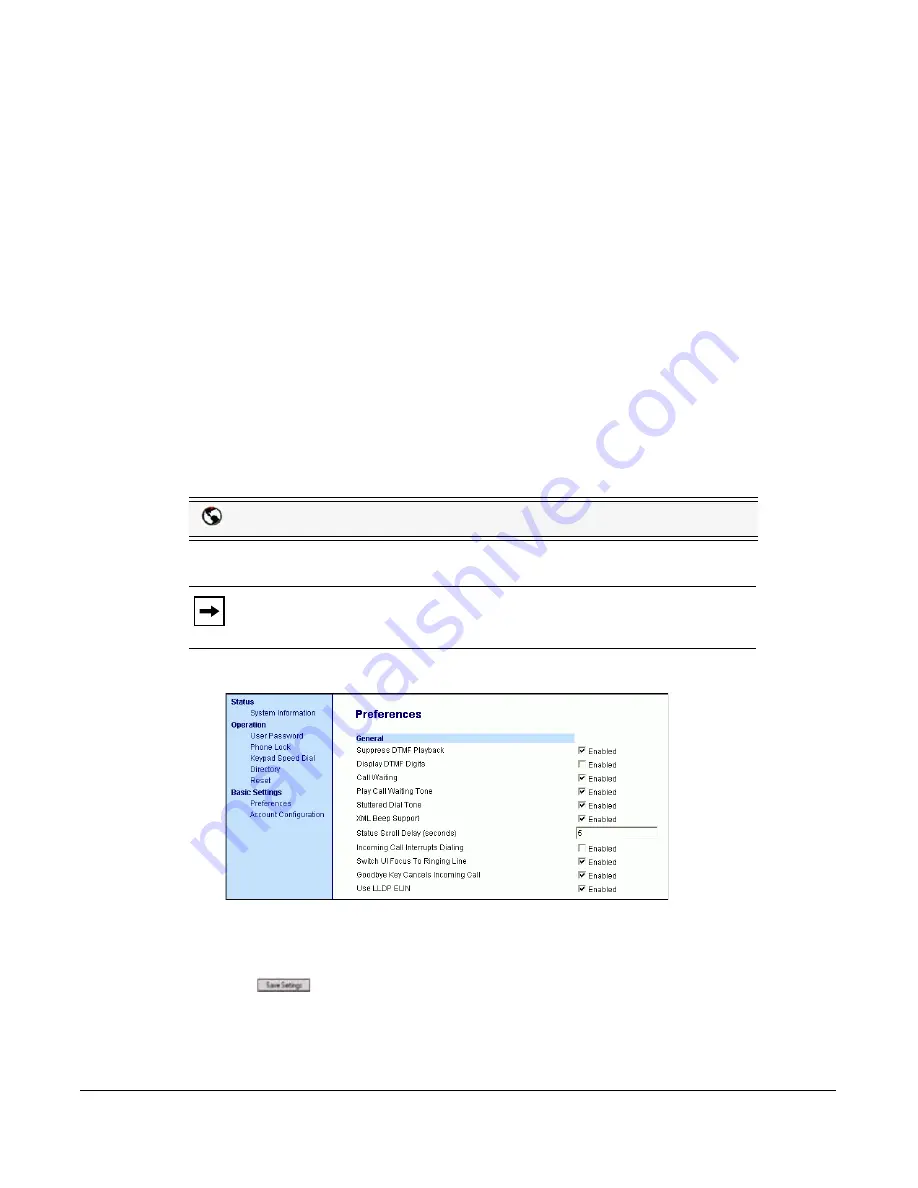
1.

Click on 

Basic Settings->Preferences->General.

2.

Enable the "

Display DTMF Digits

" field by checking the check box.

Disable this field by unchecking the box). Default is disabled.

3.

Click 

 to save your settings.

Aastra Web UI

Note: 

"Display DTMF Digits" is disabled by default.

Summary of Contents for 6751I

Page 1: ...User Guide 6751i IP Phone 6751i IP Phone 41 001212 25 Rev 00 Release 2 5 ...

Page 2: ...ul use While every effort has been made to ensure accuracy Aastra Telecom will not be liable for technical or editorial errors or omissions contained within this documentation The information contained in this documentation is subject to change without notice Copyright 2008 Aastra Telecom www aastratelecom com All Rights Reserved ...

Page 3: ...be translate or reduce to electronic medium or machine readable form or language derive source code without the express written consent of the Seller and its Suppliers or disseminate or otherwise disclose the Software to third parties All Software furnished hereunder whether or not part of firmware including all copies thereof are and shall remain the property of Seller and its Suppliers and are s...

Page 4: ......

Page 5: ...Description 8 Methods for Customizing Your Phone 10 Phone Options via the IP Phone UI 10 Phone Options via the Aastra Web UI 12 Phone Status 15 Phone Status via IP Phone UI 15 Finding Your Phone s IP Address 16 Phone Status via the Aastra Web UI 17 Customizing Your Phone 20 Ring Tones and Tone Sets 20 Contrast Level 23 Live Dialpad 23 Time and Date 24 Language 28 User Password 37 Resetting a User ...

Page 6: ...5 Transferring Calls 57 Conferencing Calls 58 Swapping Calls 60 Ending Calls 60 Managing Calls 61 Directory List 61 Callers List 72 Account Configuration DND and Call Forwarding 78 Additional Features 83 Star Codes 83 Suppress DTMF Playback 84 Display DTMF Digits 85 Call Waiting 86 Play Call Waiting Tone 88 Stuttered Dial Tone 89 XML Beep Support 90 Status Scroll Delay 91 Incoming Call Interrupts ...

Page 7: ...swer and Ignore Softkeys for XML Applications 107 Playing a WAV File On Your Phone 107 Using the Keypad During Active XML Applications 108 Key Redirection 108 XML Applications and Off Hook Interaction 109 Hold Feature Enhancement for Broadsoft Servers 109 Authentication Support for HTTP HTTPS Download Methods Used with Broadsoft Client Management System CMS 110 Diverting Calls from Your Phone 111 ...

Page 8: ......

Page 9: ...i SIP IP Phone Installation Guide installation and set up instructions general features and functions and basic options list customization This guide is included in the box with your phone Aastra 6751i SIP IP Phone User Guide explains the most commonly used features and functions This guide can be downloaded from www aastratelecom com Aastra SIP IP Phone Administrator Guide explains how to set the...

Page 10: ...ronment SIP based IP PBX system or network installed and running with a SIP account created for the 6751i phone Access to a Trivial File Transfer Protocol TFTP File Transfer Protocol FTP Hypertext Transfer Protocol HTTP server or Hyper Text Transfer Protocol over Secure Sockets Layer SSL HTTPS Ethernet Fast Ethernet LAN 10 100 Mb Category 5 5e straight through cabling Power over Ethernet PoE inlin...

Page 11: ... phone goes through this process the first time you plug in your phone and every time you restart your phone The phone displays the following startup screens During the first start up the 6751i phone attempts to contact the Redirection and Configuration Server rcs aastra com for current server information No personal information is transmitted from the phone during this process Note Some start up ...

Page 12: ...ew update is found the phone displays the message Updating Configuration This may take a few moments while the phone downloads the latest updates If language packs were loaded to your phone by your System Administrator the following screen displays during startup Note New updates to your phone can be automatically scheduled from the server This is set up on the phone system by your System Administ...

Page 13: ...your name SIP screen name extension or phone number and day date and time The 1 in the upper corner in the above example indicates the idle screen for the first line appearance You can use the UP and DOWN arrow keys to scroll through the idle screens This screen is shown whenever your phone is not in use Idle Screen 2 The second display line displays the following temporary messages if the event o...

Page 14: ... keys to scroll through the remaining messages Incomplete Configuration If your phone displays an Incomplete Config message without any extension or user name at the end of the start up sequence instead of an Idle state screen this inidicates the phone configuration that was downloaded from the configuration server is not complete or correct Contact your System Administrator for assistance Note Si...

Page 15: ...of 12 00am Jan 1st 2000 Check that the cables are tightly connected to the phone and to the wall jack The phone should automatically detect when the connection is reconnected and will display the Network Connected prompt temporarily If changes have been made to your phone settings you may need to restart your phone For more information on restarting your phone see Restarting your phone on page 39 ...

Page 16: ...xits an open list such as the Directory List without saving changes Options key Accesses options to customize your phone See Phone Options via the IP Phone UI on page 10 for specific options you select to customize your phone Hold key Places an active call on hold To retrieve a held call press the Hold key again Redial key Redials up to 100 previously dialed numbers Pressing the Redial key twice s...

Page 17: ...n active calls to switch from the handset to handsfree Mute key Mutes the microphone so that your caller cannot hear you Navigation keys Pressing the UP and DOWN arrow keys lets you view different status and text messages on the LCD display if there is more than 1 line of status text messages These buttons also let you scroll through menu selections such as the Options List UP Arrow This key also ...

Page 18: ... menu that displays The Options Menu allows you to customize the following phone settings Option Number Option 1 Call Forward 1 Screenname 2 All Off 3 All On The menus that display for Call Forward are dependant on the Call Forward Mode set on the phone Default is Account mode 2 Services 1 Directory 2 Callers List 3 Voicemail 3 Preferences 1 Tones Ring Tone Tone Set 2 Contrast Level 3 Speeddial Ed...

Page 19: ...ed 7 Restart Phone 8 Phone Lock Note The Administrator Menu options are administrator level functions only and are not accessible by the user These options should only be set up and changed by your system administrator Option Number Option 1 Call Forward 1 Screenname 2 All Off 3 All On The menus that display for Call Forward are dependant on the Call Forward Mode set on the phone Default is Accoun...

Page 20: ...r the key at any time to exit without saving changes Reference For more information about customizing your phone using the available options from the IP Phone UI see the section IP Phone Keys and Key Descriptions on page 8 For more information about administrator options contact your System Administrator Phone Options via the Aastra Web UI In addition to the IP Phone UI options you can customize a...

Page 21: ... the address field and press Enter The following logon screen displays 2 At the prompt enter your username and password and click The Network Status window displays for the IP phone you are accessing 3 You can logout of the Aastra Web UI at any time by clicking Log Off Aastra Web UI Note For a user the default user name is user and the password field is left blank ...

Page 22: ... you to assign a speeddial number to a specific digit on the phone s keypad for speeddialing purposes Directory Allows you to copy the Callers List and Directory List from your IP phone to your PC Reset Allows you to restart the IP phone when required Basic Settings Preferences Allows you to configure the following general preferences Suppress DTMF Playback Display DTMF Digits Call Waiting Play Ca...

Page 23: ...our phone s IP and MAC address Local Area Network LAN port information PC Port information if PC link exists Firmware version Error messages from the last reboot or startup Use the following procedure to view the status of your phone using the IP Phone UI 1 Press on the phone to enter the Options List 2 Select Phone Status 3 Select the option you want to view IP MAC Address LAN Port PC Port Firmwa...

Page 24: ... browser to open the Aastra Web UI Use the following procedure to find your phone s IP address 1 Press on the phone to enter the Options List 2 Select Phone Status and press the 4 key 3 Select IP MAC Addresses and press the 4 key The IP address of your 6751i IP phone displays in the IP Address field IP Phone UI 3 Phone Status Enter Next 1 IP MAC Addresses Enter Next IP Address 10 40 50 112 Exit Ne...

Page 25: ... and password and click The Network Status window displays for the IP phone you are accessing You can logout of the Aastra Web UI at any time by clicking Log Off This Network Status window is view only It displays the Network Status of your phone which includes the following Link State Negotiation Speed and Duplex setting for the LAN and PC ports MAC Address Hardware Information Firmware Informati...

Page 26: ... IP Phones show the SIP registration status on the IP Phone s Network Status screen in the Aastra Web UI The 6751i displays only one status line The following is an illustration of the Network Status screen in the Aastra Web UI with SIP status displayed SIP Account Status ...

Page 27: ...roxy aastra com 5060 Registered Yes where Account Number is 1 SIP Account is 9057604603 anasipproxy aastra com on port 5060 Status is Registered Backup registrar is used Yes SIP Error Number Displays on accounts when registration fails with the SIP proxy server Example Backup Registrar Line SIP Account Status Used 4 9057604601 anasipproxy aastra com 5060 401 No where Account Number is 4 SIP Accoun...

Page 28: ...phs describe the Ring Tones and Ring Tone Sets you can set on the 6751i Ring Tones There are several distinct ring tones a user can select from to set on the IP phones You can enable disable these ring tones on a global basis only The following table identifies the valid settings and default values for each type of configuration method Ring Tones Table Configuration Method Valid Values Default Val...

Page 29: ...onfigure the country s tone set the country specific tone is heard on the phone for the following dial tone secondary dial tone ring tone busy tone congestion tones call waiting tone ring cadence pattern You configure global ring tones and tone sets using the Aastra Web UI and the IP Phone UI Configuring Ring Tones and Tone Sets Use the following procedures to configure ring tones and tone sets on...

Page 30: ... you select is immediately applied to the IP phone 1 Click on Basic Settings Preferences Ring Tones 2 In the Ring Tones section select a country from the Tone Set field Valid values are Australia Europe France Germany Italy UK Mexico Brazil and US Default is US 3 In the Global Ring Tone field selec a ring tone to set on the phone Valid values are Tone 1 through Tone 5 or Silent Default is Tone 1 4...

Page 31: ...n Live Dialpad The Live Dialpad option on the IP phone turns the Live Dial Pad mode ON or OFF With live dial pad ON the 6751i IP phone automatically dials out and turns ON Handsfree mode as soon as a dial pad key or softkey is pressed With live dial pad OFF if you dial a number while the phone is on hook lifting the receiver or pressing the initiates a call to that number You can enable disable th...

Page 32: ...phone Use the 3 and 4 navigation keys to move backward or forward when entering the time Use the key to set either AM or PM 6 Press Set to save the time you entered 7 Select Time Format 8 Using the Change softkey set the Time Format to either a 12 hour format or a 24 hour format Valid values are 12h and 24h Default is 12h 9 Press Set to save the Time Format you selected Set Date and Date Format 1 ...

Page 33: ... Jan 2000 Sun 2 Jan 2 Jan 02 01 2000 8 Press Done to save the Date Format Set Time Zone 1 Select Preferences 2 Select Time and Date 3 Select Time Zone 4 Press to display a list of Time Zone options A list of Time Zones display for different areas of the world 5 Select a Time Zone that applies to your area The default Time Zone is US Eastern 6 Press Set to save the Time Zone you selected Note For a...

Page 34: ... enabled your IP phone will synchronize the time displayed with the specified configuration server The phone will use the time from Time Server 1 unless it is not configured or unavailable in which case it will move on to Time Server 2 and if neccessary Time Server 3 1 Select Preferences 2 Select Time and Date 3 Select Time Server 4 Select from Time Server 1 Time Server 2 or Time Server 3 5 Enter ...

Page 35: ...te format you want to use on your phone Default is WWW MMM DD Valid values are WWW MMM DD default DD MMM YY YYYY MM DD DD MM YYYY DD MM YY DD MM YY MM DD YY MMM DD DD MMM YYYY WWW DD MMM DD MMM DD MM YYYY 4 In the NTP Time Servers field enable by checking the checkbox or disable by unchecking the box default is enabled Aastra Web UI Note The time displays on the phone s idle screen in the format y...

Page 36: ...ameters etc display in that language The IP phones support the following languages English default French Canadian French European Spanish Mexican Spanish European German Italian Portuguese You can also configure the language to use when inputing values in the Aastra Web UI and the IP Phone UI Specifying the Language to Use Once the language pack s are available on your phone from your System Admi...

Page 37: ... scroll through the languages Valid values are English default Français French Español Spanish Deutsch German Italiano Italian Português Portguese 6 Press Set to set the language on the phone The change is dynamic When you exit the Options Menu the phone displays all menu items in the language you selected IP Phone UI Note All languages may not be available for selection The available languages ar...

Page 38: ... Click to save your settings The change is dynamic The Aastra Web UI displays all screens in the language you selected Aastra Web UI Note You must have the language pack s already loaded to your phone in order to use them For more information about loading language packs see your System Administrator Note All languages may not be available for selection The available languages are dependant on the...

Page 39: ... in a specific language when performing inputs on the phone The following tables identify the language characters that you can use to enter text and characters on the 6751i Keypad Input Alphabet Tables English French Key Uppercase Characters Lowercase Characters 0 0 0 1 1 _ 1 _ 2 ABC2 abc2 3 DEF3 def3 4 GHI4 ghi4 5 JKL5 jkl5 6 MNO6 mno6 7 PQRS7 pqrs7 8 TUV8 tuv8 9 WXYZ9 wxyz9 SPACE SPACE Key Upper...

Page 40: ...1 _ 1 _ 2 ABC2ÁÀÇ abc2áàç 3 DEF3ÉÈ def3éè 4 GHI4ÏÍ ghi4ïí 5 JKL5 jkl5 6 MNO6ÑÓÒ mno6ñóò 7 PQRS7 pqrs7 8 TUV8ÚÜ tuv8úü 9 WXYZ9 wxyz9 SPACE SPACE Key Uppercase Characters Lowercase Characters 0 0 0 1 1 _ 1 _ 2 ABC2ÄÀ abc2äà 3 DEF3É def3é 4 GHI4 ghi4 5 JKL5 jkl5 6 MNO6Ö mno6ö 7 PQRS7ß pqrs7ß 8 TUV8Ü tuv8ü 9 WXYZ9 wxyz9 SPACE SPACE ...

Page 41: ... 1 _ 2 ABC2ÀCÇ abc2àcç 3 DEF3ÉÈË def3éèë 4 GHI4 ghi4 5 JKL5 jkl5 6 MNO6ÓÒ mno6óò 7 PQRS7 pqrs7 8 TUV8Ù tuv8ù 9 WXYZ9 wxyz9 SPACE SPACE Key Uppercase Characters Lowercase Characters 0 0 0 1 1 _ 1 _ 2 ABC2ÁÀÂÃÇ abc2áàâãç 3 DEF3ÉÊ def3éê 4 GHI4Í ghi4í 5 JKL5 jkl5 6 MNO6ÓÔÕ mno6óôõ 7 PQRS7 pqrs7 8 TUV8ÚÜ tuv8úü 9 WXYZ9 wxyz9 SPACE SPACE ...

Page 42: ...e when inputting text and characters into the IP Phone UI Valid values are English default Français French Español Spanish Deutsch German Italiano Italian Português Portguese 5 Press Set when you have selected an input language Once Language Input is enabled you can change the default input language on the phone using the Aastra Web UI Use the following procedure to set the input language using th...

Page 43: ...n the Aastra Web UI and IP Phone UI Valid values are English default Français French Español Spanish Deutsch German Italiano Italian Português Portguese 3 Click to save your settings The change is dynamic The Aastra Web UI and IP Phone UI allow you to enter text and characters in the language you selected Note All languages may not be available for selection The available input languages are depen...

Page 44: ...751i includes support for ISO 8859 2 Latin2 of multi national languages when displaying and inputing in the IP Phone UI and the Aastra Web UI UTF 8 is also compatible with XML encoding on the IP Phones The following table illustrates the Latin 2 character set used on the 6751i IP Phone ...

Page 45: ...ed displays on the screen 1 Click on Operation User Password 2 In the Current Password field enter the current user password 3 In the New Password field enter the new user password 4 In the Password Confirm field enter the new user password again 5 Click to save your changes If you change the password you will need to using the IP Phone UI use that new password to log into the Aastra Web UI using ...

Page 46: ...the following procedure to reset a user password 1 Click on Operation Phone Lock 2 In the Reset User Password field click The following screen displays 3 In the Current Password field leave this blank 4 In the New Password field enter a new password 5 In the Password Confirm field re enter your new user password 6 Click to save your settings Note Valid values when creating or changing a password a...

Page 47: ...tart your phone if you have been asked to do so by your System Administrator or should you experience any unexpected behavior 1 Press on the phone to enter the Options List 2 Select Restart Phone 3 Press to confirm the restart of the phone If you do not wish to restart your phone press the 3 key to cancel 1 Click on Operation Reset 2 Click 3 Click OK at the confirmation prompt IP Phone UI Note You...

Page 48: ...ew user password Set an emergency dial plan An emergency dial plan can be 911 999 112 110 or all of the above The default emergency dial plan is 911 999 112 110 The following procedures describe locking the phone setting an emergency dial plan and resetting the user password Locking Unlocking a Phone Use the following procedures to lock an IP phone and prevent it from being used or configured Lock...

Page 49: ...cy services number that allows a caller to contact local emergency services for assistance when required The emergency telephone number may differ from country to country It is typically a three digit number so that it can be easily remembered and dialed quickly Some countries have a different emergency number for each of the different emergency services You can specify the digits to dial on the I...

Page 50: ...services For multiple numbers enter a between each emergency number For example 911 110 Default for this field is 911 999 112 110 3 Click to save the emergency dial plan to your phone Reference For more advanced options you can set on your phone see Additional Features on page 83 Emergency Number Description 911 A United States emergency number 999 A United Kingdom emergency number 112 An internat...

Page 51: ...numbers that contain long prefixes For example if you set the following speeddial configuration Digit 1 1234567 then after you press Digit 1 on the keypad the prefix number displays on the phone screen The phone proceeds to dial the prefix number automatically and pauses for you to enter the remaining phone number using the keypad on the phone You can save up to 7 speeddial numbers on the 6751i Us...

Page 52: ...owing procedure to create a speeddial key using the Save key Use the following illustration for reference 1 Press the Save key The screen displays Save to 2 Select a Keypad key you want to save to Note Press and hold a speeddial key to edit that speeddial key If you try to edit a digit key set to Empty or None the phone proceeds to enter the Add a Speeddial Key process For more information about e...

Page 53: ...es To insert a space between letters press 4 To backspace and erase a mistake press 3 or the Delete key You can save up to 16 letters and numbers on each keypad key entry 6 Press the Save key to finish Creating Speeddial Key Using the Aastra Web UI 1 Click on Operation Keypad Speeddial 2 Select from Digit 1 through Digit 9 3 In the input box enter the phone number extension or speeddial prefix to ...

Page 54: ...lers List from the Services Menu or Press to enter the Redial List 4 From the Directory List Callers List or Redial List scroll through the list to find the name and number that you wish to save to your speeddial 5 Press the Save key 6 Press the selected speeddial key from the keypad If the name is displayed with the number both are saved to the speeddial If no name is displayed you can enter the ...

Page 55: ...dit screen displays IP Phone UI Note A speeddial key must be already configured on the phone to edit the key Notes 1 If a number on the keypad is setup as a speeddial key pressing the applicable number in the speeddial editing process also displays the speeddial edit screen 2 If you press a key that is NOT setup as a speeddial key the phone displays an Invalid Key message However if you press and ...

Page 56: ...r extension or speeddial prefix for this Digit key If you enter a speeddial prefix you must enter the character at the end of the prefix number for example 123456 4 Click to save your changes Notes 1 You can cancel out of the speeddial editing process at any time without saving by pressing the key 2 On the 6751i you can remove the Speeddial Key by erasing the speeddial number digits leaving the sp...

Page 57: ...l transfers to other recipients The blind transfer feature transfers a call to another number without you having to talk to the recipient A consultative transfer feature transfers a call to another number but allows you to speak with the recipient before the call is actually transferred Reference For more information about using blind and consultative call transfers see Transferring Calls on page ...

Page 58: ...onference Server Side Conferencing This key also helps to create multiple conferences with unlimited participants on your phone if your System Administrator has enabled Centralized Conferencing on your phone Reference For more information about Server Side and Centralized Conferencing see Conferencing Calls on page 58 Note You must set the maximum number of conference participants on your conferen...

Page 59: ...ks up a timer appears on your display that records the length of your call Using Handsfree Speakerphone The handsfree feature allows you to speak to someone without using the handset To dial using handsfree first press and enter a number at the dial tone To answer a call on your phone using handsfree press If the Speakerphone is enabled lift the handset and press to switch between handsfree and ha...

Page 60: ...ly dials the last number you called 2 If you are not on the phone press to display the most recently dialed number and use 2 and 5 to scroll through the list to view the other numbers 3 Press 2 to see the second most recently dialed number or 5 to see the oldest call on your list 4 To dial the displayed number press or lift the Handset 5 Press or the key to cancel IP Phone UI Note Your System Admi...

Page 61: ...muted the icon displays as follows For muted calls the handsfree LED flashes and the Mute key LED is ON Press the button at any time to mute handset or speakerphone The speaker light will flash slowly and you can hear the caller but they cannot hear you To switch mute on or off press Note You cannot delete individual entries in the Redial List IP Phone UI IP Phone UI Note If you place a muted call...

Page 62: ...all If you cannot answer the call the call goes to voicemail if it has been configured for your extension Sending an Incoming Call to Voicemail You can send an incoming call directly to voicemail without answering the call To do this press without picking up the handset If you re already on the phone your incoming call should go directly to voicemail Your phone screen displays a voicemail icon alo...

Page 63: ... a call on hold only your phone can retrieve the call When a call is on hold the icon displays on hook as follows For on hold calls the timer displays as running To place a call on hold 1 Connect to the call if not already connected 2 Press the Hold key If a call is on hold for an extended period of time the phone beeps softly to remind you that you still have a call on hold The screen displays Ca...

Page 64: ...tly if this has been set up by your phone system The offhook icon displays on your LED to indicate the call is still connected but on hold Retrieving a Held Call If you have a call on hold you can scroll through the held call information by pressing 3 and 4 navigation keys To reconnect to a call press the Key again John 1051 01 17 ...

Page 65: ...consulting with the receiving party you can either complete the transfer or cancel the transfer to go back to the original call The 6751i has a Transfer Key configured on the UP arrow of the Navigation Keys Use the following procedure to transfer a call to another extension Use the following illustration as a reference 1 Connect to Party 1 if not already connected Party 1 is the party you want to ...

Page 66: ...use the right arrow key to select the party to drop Server Side Conferencing The 6751i phone supports up to 3 parties including yourself in a conference call This is called Server Side Conferencing and is the default method of conferencing on the 6751i Using Server Side Conferencing The 6751i has a Conference Key configured on the DOWN arrow of the Navigation Keys Use the following procedure to cr...

Page 67: ...ty 2 and Party 3 are all connected to a single conference 8 To drop a party from the conference press the DOWN arrow key once more Ending a Conference and Transferring Remaining Parties The 6751i allows a Host to drop from a 3 way conference and let the other two parties remain connected by pressing a Xfer key If you are the Host of a conference and want to leave that conference While in a 3 way c...

Page 68: ...the Swap key again toggles between the two active calls Ending Calls To end a call you first need to connect to the call if not already connected To end a call you first need to reconnect to the call if not already connected for example if your caller is on hold Press when on an active call to end the call If connected through the handset you can also place the handset back on hook to end the call...

Page 69: ...eniently stored within your phone You can enter up to 200 entries into the 6751i Directory by adding them manually or by saving the number and name from other lists stored on your phone You can also dial directly from a directory entry Each entry can contain a maximum of 16 letters and numbers On the 6751i you access the Directory List at the location Options Services Accessing Your Directory Use ...

Page 70: ...ss the next letters of the name to find a better match 6 To dial the displayed number press or just lift the handset 7 Press the Key to cancel Sorting Entries and Quick Search Feature You can also sort multiple numbers according to preference and perform a quick search feature that allows you to enter the first letter that corresponds to a name in the Directory to find specific line items The phon...

Page 71: ...sociate with the phone number you just entered and press Save Use the keypad to select the letters Continue to press the number key to access the next letter for that key for example press 2 three times to access C Press 4 to move to the next space or wait a moment and the cursor automatically advances To insert a space between letters press 4 To backspace and erase a mistake press 3 or press the ...

Page 72: ...pt displays 6 Enter a name to associate with the phone number you just entered and press Save Use the keypad to select the letters Continue to press the number key to access the next letter for that key for example press 2 three times to access C Press 4 to move to the next space or wait a moment and the cursor automatically advances To insert a space between letters press 4 To backspace and erase...

Page 73: ...ou want to edit by pressing the first letter of the name on the dial pad or use 2 and 5 to scroll through the list to find the name 5 To begin editing press 3 Press 3 again to erase the numbers or letters to the left or use the dial pad to enter additional digits or characters once you have saved the number If you don t want to change the number or name just press the Key or the Key at any time to...

Page 74: ...from the Directory List Use the following illustration as a reference Delete a Single Entry 1 Press on the phone to enter the Options List 2 Select Services 3 Select Directory 4 Press 2 and 5 to find the entry you want to delete 5 Press the Delete Key The DELETE again to erase this item prompt displays 6 Press the Delete Key again at the prompt to erase the entry IP Phone UI Delete Key Press Optio...

Page 75: ...he Options List 2 Select Services 3 Select Directory 4 Press the Delete Key The DELETE again to erase all items prompt displays 5 Press the Delete Key again to erase all entries from the Directory List The Directory empty prompt displays DELETE again to erase all items Directory empty Use Save to add ...

Page 76: ...your screen during a call to the Directory List or to a Keypad key using the following procedure Use the following illustration as a reference 1 Press the Save Key during the call 2 Press on the phone to enter the Options List 3 Select Services 4 Select Directory If a name is displayed both the number and name are saved in the Directory List If no name or Unknown Name displays you can enter the na...

Page 77: ...4 From the Callers List scroll through the list to find the name and number that you want to save to your Directory 5 Press the Save Key 6 Press on the phone to enter the Options List 7 Select Services 8 Select Directory to save the number you selected to the Directory List If the name is displayed with the number both are saved to the Directory If no name is displayed you can enter the name using...

Page 78: ...ll through the list to find the name and number that you want to save to your directory 3 Press the Save Key 4 Press on the phone to enter the Options List 5 Select Services 6 Select Directory to save the number you selected to the Directory List If the name is displayed with the number both are saved to the Directory If no name is displayed you can enter the name using the dial pad IP Phone UI Sa...

Page 79: ...mber for each Directory entry Download the Directory List Use the following procedure to download the Directory List to your PC using the Aastra Web UI 1 Click on Operation Directory 2 In the Directory List field click on A File Download message displays 3 Click OK 4 Enter the location on your computer where you want to download the Directory List and click SAVE The callerslist csv file downloads ...

Page 80: ...d name if available of the caller when they last called and the number of times they tried to reach you When the Callers list is full the oldest call records are deleted to accommodate the information of new callers If the phone number of an incoming or outgoing call matches a number that you have programmed with a name in a speeddial key or in the Directory List the Callers List displays the name...

Page 81: ...om the Callers list N MAR 04 3 30pm 2x N indicates a new call XX New Callers When you re not on the telephone and not in the Callers list the display shows you how many callers have been added to the list since you last checked it Indicates an unanswered call in the Callers list Indicates an answered call in the Callers list Indicates a Call Waiting call in the Callers list Indicates an incoming C...

Page 82: ... save changes Editing in the Callers List is generally used if you plan to call the number and need to add a prefix In the Callers List if a dial pad key is pressed when a number and or a name is displayed the cursor will automatically add the digit at the left side of the number to enable the entry of the prefix Use the following procedure to edit the Callers List Use the following illustration a...

Page 83: ...ft the handset Deleting Entries From the Callers List You can delete individual items from the Callers List or you can delete all items in the Callers List Use the following procedure to delete an individual item from the Callers List Use the following illustration as a reference 1 Press on the phone to enter the Options List 2 Select Services 3 Select Callers List 4 Press 5 and 2 to find the item...

Page 84: ...tems Downloading the Callers List to Your PC You can download the Callers List to your PC for viewing using the Aastra Web UI When you download the Callers List the phone stores the callerlist csv file to your computer in comma separated value CSV format You can use any spreadsheet application to open the file for viewing The following is an example of a Callers List in a spreadsheet application T...

Page 85: ... Aastra Web UI 1 Click on Operation Directory 2 In the Callers List field click on A File Download message displays 3 Click OK 4 Enter the location on your computer where you want to download the Callers List and click SAVE The callerslist csv file downloads to your computer 5 Use a spreadsheet application to open and view the Callers List Aastra Web UI ...

Page 86: ...ming calls can be call forwarded to voicemail or another number See CFWD Account Based Configuration on page 80 for more information about call forwarding to other numbers On the 6751i you can set DND on the phone side by configuring the account information via the Aastra Web UI at the path Basic Settings Account Configuration Once you enable DND on the phone DND displays on the idle screen The fo...

Page 87: ...figuring DND Using the IP Phone UI Use the following procedure to set DND using the IP Phone UI 1 Press on the phone to enter the Options List 2 Select DND 3 Toggle DND ON and OFF using the DOWN arrow key 4 Press Set to save the setting The change is dynamic DND applies to the phone immediately Aastra Web UI Note If you make changes to the configuration for DND via the IP Phone UI you must refresh...

Page 88: ...ng table describes the Message Waiting Indicator MWI LEDs when you enable CFWD on the IP Phone You can also enable and disable CFWD on the phone using the IP Phone UI In the IP Phone UI you set CFWD at the path Services Option List Call Forward Configuring CFWD Using the Aastra Web UI Use the following procedure to configure CFWD using the Aastra Web UI 1 Click on Basic Settings Account Configurat...

Page 89: ...y scroll to the CFWD State you want to set and press Change 6 Using the DOWN arrow key toggle the state ON or OFF as required and press Set 7 Press the DOWN arrow key to scroll to CFWD Number and press Change 8 Enter the call forward phone number for the state you are configuring and press Set 9 No Answer state If you enable the No Answer state in addition to entering a phone number you must also ...

Page 90: ...a phone number specified for the state An X indicates CFWD is disabled on the account A indicates call forward is enbabled for a state witbout a phone number specified Call Forward 1 Next Enter Call Forward 1 Screenname1 Change Done 2 Cfwd Number Done Change 1 Cfwd NoAns 1 Cfwd State Done On Change Use to view 3 No Rings Done Change No Rings 1 Next Set Cfwd Number Next Set Cfwd State On Next Set A...

Page 91: ...e main call handling and extension management features for your system can be set up as speed dials on the Keypad keys on your phone Contact your System Administrator for more information about available star code functions in your network If these have not been set up you can dial any star code commands on the 6751i phone the same way you would on a regular telephone ...

Page 92: ... phone dials the stored number and displays the entire number immediately in the LCD window allowing the call to be dialed faster DTMF playback suppression is enabled by default Disabling suppression of DTMF playback can be configured using the Aastra Web UI Configuring Suppression of DTMF Playback Use the following procedure to configure suppression of DTMF playback 1 Click on Basic Settings Pref...

Page 93: ...ncy group of tones and the other from a low frequency group If you enable the Display DTMF Digits parameter the digits you are dialing from the keypad or from a speeddial key display to the IP phone s LCD display This parameter is disabled by default no digits display when dialing You can enable the Display DTMF Digits parameter using the Aastra Web UI Configuring Display of DTMF Digits Use the fo...

Page 94: ...It then forwards the call according to the rule configured The phone can only transfer the currently active call or accept transferred calls if there is no active calls If call waiting is disabled intercom calls are treated as regular incoming calls and are rejected pre dialing with live dial pad disabled still accepts incoming calls the Incoming Call Interrupts Dialing parameter is ignored becaus...

Page 95: ...wing procedure to enable or disable Call Waiting on the IP phone 1 Click on Basic Settings Preferences General 2 Call Waiting is enabled by default If required disable the Call Waiting field by unchecking the check box 3 Click to save your settings Aastra Web UI Note Call Waiting is enabled by default ...

Page 96: ...nfigure this feature using the Aastra Web UI Configuring Call Waiting Tone Use the following procedures to configure a call waiting tone on the IP phone 1 Click on Basic Settings Preferences General 2 A call waiting tone is enabled by default If required disable the Play Call Waiting Tone field by unchecking the check box 3 Click to save your settings Aastra Web UI Note Play Call Waiting Tone is e...

Page 97: ...this feature using the Aastra Web UI Configuring Stuttered Dial Tone Use the following procedures to configure stuttered dial tone on the IP phone 1 Click on Basic Settings Preferences General 2 Stuttered dial tone is enabled by default If required disable the Stuttered Dial Tone field by unchecking the check box 3 Click to save your settings Aastra Web UI Note Stuttered Dial Tone is enabled by de...

Page 98: ... set a value for this feature in a custom XML application or in the configuration files the value you set in the Aastra Web UI overrides the Administrator s setting Setting and saving the value in the Aastra Web UI applies to the phone immediately Configuring XML Beep Support Use the following procedures to configure an XML beep on the IP phone 1 Click on Basic Settings Preferences General 2 XML B...

Page 99: ...erences General The default time is 5 seconds for each message to display before scrolling to the next message You can increase or decrease this time as required Setting and saving the value in the Aastra Web UI applies to the phone immediately Configuring Status Scroll Delay Use the following procedures to specify a status scroll delay on the IP phone 1 Click on Basic Settings Preferences General...

Page 100: ...all your dialing is never interrupted regardless of whether the Incoming Call Interrupts Dialing is enabled or disabled For Transfer and Conference the incoming calls always go to an available line other than the one you are using for dialing and the incoming call s line LED blinks The LCD still displays your dialing screen Intercom Behavior If Incoming Call Interrupts Dialing is enabled and you a...

Page 101: ...re Incoming Call Interrupts Dialing on the IP Phone 1 Click on Basic Settings Preferences General 2 Enable the Incoming Call Interrupts Dialing field by checking the check box Disable this field by unchecking the box Default is disabled 3 Click to save your settings Aastra Web UI Note Incoming Call Interrupts Dialing is disabled by default ...

Page 102: ... the user to see who is calling them You can turn off this functionality so that the phone stays focused on the connected call You can do this using the Switch Focus to Ringing Line parameter in the Aastra Web UI Configuring Switch Focus to Ringing Line Using the Aastra Web UI Use the following procedure to enable or disable the Switch Focus to Ringing Line using the Aastra Web UI 1 Click on Basic...

Page 103: ... Goodbye key hangs up the active call If you disable this feature and the phone receives another call when an active call is already present the 6751i displays 3 Ignore Answer 4 on the LCD For the 6751i you must use the Right and Left arrow keys to answer or ignore the call A User can set this parameter using only the Aastra Web UI Configuring Goodbye Key to Cancel Incoming Calls Use the following...

Page 104: ...nd incoming call Goodbye Key Cancels Incoming Call is disabled AND a second call comes in while you are on an active call press the Goodbye key to hang up on the active call so you can answer the second incoming call Goodbye Key Cancels Incoming Call is disabled AND a second call comes in while you are on an active call press the Left Arrow key to ignore the second incoming call and remain on the ...

Page 105: ...s feature If you want to unmute or hear the intercom call you disable this feature Microphone Mute is enabled by default Incoming Intercom Features in Aastra Web UI Description Microphone Mute Allows you to enable or disable the microphone on the IP phone for Intercom calls made by the originating caller Auto Answer Allows you to enable or disable the IP phone to automatically answer an Intercom c...

Page 106: ...ature When you enable the this parameter which is the default value an incoming intercom call takes precedence over any active call by placing the active call on hold and automatically answering the intercom call When you disable this parameter and there is an active call the phone treats an incoming intercom call like a normal call and plays the call warning tone Allow Barge In is enabled by defa...

Page 107: ... on the screen The last number redial feature for the Redial key is static and is not configurable Group RTP Paging Receiving End Only You can configure the phone to allow it to receive a Real Time Transport Protocol RTP stream to from pre configured multicast address es without involving SIP signaling This is called Group Paging on the IP phones You can specify up to 5 listening multicast address...

Page 108: ...this case is also based on the setting for the Allow Barge in parameter The incoming call is handled as if there were an existing call already on the phone Configuring Group RTP Paging Use the following procedure to configure RTP streaming on the receiving end for Paging applications using the Aastra Web UI 1 Click on Basic Settings Preferences Group Paging RTP Settings 2 In the Paging Listen Addr...

Page 109: ...n about LLDP MED and LLDP ELIN contact your System Administrator Configuring LLDP ELIN Use the following procedure to enable or disable LLDP ELIN using the Aastra Web UI 1 Click on Basic Settings Preferences General 2 The Use LLDP ELIN field is enabled by default If required disable this field by unchecking the check box 3 Click to save your settings Note If the phone receives location information...

Page 110: ...SCA parties in a bridge or one to one call hear an audible beep when another party has joined the call If a phone is configured for SCA bridging and it attempts to join a call but the account on the server does not have this functionality enabled an error message displays to the LCD on the phone The SCA call bridging feature is disabled by default on all phones Your Administrator can enable disabl...

Page 111: ...le N A N A Off N A Seized Solid Green None Solid Red None Progressing outgoing call Green Called Part7 Solid Red None Alerting incoming call Blinking Unselected Red N A Active Solid Green Far end Solid Red Far end Held Slow Flashing Green Far end Slow Flashing Red Far end Hold private Slow Flashing Green Far end Solid Red Far end Bridge active Solid Green Far end Solid Red Far end Bridge held Slow...

Page 112: ...trator For this feature to work you must configure voicemail on the phone that the call was initially directed to For example phones A B and C are connected to the server Your Administrator configures the server to direct calls coming into phone B which has voicemail configured to be forwarded to phone C When phone A calls phone B the server forwards the call to phone C With the Missed Call Summar...

Page 113: ...ook Depending on the configuration specified by your Administrator the Autodial functions as either a hotline or as a warmline as follows Hotline The IP phone immediately dials a preconfigured number when you lift the handset Warmline The IP phone waits for a specified amount of time after you lift the handset before dialing a preconfigured number If you do not dial a number within the time allott...

Page 114: ...trator for more information Playing a WAV File On Your Phone If enabled by your Administrator the 6751i IP Phone can play a WAV file A WAV file is an audio file format standard for storing an audio bit stream on a system in raw uncompressed format or compressed format to reduce the file size A WAV file is streamed to the phone using the HTTP protocol The WAV feature supports the following Streamin...

Page 115: ...d Intercom keys as well as the Voicemail option can be redirected to XML scripts This allows the server to provide the phone with Redial Transfer Xfer Conference Conf and Intercom Icom key features and the Voicemail option feature rather then accessing them from the phone side By default the server side keys function the same as the phone side key features Contact your System Administrator for mor...

Page 116: ... more information about this feature XML Applications and Off Hook Interaction If enabled by your Administrator the 6751i can be prevented from going into the off hook dialing state when the handset is off hook and the call ends This feature is disabled by default and must be enabled by your Administrator The disabled behavior is as follows You are in a call using the handset and the phone display...

Page 117: ...Name to be used as the Username e g username domain com A user can navigate the screen using the navigation keys arrow keys on the phone The screen provides a SUBMIT key for submission of the field information and a CANCEL key for exiting the login screen Appropriate messages display if the phone reaches a timeout while trying to connect to the server or if a Username or Password are incorrect Onc...

Page 118: ...nable this call diverting feature contact your System Administrator Call Diversion Example 1 Tim calls Mark at x400 2 Mark s phone is busy 3 Mark s phone diverts the incoming call to another destination Roger x 464 4 Tim s phone displays name and extension of where the call is being diverted to and reason for diverting the call The screen scrolls between Screen 1 and Screen 2 5 Roger s phone accep...

Page 119: ...nds The following example shows call destination information on the 6751i IP Phone If your phone does not display call destination information your System Administrator may have disabled this feature Contact your System Administrator for more information Note When both call diversion and call destination are enabled the information displays to the phone s screens in the following order Screen 1 Ca...

Page 120: ... and Setup section in the Aastra 6751i Installation Guide provided with your phone Why doesn t my phone ring Check the ring volume on your phone It may be turned down or turned off To adjust the ringer volume setting press the volume button when the phone is on hook and idle For more information refer to the Adjusting Volume section in the Aastra 6751i Installation Guide provided with your phone W...

Page 121: ...enter the current user password 3 In the New Password field enter the new user password 4 In the Password Confirm field enter the new user password again 5 Click to save your changes For information on how to access the Aastra Web UI go to the section Using the Aastra Web UI on page 13 Why does my phone display Bad Encrypted Config The IP phone displays Bad Encrypted Config because encrypted confi...

Page 122: ...ne Status and press the 4 key to select 3 Press the 2 key to scroll to the Restart Phone option Press the 4 key to confirm and restart the phone If you do not wish to restart your phone press the 3 key to cancel 1 Click on Operation Reset 2 Click 3 Click OK at the confirmation prompt IP Phone UI Note Your phone will be out of service temporarily during the restart and downloading process Aastra We...

Page 123: ...the path Operations Phone Lock on the Aastra Web UI Use the following procedure to lock an IP phone using the IP Phone UI Lock the Phone 1 Press the key and select Options List from the Menu 2 Select Phone Lock and press 4 3 Press 4 to set the phone to lock 4 Press on the phone The following message displays Phone is locked Unlock the Phone 1 Press the key and select Options List from the Menu 2 E...

Page 124: ...Phone 2 In the Lock the Phone field click The phone locks dynamically and displays the following message Phone is locked Unlock the Phone 3 Click on Operation Phone Lock 4 In the Unlock the Phone field click The phone unlocks dynamically and displays the following message Phone is unlocked Aastra Web UI ...

Page 125: ...Model 6751i IP Phone User Guide 117 Troubleshooting Solutions ...

Page 126: ......

Page 127: ...e equipment of any particular telephone company This warranty does not extend to damage to products resulting from improper installation or operation alteration accident neglect abuse misuse fire or natural causes such as storms or floods after the telephone is in your possession Aastra Telecom shall not be liable for any incidental or consequential damages including but not limited to loss damage...

Page 128: ...arge You are responsible for all shipping charges For further information and shipping instructions In North America contact our service information number 1 800 574 1611 Outside h America contact your sales representative Note Repairs to this product may be made only by the manufacturer and its authorized agents or by others who are legally authorized This restriction applies during and after the...

Page 129: ...U Lord Howe AU Tasmania AU Melbourne AU Sydney AU Broken Hill AU Brisbane AU Lindeman AU Adelaide AU Darwin AU Perth AW Aruba AZ Baku CET GST AST AST CET AST ART BST CET LHS EST EST EST CST EST EST CST CST WST AST AZT BA Sarajevo BB Barbados BE Brussels BG Sofia BM Bermuda BO La Paz BR Noronha BR Belem BR Fortaleza BR Recife BR Araguaina BR Maceio BR Sao Paulo BR Cuiaba BR Porto Velho BR Boa Vista...

Page 130: ...in DK Copenhagen DM Dominica DO Santo Domingo CET CET AST AST EE Tallinn ES Madrid ES Canary EET CET WET FI Helsinki FJ Fiji FK Stanley FO Faeroe FR Paris EET NZT FKS WET CET GB London GB Belfast GD Grenada GE Tbilisi GF Cayenne GI Gibraltar GP Guadeloupe GR Athens GS South Georgia GT Guatemala GU Guam GY Guyana GMT GMT AST GET GFT CET AST EET GST CST CST GYT HK Hong Kong HN Tegucigalpa HR Zagreb ...

Page 131: ...ST CET MUT CST CST CST CST MST MST MST PST NI Managua NL Amsterdam NO Oslo NR Nauru NU Niue NZ Auckland NZ Chatham CST CET CET NRT NUT NZS CHA OM Muscat GST PA Panama PE Lima PL Warsaw PR Puerto Rico PT Lisbon PT Madeira PT Azores PY Asuncion EST PES CET AST WET WET AZO PYS RO Bucharest RU Kaliningrad RU Moscow RU Samara RU Yekaterinburg RU Omsk RU Novosibirsk RU Krasnoyarsk RU Irkutsk RU Yakutsk ...

Page 132: ...SM San Marino SR Paramaribo SV El Salvador CET SGT CET CET CET SRT CST TR Istanbul TT Port of Spain TW Taipei EET AST CST UA Kiev US Eastern US Central US Mountain US Pacific US Alaska US Aleutian US Hawaii UY Montevideo EET EST CST MST PST AKS HAS HST UYS VA Vatican CET YU Belgrade CET Time Zone Name Time Zone Code ...

Page 133: ...onference calls making 58 conference key 50 conferencing ending 59 transfer remaining parties 59 conferencing server side 58 contrast level 23 D date format 24 daylight savings time DST 26 dial plan emergency 41 dial tones stuttered 89 dialing a number 51 dialpad live 23 Directory List downloading to phone 71 directory list 61 downloading to PC 71 sorting 62 diverting calls 111 DND enabling disabl...

Page 134: ...ng in the phone 3 R redial 52 requirements 6751i 2 restarting the phone 39 ring tone sets 21 ring tones 20 RTP paging group 99 S speakerphone using 51 speeddial keys creating 43 prefix 43 speeddial key creating from phone keypad 43 speeddial keys editing 47 star codes 83 starting up the phone 3 status scroll delay 91 swapping calls 60 switch UI focus to ringing line 94 T time and date 24 time form...

Page 135: ...Model 6751i IP Phone User Guide Index 3 Index X XML beep support 90 XML features 108 109 ...

Page 136: ......

Page 137: ......

Page 138: ...lawful use While every effort has been made to ensure accuracy Aastra Telecom will not be liable for technical or editorial errors or omissions contained within this documentation The information contained in this documentation is subject to change without notice Copyright 2008 Aastra Telecom www aastra com All Rights Reserved ...

Reviews: