background image

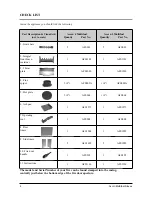
Inside the appliance you should find the following:

6

Acorn Multifuel Stoves

CHECK LIST

Part Description & Visual Aid

(not to scale)

Acorn 4 Multifuel

Quanity

Part No.

1. Grate bars

5

2. Integral
front brace/
reatainer

1

3. Throat
plate

1

4. Flue 
spigot

1(4”)

5. Hot plate

1(4”)

6. Ash pan

1

7.Operating
tool

1

8. Rear 
liners

1

9. Side liners

2

10. Fire door
handle

1

11. Instructions

1

The model and Serial Number of your fire can be found stamped into the casing,
centrally just below the bottom edge of the fire door aperture.

Acorn 5 Multifuel

Quantity

Part No.

5

1

1

1(4”)

1(4”)

1

1

1

2

1

1

AFS001

AFS1101

AFS1086

AFS064

AFS1094

AFS008

AFS1273

AFS009A

AFS1092

AFS205

AFS1126

AFS001

AFS1101

AFS1018

AFS064

AFS1059

AFS008

AFS1273

AFS009A

AFS1058

AFS205

AFS1126

Summary of Contents for Tf 70

Page 1: ...t Britain Tel 44 01308 427234 Fax 44 01308 423441 www aarrowfires com Acorn Multifuel Stoves Operating Installation Manual PLEASE RETAIN THESE INSTRUCTIONS FOR FUTURE REFERENCE The Acorn 4 Multifuel S...

Page 2: ...y we are so confident in the reliability of our product that we offer a 3 year guarantee Should you have any questions about our Acorn Stoves that are not covered in this manual please contact the Aar...

Page 3: ...g the Multifuel Grate 10 Flues Chimneys 11 14 Add in Boilers 15 16 OPERATING INSTRUCTIONS Page AirInlet Controls 16 17 Airwash System 16 17 Multi Purpose Operating Tool 17 Fire Door Glass 17 18 Adjust...

Page 4: ...BE BURNED IN THIS APPLIANCE TO USE THESE FUELS WILL INVALIDATE THE APPLIANCE GUARANTEE IF IN DOUBT CONTACT THE SOLID FUEL ASSOCIATION TELEPHONE NUMBER 0800 600 000 www solidfuel co uk THE USE OF SPAR...

Page 5: ...not properly installed and operated a house fire may result installation must comply with the Building Regulations and conform to all relevant fire safety standards Aarrow produce a variety of applian...

Page 6: ...pan 1 7 Operating tool 1 8 Rear liners 1 9 Side liners 2 10 Fire door handle 1 11 Instructions 1 The model and Serial Number of your fire can be found stamped into the casing centrally just below the...

Page 7: ...estic Hot Water with add in boiler type Type 7 Max Output to Room kW Max Output to Water kW 3 1 5 Height mm 458 Width mm 355 Depth mm 350 Height to Centre of Rear Flue 360 Depth from Back to Centre of...

Page 8: ...should be installed to stand on a constructional hearth of non combustible materials not less than 125mm 5 thick conforming to Building Regulations Dimensions of the hearth should project at least 30...

Page 9: ...plate and grate in the Acorn REMOVAL OF THE THROAT PLATE Blocked chimneys cause dangerous fumes to escape Remove the throat plate at least monthly to clean Keep chimney and flue ways clear FITTING THE...

Page 10: ...ring end marked L onto the low section of the comb The upper bar is fitted in a similar manner but with the end marked L inserted in the rear channel and the end marked H seated on the high section of...

Page 11: ...he flue size suits the stove The termination of the outlet at the top of the flue also needs to comply with the Building Regulations The minimum effective height of the flue must be at least 4 5 metre...

Page 12: ...Notice Plate giving details on the chimney flue lining hearth and fireplace installation Approved Document J of the Building Regulations for England and Wales is available from The Stationery Booksho...

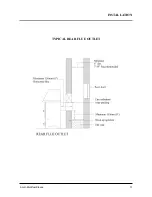
Page 13: ...Acorn Multifuel Stoves 13 INSTALLATION TYPICAL REAR FLUE OUTLET...

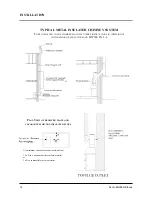
Page 14: ...THE CHIMNEY MANUFACTURERS INSTRUCTIONS IN COMPLIANCE WITH BUILDING REGULATIONS AND BS7566 PTS 1 4 PLAN VIEW OF REGISTER PLATE AND CLEARANCES FOR NON INSULATED FLUES A is minimum clearance for non insu...

Page 15: ...n in an area with soft water If radiators are used then an indirect system must be utilised To connect the cylinder use 28mm copper pipes Ensure that the pipes rise continuously to the cylinder Ensure...

Page 16: ...tains becoming burnt on Check the flue draught which should read 1 2mm or 0 1 0 2mbar The following details must be checked and completed in full by the installer at the time of installation Please an...

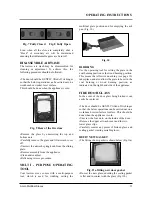
Page 17: ...g the multifuel grate position and for emptying the ash pan Fig 10 Fig 10 RIDDLING Use the operating tool for setting the grate in the coal burning position or the wood burning position This means tha...

Page 18: ...e case of hard wood We recommend that for general burning wood should be split into logs of no more than 130mm 5 diameter Larger logs can be used for overnight burning WARNING wet wood must not be use...

Page 19: ...closed Set the air wash to one quarter open position Set the primary inlet to the fully open position Light in the normal manner with paper and kindling or use a fire lighter If using a gas poker be s...

Page 20: ...e taken not to risk burning of hands or household objects from falling embers DE ASHING It is necessary to maintain an ash layer on the upper surface of the grate bars in order to protect them so de a...

Page 21: ...It is important that the flue ways flue pipe and chimney be cleaned prior to lighting the fire after a prolonged shut down period DOOR GLASS The door glass should remain clear during normal daytimebu...

Page 22: ...appliances only c If clay or concrete flue liners used confirm that they are correctly jointed with socket end uppermost and state jointing materials used d If an existing chimney has been refurbished...

Page 23: ...ainer AFS1101 AFS1086 AFS001 AFS064 AFS008 AFS1273 AFS009A 2 Throat Plate 3 Grate Bar 4 Hot Plate 5 Operating Tool 6 Ashpan 7 Flue Spigot Part Description Visual Aid not to scale Acorn 4 Part No AFS11...

Page 24: ...047 AFS1097 9 Side Liner 10 Back Liner Set 11 Glass Replacement Kit Complete with Gasket 12 Glass Clips 13 Hinge kit Comprises 2 Hinges 4 Fixings Per Set 14 Airwash Part Description Visual Aid not to...

Page 25: ...te with Handle Glass Gaskets Clips and Seal 17 Comb with Extension 18 Fire Door Locking Assembly Including Fire Door Handle 20 Aarrow Fires Gauntlet Gloves Part Description Visual Aid not to scale Aco...

Page 26: ...engineer The Manufacturers decision shall be final If your appliance proves to be defective as a result of faulty materials or workmanship during guarantee we will repair or replace it FREE OF CHARGE...

Page 27: ...s manual please contact your Aarrow retailer Please keep all repair receipts safely Please ensure you have this manual available when an engineer visits as they will complete the service record chart...

Page 28: ...G INSTRUCTIONS Model Serial No I ve checked it and it s O K Assembled by Checked by Date of Purchase Name and address of supplier Please ensure installer completes INSTALLATION CHECK LIST details on p...

Reviews: