background image

Beat syncing: advanced re-mix techniques

This patch idea is a powerful way to sync your modular system with an external audio source-- whether it's a pre-recorded 
track or a feed from other instruments being played live. The basic idea is to convert different frequency bands into trigger 
outputs, with the rhythm of the triggers matching the rhythm of the original audio's instrumentation.
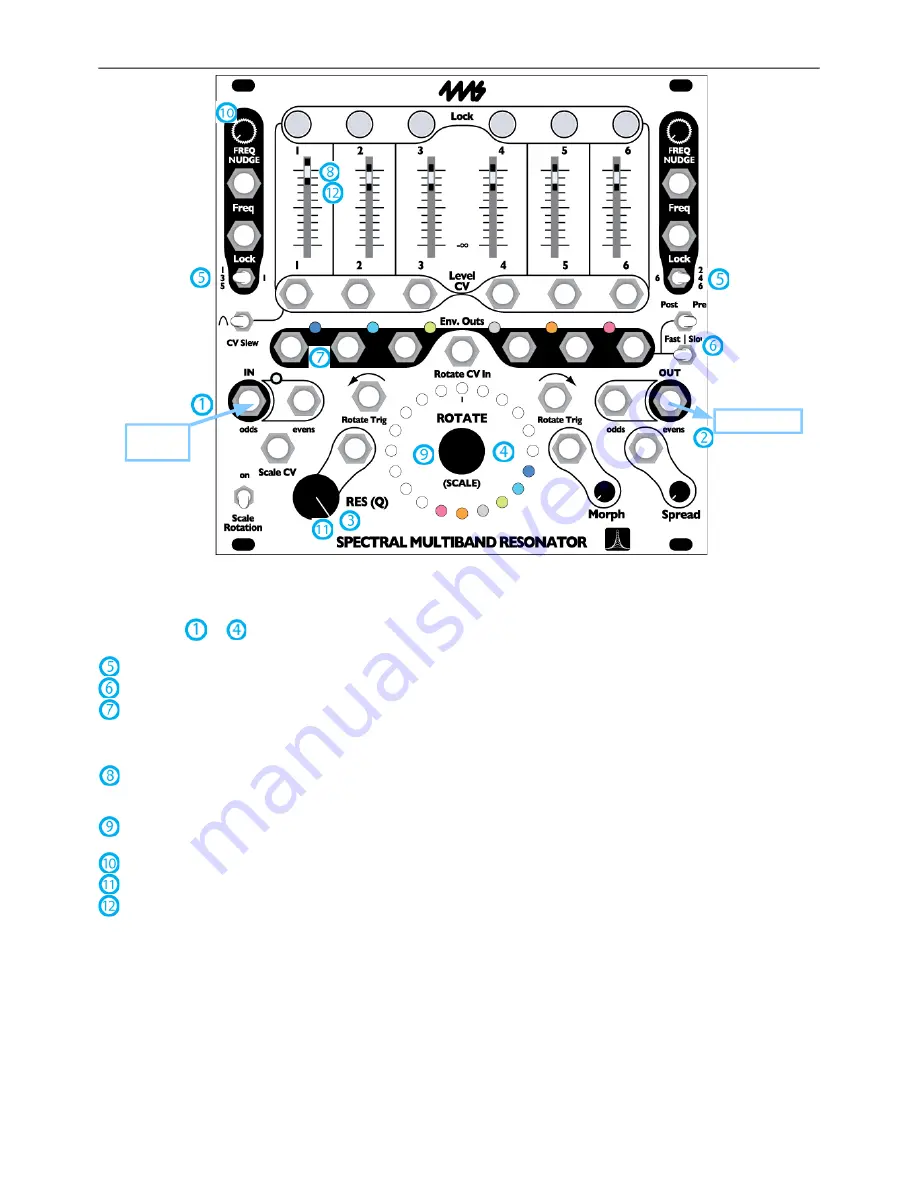
Start with step 

 to 

of the Re-mix patch on the previous page (patch audio inputs and outputs, turn down RES [Q] and 

select the EQ bank).

 Set the 135 | 1 switch to 135, and the 246 | 2 switch to 246.
 Set Fast | Slow to the center position (triggers), and set Post | Pre to Post. Set Scale Rotation down.
 Let's say you have a dance track with a kick, snare, hi-hat, and some melody lines happening. You can use the SMR to 

convert each kick drum hit into a trigger output, which you can use to trigger your own kick drum (or clock your master clock, 
or trigger anything on the modular). Start by patching the ENV OUT jack for channel 1 into something that makes sound when 
triggered.

 Turn down all the sliders and bring up the slider for channel 1 to around 50%. Listen to the SMR's output as well as the 

externally triggered module. You might want to monitor the input audio, too (use a mult or splitter before the SMR).
There are four parameters to play with to get beat-synced trigger outputs: Rotation, Freq Nudge, Q, and Level (steps 9-12):

 Turn ROTATE so that channel 1 is triggering the external module whenever the kick drum hits. Probably for a typical kick 

drum, channel 1 should be on the 2

nd

, 3

rd

, or 4

th

 note (it depends on the pitch of the kick you're trying to tune into).

 Set Freq nudge to dial in a frequency in between two rotation spots.
 Turn Q up to narrow the band. Around 50% is a good place to start for syncing to drum sounds.
 Set the Level slider to set the threshold at which the trigger fires. If you set it too high, the Env Out light will stay on, and it 

it's too low it'll stay off. If the slider seems to have no effect, double-check Post | Pre is set to Post.

When you get a good lock, press and hold the lock button while you wiggle the Q knob, the release. Press the Lock button 
again. Now the channel should be locked and Q-locked. Its Lock button will be on with a quick periodic flicker off.
Repeat 9-12 for the next channel, perhaps do the snare or a hi-hat next. Make sure the channel is locked before you move to 
a new channel, or else you'll lose your settings.
Advanced: Use an external CV source (try a SISM) into the Level CV jack with the slider all the way up. This way you can 
mute/unmute a channel using the slider and not lose your level setting (since it's set on the SISM).
When you like what you hear, save your settings. Hold the ROTATE button down for 5 seconds until the Lock buttons flash 
and an animation appears on the slider LEDs. Release the ROTATE button. If you want, you can spin the ROTATE knob to 
choose a new color scheme for these settings. Each Lock button represents a Settings Slot (1-6). If you wanted to load a slot 
you could tap any of the Lock buttons. But in this case we want to save our settings, so press and hold any Lock button for 2 
seconds. The SMR will pause for a fraction of a second while it saves all the settings into that slot. The next time you power 
on the SMR, these settings will be loaded automatically.

7

Audio 

track

TO MIXER

Summary of Contents for Spectral Multiband Resonator

Page 1: ...ts outputs and a host of unique features allows for many uses Create beautiful moving chord structures quantized to selectable scales Process audio like a classic filter bank EQ Pluck ping strike to ring like a marimba gong or membrane Beat sync to an audio track triggering modular sounds in sync with original audio Vocode outputting spectral data to a second SMR Re mix tracks Harmonize to audio Q...

Page 2: ...v Out LEDs Brightness of each light shows level of each filter Resonance Q Res Q CV jack 0 to 5V Knob offsets CV jack Stereo input and output divided into even odd bands Odd input jack and Even output jack serve as Mono in out Clipping LED between IN jacks flickers when input is clipping about 20Vpp or 10V Rotation shifts frequency pattern up or down Rotate Clockwise trigger input 2V threshold Rot...

Page 3: ...xponential decay and different timbral qualities when plucked Freq jacks no longer track 1V oct in this mode Slider LEDs can be selected to display clipping and level or just level Firmware can be updated by playing encoded audio files from a computer into the SMR Specifications 26 HP Eurorack format module 16 to 16pin eurorack power cable included 0 95 24mm maximum depth Power consumption 12V rai...

Page 4: ...tating and pushing different sliders up and down you can make different chords Play with Morph as you continue to turn the ROTATE knob Morph sets the speed at which rotation happens With Morph at 100 when you turn the ROTATE knob the SMR will slowly fade from one position to the next With Morph at 0 the SMR will instantly jump from one position to the next Play with Spread which controls the numbe...

Page 5: ...the sliders to adjust the level of each note Input another trigger source into Rotate Trig or Rotate Trig If you don t have another trigger source you could input an LFO or envelope 0 to 5V into Rotate CV In and the rotation will track the waveshape of the incoming CV Play with slowing down the rotation from the external triggers by turning up Morph Try setting the rotation trigger source super fa...

Page 6: ...hile holding down the Lock button The Lock button will be lit if the channel is locked and also flicker if it s Q locked If you don t lock the Q then the channel s resonance will be controlled by the RES Q knob and jack along with all the other channels with unlocked Q Repeat this process steps 5 7 for channels 2 6 Note that for channels 2 4 and 6 the Freq Nudge knob on the right is used while for...

Page 7: ...e it depends on the pitch of the kick you re trying to tune into Set Freq nudge to dial in a frequency in between two rotation spots Turn Q up to narrow the band Around 50 is a good place to start for syncing to drum sounds Set the Level slider to set the threshold at which the trigger fires If you set it too high the Env Out light will stay on and it it s too low it ll stay off If the slider seem...

Page 8: ...hnique outlined in the Re mix patches setting the note scale bank and resonance of each channel on both SMRs Usage Channels Six resonant filters The core of the SMR is six resonant band pass filters The six channels take their inputs from the audio IN jacks and their outputs are mixed together using the sliders and Level CV jacks The mix is then fed to the audio OUT jacks The audio IN jacks are no...

Page 9: ...ency for instance with a stereo input where you want the same filtering to happen to both left and right you can rotate them to adjacent spots on the light ring and turn Freq Nudge all the way up for the lower channel Alternatively you can program a custom scale with duplicate frequencies Freq Nudge knobs There are two Freq Nudge knobs one for the odd channels and one for the even channels A switc...

Page 10: ...uency of any of the channels that channel will ring and continue ring for a bit after the VCO has left that frequency When the resonance is low the six channels act more like band pass filters Each slider controls the volume of that band If the bands are spaced evenly across the range of human hearing then the SMR will function like a graphic EQ If the bands are rotated or swept up and down in fre...

Page 11: ...tive in the range of 0V to 5V so each rotation step has a window of 0 25V Applying 0 25V will cause the channels to rotate one step clockwise Dropping back to 0V will cause them to rotate back one step counter clockwise Applying 1 0V will result in the channels morphing four positions clockwise Dropping from 1 0V to 0 75V will cause them to rotate back one step This kind of rotation is different t...

Page 12: ...If you unlock that channel it will keep the same bank but when you change the bank again it will join the same bank as the rest of the unlocked channels Scale CV The scale can be changed via CV using the Scale CV jack Voltages in the range of 0 to 5V are accepted Since there are 11 scales in each bank a voltage increase of 0 45V causes all unlocked channels to move to the next scale Likewise a vol...

Page 13: ... the selected channels to invert their lock state Thus locked channels will unlock and unlocked channels will lock Q lock Q locking is an advanced feature that locks the channel s Q or resonance setting To Q lock a channel hold the Lock button down while you turn the RES Q knob When the RES Q knob is where you want the channel to be locked release the Lock button The Lock button will now flicker t...

Page 14: ...er LEDs do a sequential animation and the light ring slowly filling up with lights and then clearing then filling up again Do not interrupt the process You can monitor the audio by listening to the evens Lock jack or the audio OUT jacks 5 If at any time two of the Lock lights turn on channels 2 and 3 or channels 2 and 4 and the other lights stop animating then an error has occurred Verify the cabl...

Page 15: ...mount of red the second slider controls the amount of green and the third slider controls the amount of blue Billions of colors can be chosen with these three sliders When you find a color you like lock the channel and unlock the next channel you want to edit You also can edit multiple channels at once by unlocking them all while adjusting the sliders This is a quick way to set all the channels to...

Page 16: ...ntains intervals selected from Wendy Carlos s non octave repeating Gamma scale spanning roughly 20Hz to 20kHz 6 17 note per octave yellow The first scale starts at 13 75Hz and each note is equally tempered to a 17 note octave Each scale is one octave above the previous 7 Chromatic purple The first scale starts at E2 82 4Hz and each note is one semi tone above the previous Each scale spans an octav...

Reviews: