


P a g e
|
2
Innovated by
1.
As soon as you access the IP address the first page that you can see is the GreenBox Wizard. This Wizard will guide you to
setup GreenBox ensuring its correct operation. If you feel at any point of the setup to cancel or postpone the setup, you can
do so by clicking on the shutdown button.
Record the administrator password in a safe place
. Recovering a lost administra-
tor password is not a simple process.
2.
When you complete the setup from the wizard then the system will reboot applying the new settings; it could take up to 2
minutes for the GreenBox unit to boot up for the first time.
3.
Load a web browser on your PC, and in the address bar, type “http:// [GreenBox IP Address]:8092” (be sure to include the
“http://”) and press “Enter”.
4.
You should see the GreenBox login screen. Mozilla Firefox is the recommended browser required to access the GreenBox
unit. If you do not have it installed, please download this free browser first.
5.
If you still do not see a login screen after 5 minutes then check your network settings and the address in the browsers ad-
dress bar.
6.
Log in to the GreenBox unit with the username and password you have set
on the Wizard.
7.
When loading the system for the first time with a new gateway it can take
up to 3 minutes for the Gateway to be setup and appear as connected on
the interface.
8.
You are now set to add devices and data points and build your ZB Connec-
tion network before initiating the remote services (See technical user man-
ual for more information).
Getting Started
Adding Device
1.
Ensure the device to be joined is powered up and ready to be added to the GreenBox. If the device required hard addressing
then ensure the address which is set is unique. Please refer to the Add Device/Sensor section
in the User Manual. Also refer to the Device user guides.
2.
From the “Devices” tab on the left pane, right click on the “Gateway”, click “Add
Device/Sensor” button.
3.
The Add device dialogue appears, select the appropriate device product code from the drop
down list. Enter the name and its unique Modbus address. Click the “Submit” button and
wait until the device appears in the list. You may need to stimulate the ZB-Connection device
(See Technical User guide and device user guides for more details)
Adding a Data Point
1.
Click on a device node on the Devices tree or occupancy map, the ModBus register details of
the device will appear. From the details screen of the device, right click on a register row of
the desired point you wish to add as a data point.
2.
Select “Add Data Points” from the context menu.
3.
A dialog will be displayed. Enter the details for the new
data point and click the “Submit” button. The data
point will now appear in the “Data Points” tab under
the “Gateway” folder.
4.
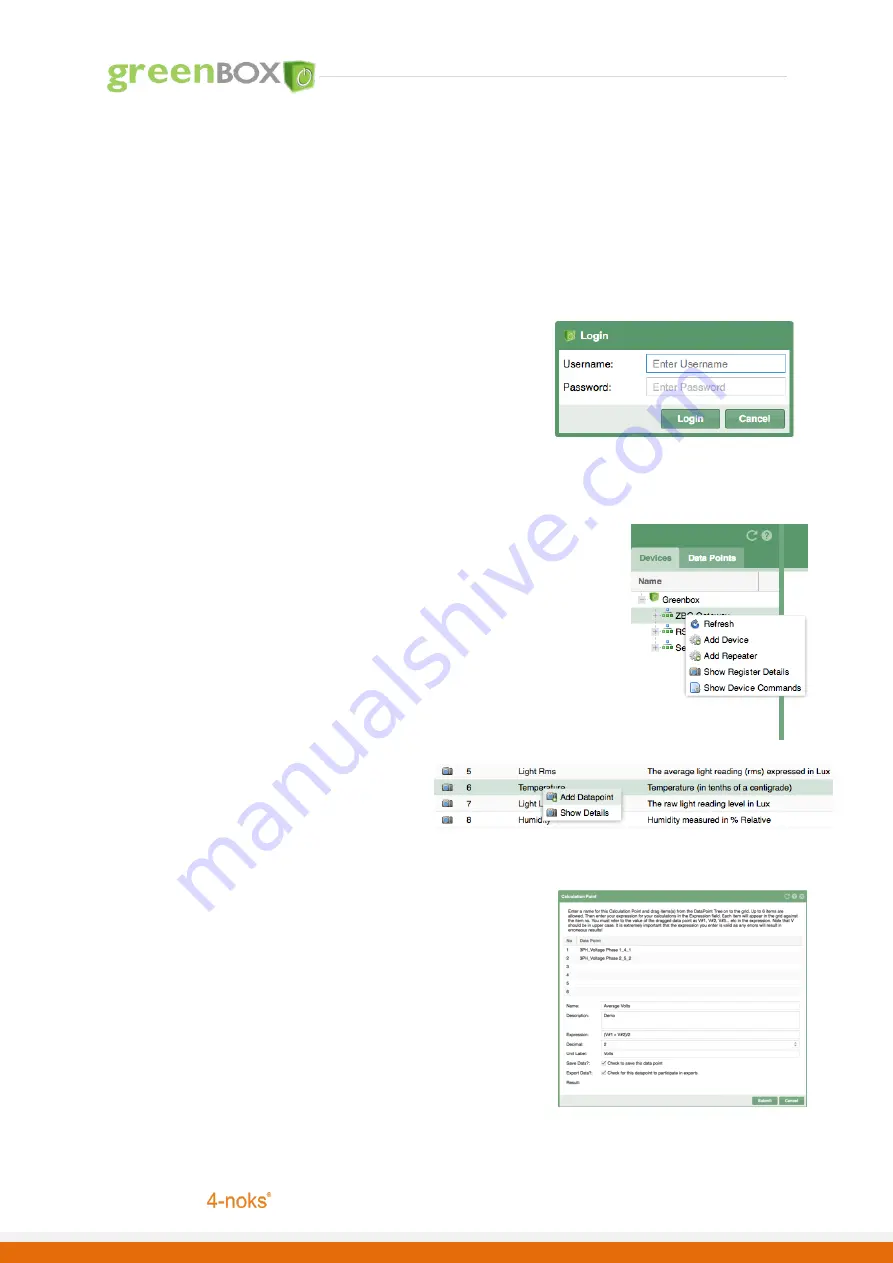
Creating a Calculation point – whilst in the “Data
Points” tab, right click on the Device folder and select “Add Calculation Point”. A Calculation Point dialog will be displayed.
With your mouse, select a data point from the Data Points tree and drag it into the first empty row in the grid on the
Calculation Point dialog and release the mouse. You may repeat this for other data points if required (up to 6 data points
allowed). E.g. To calculate average temperature. Complete the rest of the
fields in the dialogue and pay attention to the “Expression” field. Here you will
enter the calculation expression comprising of the dragged data points. The
first one is referred to “V#1”, the second as “V#2” and so on. If for example
you dragged 6 temperature points and require an average value then the
expression would be “(V#1 + V#2 + V#3 + V#4 + V#5 + V#6) / 6”. (Please note
that the ‘V’ in the expression is upper case). When you have completed the
fields, click the “Submit” button. The Calculation point will now appear in the
Points tab under the devices folder.
You must ensure that the expression is
valid; otherwise it will produce erroneous results.
On the calculation dialog
click on the refresh icon to see the result before you use the point any further.
Data points are registers elevated directly from the device, Calculation points
comprise of Data point(s) and expressions to change the value. Both points can
be saved and logged in the GreenBox. (See Technical User guide for more
details)


