3xLogic VX-2S-OP-30X Quick Start Manual Download Page 1


VISIX SOLUTIONS | VX-2S-OP-30X QUICK START GUIDE | p.1 

1


VX-2S-OP-30X - Camera Information 

1.1


VX-2S-OP-30X Speed Dome PTZ Camera Overview 

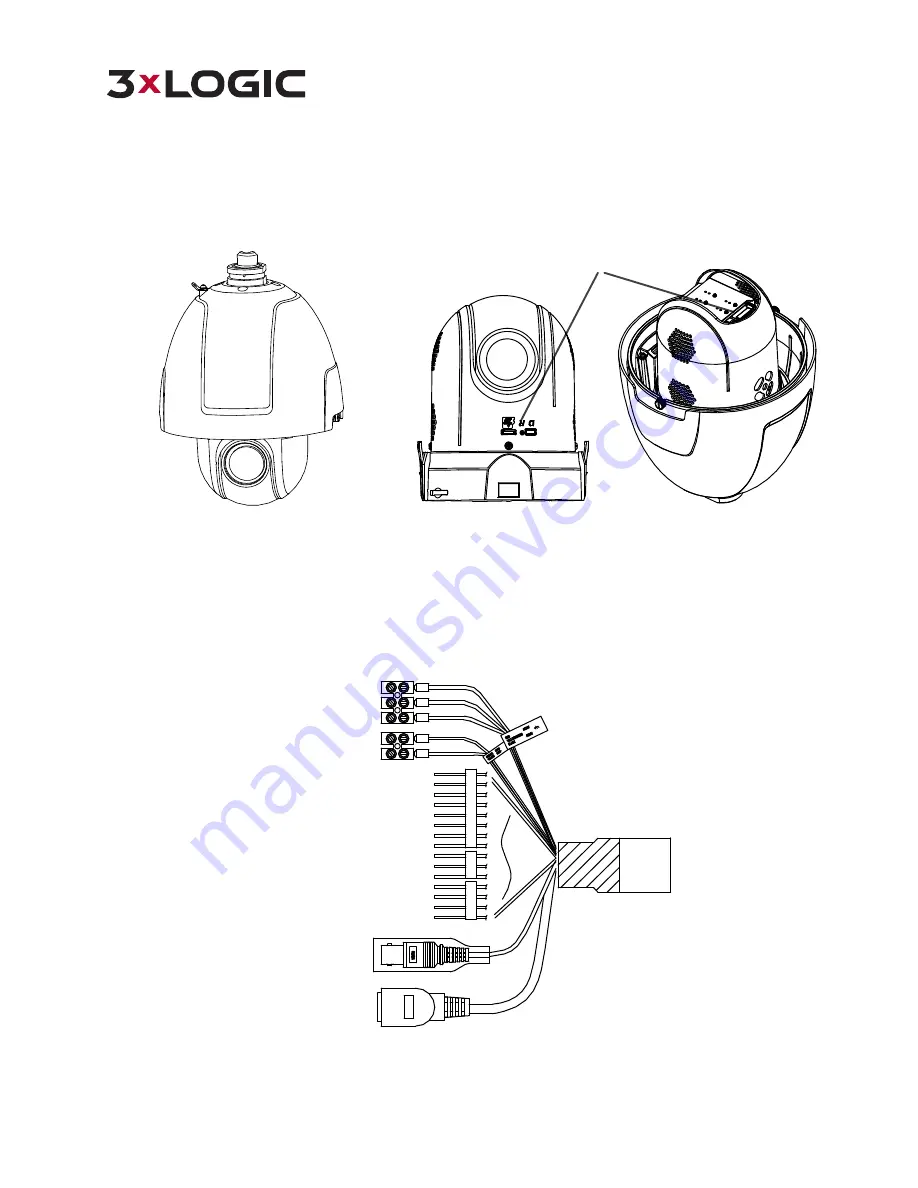
The figures below are for reference only.  


Figure 1-1


Overview - VX-2S-OP-30X


Memory Card Slot


Figure 1-2


Input/Outputs 


1.2


VX-2S-OP-30X  - Cable Interfaces 

The cabling harness of the PTZ speed dome is shown in Figure 1-3. The cables are identified by different colors. Refer 
to the labels attached on the cables for identification.


NOTE:  


n


Make certain the speed dome is powered off before you connect the cables. 
 

Network Cable

Audio Cable

Alarm Cable

Video Cable

RS-485 Cable

Power Cord


Figure 1-3


Cable Interfaces 

Camera Inputs / Outputs 

Summary of Contents for VX-2S-OP-30X

Page 1: ...1 2 Input Outputs 1 2 VX 2S OP 30X Cable Interfaces The cabling harness of the PTZ speed dome is shown in Figure 1 3 The cables are identified by different colors Refer to the labels attached on the...

Page 2: ...1 3 VX 2S OP 30X Alarm Output Diagram Alarm output is shown in Figure 1 4 Relay Output OUT n DC OUT n Direct load Relay Output OUT n OUT n DC 30V 1A Power Supply GND Output 220V AC FireWire Zero Line...

Page 3: ...y of personnel and equipment all the installation steps should be completed with power supply off n Do not lift or drag the speed dome by its cables otherwise the performance of the unit s weatherproo...

Page 4: ...adapter is required if any other bracket is selected The dimension of pendant adapter is G1 1 2 Steps 1 Loosen the two lock screws on both sides of the speed dome NOTE Only loosen the screws Do not re...

Page 5: ...Hi PoE module 4 Install the memory card optional 5 Align the cuts on the bubble with the lock screws on the back box to reinstall the bubble Tighten the lock screws 6 Install the bracket 1 Drill four...

Page 6: ...e two lock screws on the bracket 5 Fasten the speed dome to the bracket Rotate the speed dome clockwise tightly 6 Secure the two lock screws with the wrench Lock Screw Lock Screw Figure 2 11 Install t...

Page 7: ...OUNT COMPONENTS n Wall Mount VX WM PTZ You can use the wall mount with the corner adapter or pole adapter according to the needs of the installation environment Figure 2 12 Wall Mount n Corner Adapter...

Page 8: ...ull the cables through the center hole of the corner adapter 3 Attach the corner adapter to the corner by aligning the 4 screw holes of the corner adapter with expansion screws on the corner 4 Secure...

Page 9: ...f installation measures The short arm wall mount is not recommended for outdoor applications 2 4 Pole Mounting This mount and adapter must be purchased separately 3xLOGIC Part Number VX WM PTZ Wall Mo...

Page 10: ...he diameter of the pole adapter Figure 2 18 Stainless Steel Hoops n Mounting Accessories Figure 2 19 Hex Screws M8 30 and Spring Washers 1 1 2 POLE MOUNT INSTALLATION Before you start The pole mountin...

Page 11: ...Install the pole adapter 1 Pull the cables through the center hole 2 Secure the three stainless steel hoops to the pole and tighten the screws of the hoops with a screwdriver Figure 2 21 Install the...

Page 12: ...unting n The height of the space above the ceiling must be more than 250mm n The thickness of the ceiling must range from 5 to 40mm n The ceiling must be strong enough to withstand more than 4 times t...

Page 13: ...nit mm Figure 2 24 Drill a Hole on the Ceiling 6 Connect the cables 7 Install the speed dome to the ceiling 1 Loosen the two lock screws on both sides of the back box and position the locks internally...

Page 14: ...ngs The following are mandatory preconditions for ceiling mounting n The thickness of the ceiling must range from 5mm to 40mm n The ceiling must be strong enough to withstand more than 4 times the wei...

Page 15: ...VX 2S OP 30X QUICK START GUIDE p 15 Figure 2 28 Remove the Screws 2 Remove the in ceiling mount Figure 2 29 Remove the Mount 3 Install 4 bolts to the screw holes as shown in Figure 2 30 Figure 2 30 In...

Page 16: ...box it is required to drill a cable hole in the ceiling Figure 2 31 Cabling for Ceiling Mounting 2 6 4 CEILING MOUNT INSTALLATION Steps 1 The ceiling mounting speed dome is installed with an in ceili...

Page 17: ...quired to drill a cable hole in the ceiling Figure 2 35 Cabling for Ceiling Mounting 3 Install the speed dome 1 Rotate the bubble counterclockwise to separate it from the back box 2 Remove the protect...

Page 18: ...ion of the arrow with the spring end of the mounting base 9 Push the speed dome upwards and then forwards in the direction of the arrow When the speed dome is placed in position the spring will automa...

Page 19: ...ntify and change the IP address of the camera Finally use the utility to add the camera to a VIGIL Server system Connect the speed dome to the network per the following figures Network Cable Network S...

Page 20: ...ra VISIX IP Setup Utility 3 Select the camera from the list of online devices 4 If you are configuring the camera for initial setup click Activate to assign a new password This step is required for se...

Page 21: ...e IP Address You can now enter the IP address of network camera in the address field of a web browser to access the camera s web UI For more details proceed to Section 4 1 Error Reference source not f...

Page 22: ...Tab and clicking the Web Settings button 3 Input the user name and password and click Login NOTE The username password for the camera will have been configured during camera activation If the camera h...

Page 23: ...loy If the form does not deploy automatically click the Network Camera Settings button 5 Click the Detect Cameras button located next to the Type field The 3xLOGIC Camera Setup Utility will deploy and...

Page 24: ...amera Settings form toggle the Camera Control checkbox 10 Click OK to on the Network Camera Settings form then click Apply on the VIGIL Server Settings window to save the new settings The camera will...

Page 25: ...ease reference the VIGIL Client User Guide or Quick Guide for more information on adding a VIGIL Server Steps 1 Launch VIGIL Client and connect to the camera s host VIGIL Server 2 Open the VIGIL Serve...

Page 26: ...7 3xLOGIC www 3xlogic com 2017 3xLOGIC Inc All rights reserved Information in this document is subject to change without notice 3xLOGIC and the 3xLOGIC logo are trademarks of 3xLOGIC Inc all other tra...

Reviews: