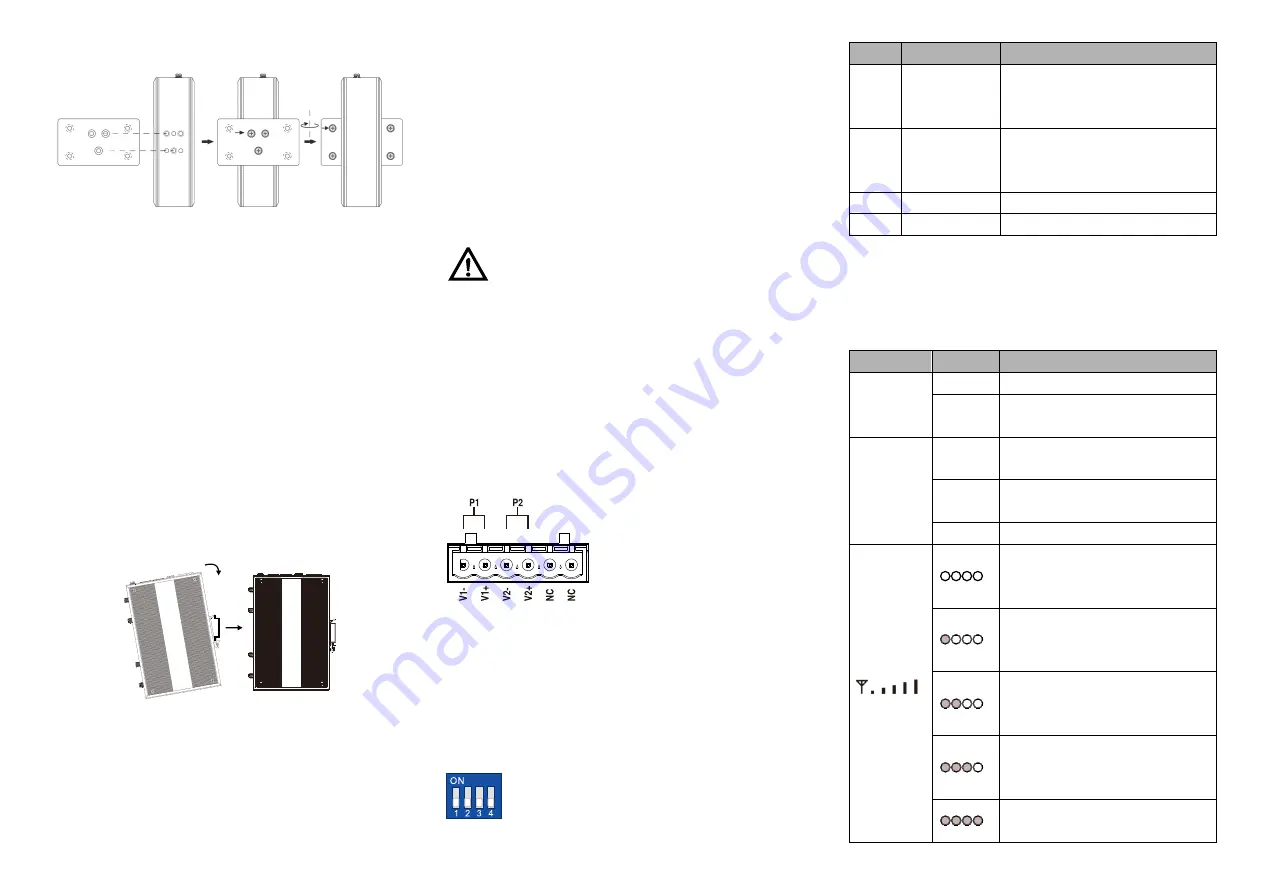
device backboard.
Step 2
Place the device on the wall as reference or
reference installation dimension; mark 4 bolt
positions on the wall.
Step 3
Attach the equipment to the marked wall and
tighten it with M4 screws to the marked position.
Mounting ends.
【
Disassembling Device
】
Step 1
Device power off.
Step 2
Hold the equipment steady and unscrew the screw
on the wall
Step 3
Take out the device, disassembling ends.
【
DIN-Rail Mounting
】
The product adopts 35mm standard DIN-Rail mounting which
is suitable for most industrial scenes, mounting steps as
follows:
Step 1
Check whether the DIN-Rail mounting kit that
comes with the device is installed firmly.
Step 2
Insert the bottom of DIN-Rail mounting kit (one side
with spring support) into DIN-Rail, and then insert
the top into DIN-Rail.
Tips:
Insert a little to the bottom, lift upward and then
insert to the top.
Step 3
Check and confirm the product is firmly installed on
DIN-Rail, then mounting ends.
【
Disassembling DIN-Rail
】
Step 1
Device power off.
Step 2
After lift the device upward slightly, first shift out the
top of DIN-Rail mounting kit, and then shift out the
bottom of DIN-Rail, disassembling ends.
Note before powering on:
Power ON operation: First insert the power supply
terminal block into the device power supply interface,
and then plug the power supply plug contact and power
on.
Power OFF operation: First, remove the power plug,
and then remove the wiring section of terminal block.
Please pay attention to the above operation sequence.
【
Power Supply Connection
】
DC power supply
The device provides 6-pin 5.08mm
pitch power supply input terminal
blocks, among which power supply
occupies the left 4 pins (the right 2
pins are reserved) Supports P1 and
P2 two independent DC power
supply systems, when one of the power supplies fails, it could
switch to another one immediately to ensure the device power
supply is not interrupted. Power supply supports non-polarity
and anti-reverse connection. Voltage range: 12~48VDC.
48VDC POE power supply input
The WAN port of this device supports POE power receiving.
【
DIP Switch Settings
】
The device provides 4 pins DIP switch for function
setting, in which “ON” is the enabled end. DIP
switches definition as follows:
DIP
Definition
operation
1
Restore
factory
defaults
Set the switch to ON and power
on the device again, then set it
back after one minute.
2
Reboot
The device will restart
immediately after setting the DIP
to ON
3
Reserved
-
4
Reserved
-
【
Checking LED Indicator
】
The device provides LED indicators to monitor the device
working status with a comprehensive simplified
troubleshooting; the function of each LED is described in the
table as below:
LED
Indicate Description
2.4G/5G
ON
WIFI is running normally
OFF
WIFI is running abnormally or
closed
RUN
ON
The device is powered on or the
device is abnormal.
OFF
The device is powered off or the
device is abnormal.
Blinking The device is running normally
All indicators are off, which
means the WLAN signal at the
opposite end is weak or no signal
Only one indicator is on, which
means the WLAN signal at the
opposite end is weak
Two indicators are on, which
means the WLAN signal at the
opposite end is normal
Three indicators are on, which
means the WLAN signal at the
opposite end is relatively strong
All indicators are on, which
means the WLAN signal at the


