background image

3M™ Wireless Communication System Model XT-1 

Store Manager Operating Instructions

November 2011 -

 Revision 1.8

Page 37 of 65

Troubleshooting

Troubleshooting 

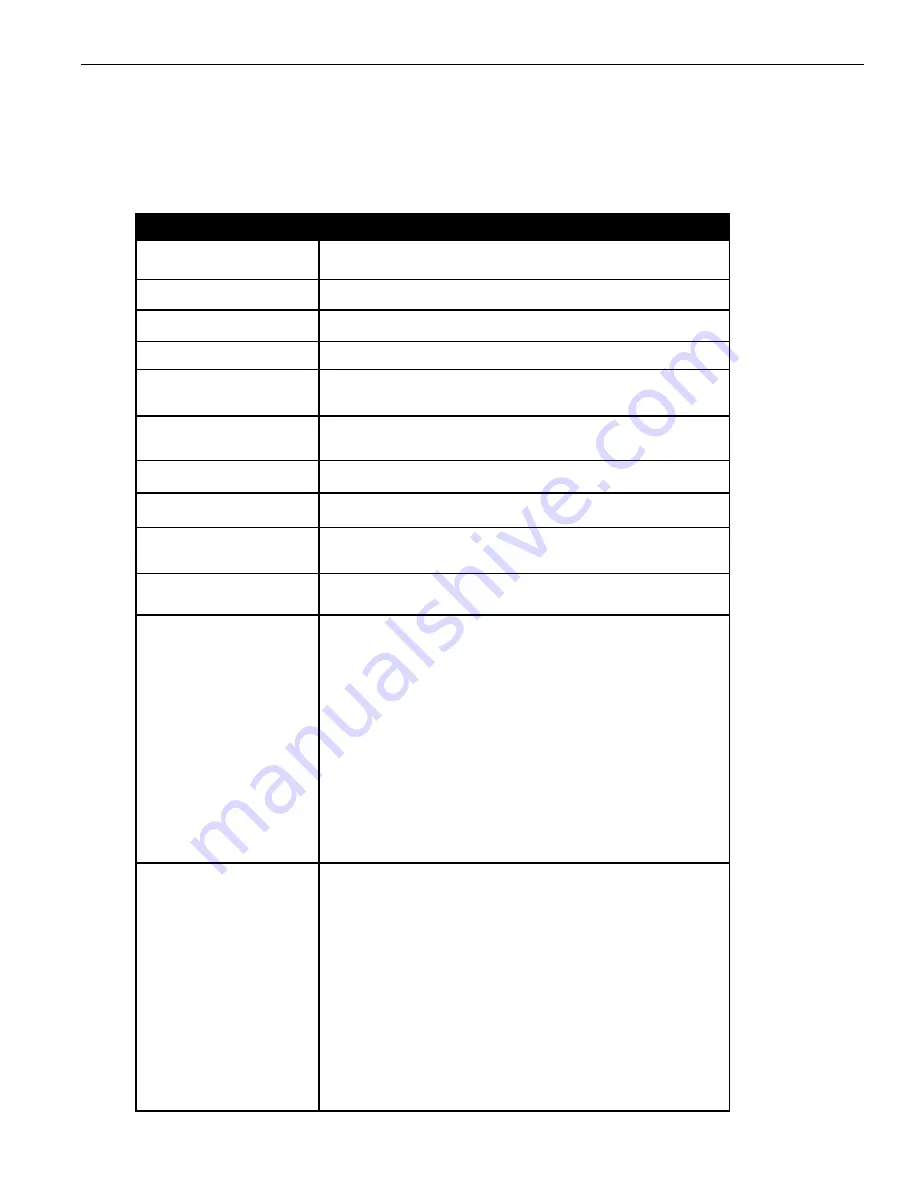
Headset Indicator Lights 

The following table describes the operating modes of the headsets according 
to the indicator lights. Use it as a troubleshooting reference. 

Indicator

Mode Description

Off(no light)

Indicates power is off. It will turn off automatically if it fails to register 
within two minutes or if the batter dies.

Solid Green

Headset is signed on, standby, Lane 1.

Solid Amber

Headset is signed on, Standby, Lane 2.

Solid Red

Headset is in transmit mode.

Flashing Green 
(changed from flashing amber)

Headset has not registered, but found an open base to which it will try to 
register.

Flashing Green 
(immediately after power on)

Headset is registered but has not yet synchronized or signed on to the 
base station.

Flashing Amber

Headset is not registered and has not found a base station.

Steadily Flashing Red

Headset is the active order taker, but the microphone is muted.

Single Red Flash 
(changed from flashing green)

Headset has successfully synchronized and signed on with a base 
station (“Lane 1” or “Lane 2” will also be heard in the earpiece).

Alternating Flashing Green and 
Amber

Page Monitor Mode.

Red-Orange-Red-Green -  
Red-Orange-Red-Green..

Headset registered to four base stations. 

Perform the following procedure to clear the headset registration data: 

1.  Start with the Headset powered on.  

It does not have to be in sync with any Base Station. 

2. Press and HOLD the power button. 

3. Press and release the T1 button 2 times. 

4. Press and release the T2 button 2 times. 

5. Release the power button. 

The Headset LED will illuminate to solid red for 2 seconds and then it 
has been cleared.

Red+4sec blank+  
Red+4sec blank... ... ..

The Base Station you are trying to register your headset to, has more 
than 20 headsets registered already 

Follow the steps below to remove any registered headsets that are not in 
use any more. 

1. Log into the Base Station 

2. Press the Mode key till you see the System Menu 

3. Select 04 Registration

4. Select 02 Remove Headsets. 

3. Scroll to the number of the headset you want to un-register. 

4. Press Enter.

Summary of Contents for XT-1

Page 1: ...clarity Digital proven reliability 3 3M Building and Commercial Services Division 3MTM Wireless Communication System Model XT 1 Store Manager Operating Instructions ...

Page 2: ......

Page 3: ...ay Information 5 Buttons 6 Configuring with a Computer 7 Logging into the Base Station with a PC 8 Change Basic Volume Settings 8 Inbound Microphone Volume 8 Outbound Talk Volume 9 Vehicle Alert Volume 9 Outbound Greeter Message Volume 9 Change the Monitor Volume 9 Inbound Listen 10 Outbound Talk 10 Vehicle Present 10 Vehicle Approach 11 Page Messages 11 Greeter Messages 11 Change the Night Volume...

Page 4: ... 20 Holiday Exception Schedule 20 Change Site Information 21 Change Self Monitoring 21 Change Passcodes 21 User Passcodes 21 Two Base Station Setup 22 Installer Setup 22 Load Installation Settings 22 Save Installation Settings 23 Technical Service Message 23 Reset Timer Database 23 Factory Setup Restore Factory Defaults 23 Create and Load Templates 24 Reboot System 24 Check the Revision Levels 24 ...

Page 5: ...ng Sure Batteries are Ready for Use 35 Important Information about Rechargeable Batteries 35 TROUBLESHOOTING 37 Headset Indicator Lights 37 General Troubleshooting 38 Battery and Battery Charger Troubleshooting 39 APPENDIX DECLARATION OF CONFORMITY 40 APPENDIX BASE STATION SPECIFICATIONS 41 Physical 41 Electrical 41 Functional 41 APPENDIX GREETER MODULE 42 Greeter Setup 42 Enter the Greeter Config...

Page 6: ...mple Settings 55 APPENDIX TIMER MODULE 56 Overview of the Timer 56 Gathering and Storing Data 56 Accessing Timer Data 56 Access the Timer Menus 56 Configuring the Timer System 56 Drive thru Template 56 Customizing Names 57 Set Input Source Names 57 Report Group Names 58 Day Part Names 58 Shift Names 58 Setting up Time Reports 58 Set Goal Times 58 Set Valid Times 59 Time Definitions 59 Detection Ty...

Page 7: ...system must be installed as specified in the 3M Wireless Communication System Model XT 1 Installation Instructions and operated as specified in 3M Wireless Communication System Model XT 1 Store Manager Operating Instructions in quick service drive through restaurants and convenience stores It has not been evaluated for other uses or locations Signal Words Explanation of Signal Word Consequences Wa...

Page 8: ...ose to heat above 200 F or incinerate the battery Always replace batteries battery chargers and power supplies with 3M approved units acceptable for use in this system to avoid system function safety concerns Do not modify this 3M Wireless Communication System Model XT 1 Install only 3M provided components Use only 3M approved system replacement parts Caution To reduce the risk of associated with ...

Page 9: ...th the instruction manual may cause harmful interference to radio communications Operation of this equipment in a residential area is likely to cause harmful interference in which case the user will be required to correct the interference at his own expense Note This Class A digital apparatus also complies with Canadian ICES 003 Note This Product contains an intentional radiator operating at 2 4GH...

Page 10: ......

Page 11: ...e Station Display Once you are in the configuration mode you can use the buttons on the base station display to update all configuration parameters Interpreting Display Information Depending upon what you are doing or what you can do text on the display screen is handled according to the following conventions Static or Informational Static informational or non editable text has no markings on it E...

Page 12: ...nstance pressing the 7 button three times creates a letter t 7 s t See Service button below for creating upper case letters Mode Exit button In run mode you mummst press and hold Mode while entering your passcode to enter user or installation service In user and installation service modes use the Mode button to exit from a current field that you are editing without saving any changes or to go upwa...

Page 13: ...from one menu item to another or to scroll through available choices when editing fields Configuring with a Computer All of the procedures in this chapter assume that you are using the display to configure your base station s However the base station can function as a web server which means it can be configured using a PC The web serve functionality is disabled on a new base station so it must be ...

Page 14: ...ng a web browser type in the IP address of the base station in the browser s Address bar then press Enter Type in your user name and password then press Enter The default user name is User1 the default password is 1234 Do NOT type the space between User and the user number e g type User5 instead of User 5 If the password has been changed you can log in using the base station to find out what it is...

Page 15: ...see page 5 Select a new value for 01 Drivethru Volume Vehicle Alert Volume The range is 0 silent to 20 maximum Outbound Greeter Message Volume Changing the outbound greeter message volume affects the sound volume of the custom greeting messages and the system internal greetings Store Closed and Pull Forward To turn up or down the greeter message volume Enter the configuration mode see page 5 Selec...

Page 16: ... can also disable the monitor playing outbound talk Note To avoid feedback and echo set the outbound talk volume as low as possible To change the outbound talk monitoring settings Enter the configuration mode see page 5 Select 02 Monitor Volume To enable or disable the monitor playing the outbound talk change the value for Outbound Talk Enable to ON or OFF To change the volume level select a new v...

Page 17: ...ing the page message volume affects how loudly the monitor plays internal paging messages You can also disable the monitor playing internal paging messages Note To avoid feedback and echo set the volume as low as possible To change the page message volume monitoring settings Enter the user service mode see page 5 Select 02 Monitor Volume To enable or disable the monitor playing internal paging mes...

Page 18: ...e speaker will turn off at night You cannot change the day outbound talk volume on this screen only the reduction amount identified above Registering Headsets Each headset must be registered to a base station before it can be used Once registered it should not need to be registered again unless it is intentionally removed Add Headsets Each headset has a unique identification number The number is i...

Page 19: ...registered headsets Enter the base station configuration mode see page 5 Select 04 Registration 3 List All Headsets Resetting Inactive Days For any headset you can manually reset its number of inactive days to zero see Change Self Monitoring on page 25 for information about the inactive days timer To reset the inactive days Enter the base station configuration mode see page 5 Navigate to 08 Headse...

Page 20: ...ng that works best for your ambient noise environment and staff Set System Date and Time Perform the following procedure to set the system time and date Enter the base station configuration mode see page 5 Change the date and time values for 06 Set Time Date in the Time and Date fields as required Use the arrows to scroll from one field to the next and type new values over the existing data in the...

Page 21: ...stems when the order taker is speaking it is impossible to hear any speech coming from the customer order point In full duplex systems the order taker can speak and hear speech coming from the customer order point at the same time 2o enable or disable the order taker hearing pages while talking Enter the base station configuration mode see page 5 Select 07 Global Settings To enable or disable the ...

Page 22: ...closed prompt to let customers know in your absence that the store is closed Note Make sure that you disable the automatic store closed prompt in stores that are open 24 hours I Enter the base station configuration mode see page 5 Change the value for 07 Global Settings Store is Now Closed Prompt to Yes or No Pull Ahead Prompt You can let customers know to pull ahead when they are at order point 2...

Page 23: ...e the option at its previous setting Change the value for 07 Global Settings Order Point Prompts in German to Yes or No Order Point TALK with No Vehicle Perform the following procedure to permit or prevent the order taker to talk to the order point when no vehicle is detected Enter the base station user service mode see page 5 Change the value for 07 Global Settings Order Point TALK With No Vehicl...

Page 24: ...sed each call must be ended by pressing the page button on the headset If you are using a vehicle detector board the presence or pulse setting should match the dip switch setting on the board If the vehicle detector is set to delay via its own dip switches and you set a delay in the base station the delays are additive you could end up with a longer than expected total delay Kitchen Noise Reductio...

Page 25: ...eadset s identified above by performing the following steps Enter the base station configuration mode see page 5 Select 04 Registration 2 Remove Headsets Scroll to the number of the headset you want to un register Press Enter 3 Rebooting the base station will now restore the Kitchen Noise Reduction feature Order Taking Modes Setup Perform the following procedure to enable or disable some of the se...

Page 26: ...ach of the four defined fields Open Day Night and Close Press 5 6 3and4to scroll up and down the list Note The greeter will not play messages while the store is closed except for the built in or custom store closed message Holiday Exception Schedule The holiday exception schedule can be used to identify up to 12 days in the year on which the store schedule is different than it would have been othe...

Page 27: ...oking for periods of extended non use that may indicate a headset problem that needs attention Perform the following procedure to enable and configure self monitoring Enter the configuration mode see page 5 Select 12 Self Monitoring To enable or disable self monitoring change the value for Self Monitoring Enabled to Yes or No If self monitoring is enabled Select a value for Number of Inactive Days...

Page 28: ... order taker hears beeps only for the lane for which the headset is configured beeps from the other lane will not be heard Cross lane mode is intended for a drive thru with one order taker who will hear beeps for both lanes on one headset You can configure the system to permit non order takers to hear orders and pages from one or both sides See Order Takers and Page Messages in Cross Lane Mode pag...

Page 29: ...e 5 Select 14 Installer Setup Change the value for Use Custom Tech Service Message to Yes or No If you chose Yes enter the customer message Reset Timer Database Perform the following procedure to Reset the Timer module database Enter the configuration mode see page 5 Select 14 Installer Setup Change the value for RESET Timer Database to Yes Note Resetting the Timer module Database will clear ALL v...

Page 30: ... Enter the configuration mode see page 5 Select 16 Reboot System Change the value of Power Cycle Complete System to Yes Press Service Check the Revision Levels Perform the following procedure to view the revision levels and serial numbers of your base station Enter the configuration mode see page 5 Select 18 Revision Levels Activate the Backup Intercom Many systems include a wired backup intercom ...

Page 31: ...re is only one order point T1 and T2 both connect to the order point 3 If you are in Manual Latching or Hands Free modes the talk button establishes you as the order taker and while you are the order taker the talk button is an order point mute button each tap turns mute on or off to the order point On Off Turns the headset on and off Hold for 3 seconds to turn off Volume The up button increases v...

Page 32: ...in two minutes or if the battery dies Solid Green Headset is signed on standby Lane 1 Solid Amber Headset is signed on standby Lane 2 Solid Red Headset is in transmit mode Flashing Green changed from flashing to amber Headset has not registered but found an open base to which it will try to register Flashing Green immediately after power on Headset is registered but has not yet synchronized or sin...

Page 33: ...te When installing a battery make sure it is fully charged It is important to remember that an unused 3M Wireless Communication System Model XT 1 battery loses five percent of its charge per week If a battery has not been used for several weeks make sure to charge it prior to use 1 Slide and hold the battery release 2 Remove the discharged battery from the battery housing 3 Insert a fully charged ...

Page 34: ...ts every day If they are dirty clean them Even if they don t look dirty every headset should be cleaned on a regular schedule Before cleaning remove the soft foam ear pad and microphone windscreen If used Use a soft cloth and mild cleaning solution to wipe the surfaces clean We recommend using a 3M 5040 7065 Cleaning Wipe or a 3M High Performance Cloth lightly dampened with 3M Food Service Degreas...

Page 35: ...on the base station looks in Run Mode Figure 5 Navigating in the Base Station in Run Mode To navigate the base station in Run mode you only need to use Enter Mode and the directional arrow buttons up 5 down 6 left 3 and right 4 The remaining buttons function only in manager or installer configuration modes Change Order Taking Mode There are seven order taking modes which offer different combinatio...

Page 36: ...icrophone to hear the customer order The order point microphone will remain on until the vehicle leaves In Automatic Listen AL the order point microphone turns on and stays on whenever a vehicle is detected The order point microphone will remain on until the vehicle leaves In Always On the order point speaker is always on so the customer can always be heard regardless of whether a vehicle is detec...

Page 37: ...ld be selected for typical ordering configurations where all of the drive thru employees are inside of the building and all of the equipment is working properly The choices between them tend to vary according to the number of people available how many duties they must perform simultaneously and possibly employee preferences If you plan to have the order taker standing outside with a headset Outsid...

Page 38: ...oth lanes Refer to configuration section of the manager s guide Cross Lane Cross Lane mode is the preferred mode for lighter volume or whenever one order taker needs to answer both order points essentially the two order points cross over Operators will hear signals from both order points single repeating beep from order point 1 or a double repeating beep beep from order point 2 The headset buttons...

Page 39: ...re 6 To replace the headband pad remove the worn damaged pad by peeling it from the back of the battery housing Remove protective backing from new pad and press it into place on the back of the battery housing Battery Charger Location The battery charger should be placed on a flat surface such as a desktop or table in a clean dry environment Cleaning the Contacts If the indicators fail to light du...

Page 40: ...ully charged battery The change battery now message continues for two minutes after which the headset turns off automatically to prevent damage to the batteries Charging Batteries To charge a battery insert the battery in one of the charging slots The indicator lights RED to indicate the battery is charging The indicator lights GREEN to indicate the battery is charged Note Discharged batteries req...

Page 41: ...hargeable Batteries Keep the following information in mind as you operate the system and as you establish operating procedures Each 3M Wireless Communication System Model XT 1 battery contains an internal protective device to prevent unsafe discharge rates But as with any battery avoid shorting across the battery contacts with metal items Never carry a battery in a pocket or place it in a drawer w...

Page 42: ......

Page 43: ...active order taker but the microphone is muted Single Red Flash changed from flashing green Headset has successfully synchronized and signed on with a base station Lane 1 or Lane 2 will also be heard in the earpiece Alternating Flashing Green and Amber Page Monitor Mode Red Orange Red Green Red Orange Red Green Headset registered to four base stations Perform the following procedure to clear the h...

Page 44: ...ll headsets will not go into Standby silence when the vehicle leaves the menu sign This is normal when a pulse air switch type of vehicle detector is used Press the Page switch to silence the menu microphone There is a large metal object near the loop in the driveway if a loop is used Remove the object The Loop detector is locked up Unplug the look detector from the AC outlet and plug it back in t...

Page 45: ...alk volume or feedback from a single headset Volume setting on headset is too high Power off and power on headset to reset volume level The holes in back of the microphone are plugged with dirt or grease Call for authorized service The hands free function does not work The system is operating in half duplex mode Hands Free is disabled in half duplex mode Hands free order taking mode not selected S...

Page 46: ...3M Wireless Communication System Model XT 1 Store Manager Operating Instructions November 2011 Revision 1 8 Page 40 of 65 Appendix Declaration of Conformity Appendix Declaration of Conformity ...

Page 47: ...ecification or Requirement Input Power 120 VAC 50 60 Hz 15A Standard 3 prong outlet required station includes AC adapter Radio Frequency 2 4 GHz ISM Does not require FCC license Speaker Outputs 5W Functional Parameter Specification or Requirement Maximum number of order points per base station 1 Maximum number of headsets per base station More than 15 Maximum number of vehicle detectors per base s...

Page 48: ...n be recorded in any of the 16 message slots allowing for a maximum of 16 Reminder messages ALERT Each Alert message takes up one 4 second message slot for a total of 4 seconds Alert messages can be recorded in any of the 16 message slots allowing for a maximum of 16 Alert messages However the system has 4 Alert Message Input Triggers so only 4 Alert messages can be used at any one time CLOSED The...

Page 49: ...age Activation Act NO MESSAGE ACTIVATION Msg 001 MON Breakfast 1 GREETER Breakfast NO Morning NO Lunch NO Afternoon NO i 3 Using the 5 6 4 3and Enter keys select a message number and day of the week to configure Msg 001 MON 4 For the selected message set the value to YES for each daypart the message is active Breakfast YES leaving the other dayparts set to Morning NO 5 Repeat the daypart assignmen...

Page 50: ...LAY Duration 00 Time g g g g g g g g Remove Message 002 ENTER Yes Mode No 13 Using the 5 6 4 3and Enter keys select Rec The screen will change to RECORD MESSAGES Msg 001 Type GREETER REC PLAY Duration 00 Time g g g g g g g g Name Breakfast 1 Service Start 14 Press and hold the Page button on the headset Note For a Dual Lane system ensure you have selected the appropriate Lane before recording T1 G...

Page 51: ...der 1 REMINDER Headset 1234 YES Headset 2020 YES XXXXXXXXXXXX YES XXXXXXXXXXXX YES 3 Using the 5 6 4 3and Enter keys select a message number to record Msg 011 Note Only REMINDER and ALERT messages are available for this function 4 Using the 5 6 4 3and Enter keys select the desired headset YES NO field and modify Headset 1234 NO Note The headsets are given a default name when registered of Headset ...

Page 52: ...e 7 Navigate to Playback After Delay Of XX Seconds where xx represents the current number of seconds 8 Change the number of seconds to a new value The range is 0 to 15 seconds Change Playback Mode Perform the following procedure to change the greeter playback mode 1 Navigate to Playback Mode 2 Change the value of the playback setting Your choices are ALTERNATING A different message plays for each ...

Page 53: ...e headsets a continuous tone can be played while the customer is hearing the greeting This permits the order taker to know when the greeting is playing and when it has stopped To enable or disable the tone during greeter playback 1 Navigate to Tone To Headsets During Playback 2 Change the value of the playback setting Your choices are YES A tone will play in the headsets while the greeting message...

Page 54: ...16 Selecting a message number means the corresponding message will play when the external detector is activated in Original Mode Note The external inputs previously used for mode selection and external message trigger now have a dual purpose In Original Mode they can still be used for their original purpose The input can also be set to an ALERT message number and will trigger the Alert Message pla...

Page 55: ...r the message is skipped or placed into queue If the delay places the message outside an active daypart the message is skipped Count XXX Count is the number of the times the message is scheduled to be played during the current active daypart Repeat hh mm ss The repeat time entered in hours minutes seconds is the amount of time elapsed before the next scheduled message plays with the elapsed time s...

Page 56: ... input setting Your choices are Original Mode The Greeter Message Properties setting determines if the EXT_MSG input plays a message msg name Selecting a message name means the corresponding message will play when the selected external input is activated Message choices include all messages of Type ALERT Message Names Perform the following procedure to customize the message names The names can als...

Page 57: ...he exception of Greeter Message Properties adding the Tandem Pull Forward message setting GREETER MESSAGE PROPERTIES h External Detector Playback Message OFF Tandem Pull Ahead Playback Message OFF Greeter Revision 03 Tandem Pull Ahead Playback Message You can assign a custom message to be played to customers at the Lane 2 order point when the Lane 1 order point is available to pull forward The cus...

Page 58: ...ating Instructions November 2011 Revision 1 8 Page 52 of 65 Appendix Greeter Module Greeter Setup For Systems with V2 V3 or V4 Base Station software Refer to Manual Version 1 6 for instruction on operating the Greeter Module with Base Station software V2 V3 or V4 ...

Page 59: ...2 Daypart 12 00 00 00 00 Messaging Assignments Msg Name Type Dayparts 1 Breakfast 1 GREETER 2 GREETER 3 Breakfast 2 GREETER 4 GREETER 5 Lunch 1 GREETER 6 GREETER 7 Lunch 2 GREETER 8 GREETER 9 Dinner 1 GREETER 10 GREETER 11 Reminder 1 GREETER 12 Reminder 2 GREETER 13 Reminder 3 GREETER 14 Reminder 4 GREETER 15 Cooler Open ALERT 16 Door Open ALERT Alert Reminder Properties Msg Name Type Priority Del...

Page 60: ... Name Start Time End Time 1 2 3 4 5 6 7 8 9 10 11 12 Messaging Assignments Msg Name Type Dayparts 1 2 3 4 5 6 7 8 9 10 11 12 13 14 15 16 Alert Reminder Properties Msg Name Type Priority Delay Count Repeat Monitor REMINDER Y 0 00 1 0 01 00 ON OFF REMINDER Y 0 00 1 0 01 00 ON OFF REMINDER Y 0 00 1 0 01 00 ON OFF REMINDER Y 0 00 1 0 01 00 ON OFF ALERT N 0 00 1 0 01 00 ON OFF ALERT N 0 00 1 0 01 00 ON...

Page 61: ...nments Msg Name Type Dayparts 1 Daily Promo GREETER 10 2 GREETER 10 3 Store Closed CLOSED 4 CLOSED 11 Travel Path REMINDER 10 12 Hand Washing REMINDER 10 16 Back Door Open ALERT 10 Alert Reminder Properties Msg Name Type Priority Delay Count Repeat Monitor 11 Travel Path REMINDER Y 0 00 1 0 30 00 ON OFF 12 Hand Wash REMINDER Y 0 00 1 1 00 00 ON OFF 16 Door Open ALERT N 0 00 1 0 01 00 ON OFF ...

Page 62: ... in a dual lane configuration As the data storage fills up the oldest data is overwritten with new data This is approximately between 7 and 30 days of data depending on the number of drive thru customers the store has each day Accessing Timer Data To retrieve the data from the timer the user creates and views reports using either the front panel of the 3M Wireless Communication System Model XT 1 o...

Page 63: ...h two detectors represent the Order Points Customizing Names Customizing the default values to match store preferences enhances the timer system and makes evaluating timer reports easier Perform the following procedure to change the parameter names 1 Enter the timer menu see above 2 Select 4 Customize Names From this menu you can customize the following Input Source Names Vehicle Detectors Report ...

Page 64: ...at can overlap with shifts Examples of day part names could be Breakfast Lunch Dinner and Late Night First customize the Day Part names then assign the time periods using Time Definitions Shift Names Perform the following procedure to change the Shift Names 1 Enter the timer configuration menu see above 2 Select 4 Customize Names 4 Shift Names Shifts are customized blocks of time that can overlap ...

Page 65: ... Enter the timer configuration menu see above 2 Select 3 Set Valid Times Valid times refers to the part of the day that the Timer System is active Outside that period the XT 1 system ignores all vehicle detection signals and records no data Valid Time is usually set to match the store s working schedule but it can also be configured to allow monitoring of after hours drive thru traffic Start and E...

Page 66: ...t the timer is configured for the correct type Note The default detector type is presence If you do not have any pulse type detectors you should not need to change these settings Perform the following procedure to change the detector type 3 Enter the timer configuration menu see above 4 Select 6 Configure Timer 1 Detection Type 5 Change the value of the desired detector to Presence or Pulse Thresh...

Page 67: ...nt group starts with a unique detector input i e If Report Group 1 starts with Order Point 1 no other Report group can contain this detection point 3 Configure any Subgroups using the independent group as the parent group i e Service can be the Pay and Pickup Windows of a 3 point single lane drive thru Configure any Supergroups combining like groups into a combined report i e Combine Lane 1 and La...

Page 68: ...running time in minutes and seconds m ss or seconds only sss Percent Attained to Goal The percent attained to goal field has two selections First specify which detector point or report group is displayed Any of the 6 Detector Inputs or Any of the 6 Report Groups or The greet event Second specify which time period is used to calculate the value from the following Full Day or Any of the 8 Day Parts ...

Page 69: ...r data metrics The Idle Time setting is not enforced until the detection point the vehicle is approaching is clear of all other vehicles For example If the vehicle is leaving the Order Point and there is already a car at the Pay Window the 30 second limit doesn t begin until the first car leaves the Pay Window The Idle Time setting is necessary to prevent customer antics from skewing the store per...

Page 70: ...ast Day Part h Lane 1 06 00 to 10 30 Total 117 Except 0015 AVG GOAL OVER Attained OrderPoint1 1 25 1 00 0031 079 05 i Following is a definition of the items on the above screen JUN 16 2010 The date selected for the report data The timer system shows at a maximum the last 7 days of data available Breakfast The time period report sub type The custom names that appear are user specified during config...

Page 71: ...source in this case OrderPoint1 currently displayed OVER 0031 Total number of vehicle times that have exceeded the goal time Attained 079 05 Percentage of vehicle times meeting the goal time Total Over Total When viewing the Timer Report screen pressing the Service key on the keypad rotates between all Report Groups configured for the Timer System The name field located under the date will advance...

Page 72: ...ease 34 replace 27 troubleshooting 39 warning 35 Buttons 6 25 Change lane mode 31 Components 25 Configuration 5 8 basestation 24 with computer 7 Date 14 Daypart 45 53 Declaration of Conformity 40 Detector Type 18 Display basestation 5 buttons 6 dual lane 51 information 5 navigating 5 Duplex Mode Selection 15 Dual Lane 12 22 25 31 32 51 Echo 10 11 14 Enter Select button 6 Ethernet 7 21 Factory sett...

Page 73: ...osed 47 tandem pull ahead 51 tone playback 47 technical service 23 ML manual listen 30 MLT manual latching 30 Mode automatic standby 30 31 change lane 31 change volume 32 configuration 5 cross lane 32 drive thru audio duplex 15 indicator lights 26 Order Taking 19 29 31 Listen Auto AL Manual ML Always On 30 31 Talk Manual Latch MLT Push to Talk PTT Hands Free run 29 split lane 32 Monitor volume 9 N...

Page 74: ...t 16 System warnings 2 T1 and T2 25 32 Talk modes 30 Talk Buttons 25 Time 14 Timer Module 23 56 65 Transducer Mode 18 Troubleshooting 37 battery charger 39 general 38 headset indicator lights 37 User passcode 21 Vehicle alert volume 9 approach 11 detector modes 30 present 10 Volume change 8 32 greeter messages 11 headset 25 inbound listen 10 inbound microphone 8 14 monitor 9 night 12 outbound gree...

Page 75: ......

Page 76: ...rvices Division 3M Canada Company Post Office Box 5757 London Ontario N6A 4T1 www 3M com foodservices 3M is a trademark of 3M Used under license in Canada Please recycle Printed in Canada 2012 3M All rights reserved 1201 CM 00049E ...

Reviews: