background image


14

3M

 Multimedia Projector MP8760

 3M IPC 2000

ENGLISH

5-2.


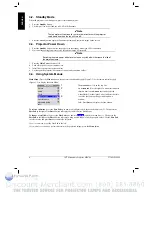
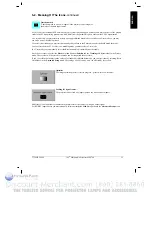
Meaning Of The Icons

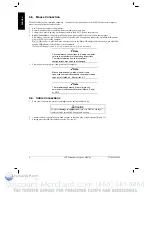
An icon will display to indicate a presentation tool is active.

Pointer mode

Activate with 

Pointer 

button on IR-Remote control

In the Pointer mode you can move a pointer over and arround the picture area.
By pressing the 

Pointer

 button on the remote control a second time it will be turned off.

Freeze mode

Activate with 

Freeze 

button on IR-Remote control

In the Freeze mode the picture will be freezed.
Pressing the 

Freeze

 button on the remote control a second time or the 

Magnify

 button, the freeze mode will be turned

off.

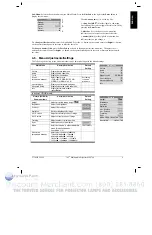
Magnify mode

Activate with 

Magnify 

button on IR-Remote control

In the magnify mode the image can be magnified (zoomed). With the 

–(1)

 and 

+(3)

 buttons you can decrease or

increase the magnifying factor. You can select the magnified area by using the 

Disc Pad

.

Pressing the 

Magnify

 button on the remote control a second time, the magnify mode will be turned off.

Reveal mode

Activate with 

Reveal (7) 

button on IR-Remote control

In the reveal mode the picture will be covered by a grey sheet. You now can reveal the covered image by using 

Disc

Pad

. Pressing the 

Reveal

 button on the remote control a second time, the reveal mode will be turned off.

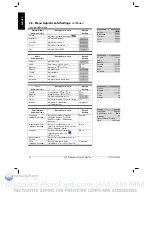
Muting mode

Activate with 

Mute

 button on IR-Remote control

In the muting mode the sound output of the projectors internal speakers and the external output will be muted.
Pressing the 

Mute

 button on the remote control a second time, the muting mode will be turned off.

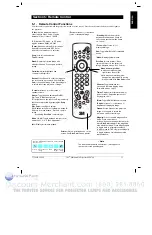
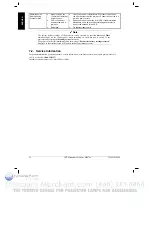
Mouse emulation (Only in data mode [PC/RGB _] available!)

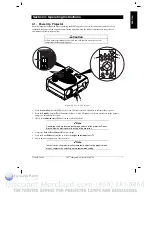
Activate with 

Mouse

 button on IR-Remote control

If you’ve connected the projector with the mouse cable and the right adapters to your PC and turned on the projector
before booting the PC it will emulate a mouse over the IR remote control transmitter.
By pressing the 

Mouse

 button on the IR remote control the mouse emulation will be activated. You can move arround

the mouse pointer with the 

Disc Pad

. The 

Disc Pad

 is pressure sensitive, that means so stronger you press the pad so

faster the mouse pointer will move. The mouse buttons will be emulated by the two buttons 

left

 and 

right

 beside the

Discpad

. . The drag function can be emulated by the 

Drag (2)

 button below the 

Disc Pad

. The mouse emulation can

be turned off by pressing the 

Mouse

 button a second time.

Summary of Contents for PS50C670

Page 1: ...ce for media product news reviews do it yourself guides and manuals Informational Blog http www fixyourdlp com Video Guides http www fixyourdlp com guides User Forums http www fixyourdlp com forum FixYourDLP s Fight Against Counterfeit Lamps http www fixyourdlp com counterfeits RecycleYourLamp org Free lamp recycling services for used lamps http www recycleyourlamp org Lamp Research The trusted 3r...

Page 2: ... Bedienerhandbuch Proyector de medios múltiples multimedia MP8760 Guía del operador Guida dell operatore del proiettore multimediale MP8760 Bruksanvisning för MP8760 Multimediaprojektor 3M MP8760 Multimediaprojector Gebruiksaanwijzing T H E T R U S T E DS O U R C EF O RP R O J E C T O RL A M P S A N DA C C E S S O R I E S ...

Page 3: ... 4 OPERATING INSTRUCTIONS 7 4 1 POWER UP PROJECTOR 7 4 2 STANDBY MODE 8 4 3 PROJECTOR POWER DOWN 8 4 4 USING SYSTEM MENUS 8 4 5 MENU ADJUSTMENTS SETTINGS 9 SECTION 5 REMOTE CONTROL 13 5 1 REMOTE CONTROL FUNCTIONS 13 5 2 MEANING OF THE ICONS 14 5 3 BATTERY REPLACEMENT 16 SECTION 6 MAINTENANCE 17 6 1 REPLACING THE AIR FILTER 17 6 2 REPLACING PROJECTION LAMP 18 6 3 LAMP LIFE INDICATOR 19 6 4 CLEANING...

Page 4: ...ied service technician 6 Position the cord so that it will not be tripped over pulled or contact hot surfaces 7 If an extension cord is necessary a cord with an earth ground and a current rating at least equal to that of the appliance should be used Cords rated for less amperage than the appliance may overheat 8 Always unplug appliance from electrical outlet before cleaning and servicing and when ...

Page 5: ...ms or areas requiring your attention LOCATION OF LABELS SAVE THESE INSTRUCTIONS The information contained in this manual will help you operate and maintain your 3M MP8760 Multimedia Projector Inside of projector gets very HOT Allow internal parts to cool before replacing the lamp T H E T R U S T E DS O U R C EF O RP R O J E C T O RL A M P S A N DA C C E S S O R I E S ...

Page 6: ...s and you may have other rights that vary from state to state FCC STATEMENT CLASS A This equipment generates uses and can radiate radio frequency energy and if not installed and used in accordance with the instruction manual may cause interference to radio communications It has been tested and found to comply with the limits for a Class A computing device pursuant to Subpart B of Part 15 of the FC...

Page 7: ...rials Save the shipping box and packing materials in the event the MP8760 should require shipping to a 3M Service Center for repair Use packing material to protect projector 1 3 What s Next Take a few minutes to review Section 2 to familiarize yourself with the MP8760 machine characteristics and then turn to Section 3 to set up the projector We hope you will enjoy using this high performance produ...

Page 8: ...tical image inverting function allows rear screen and ceiling mounted projection On screen menu for easy projector set up Menus display in English German French Spanish Italian Dutch Swedish 0 12 degree adjustable keystone correction 2 2 Parts Identification List 1 Infrared Remote Control Transmitter 2 3 Speakers Surround Sound System 3 Operator Touch Panel 4 Exhaust Fan 5 Terminal Connections 6 H...

Page 9: ... decrease increase image size 2 Video Select Video1 Video2 or S VHS input 3 PC Select PC RGB 1 2 input 4 Enter Initiate drop windows toggle check box on off display Info sub menu or press and hold then use Disc Pad to reposition menu location 5 Volume Adjust increase decrease audio level 6 Mute Toggle speakers on off 7 Brightness Adjust image brightness See Menu 8 Disc Pad Move cursor up down left...

Page 10: ...c ADB adapter is an accessory item that must be ordered separately Note For serial mouse connections to a laptop computer refer to the manufacturer s operating instructions The internal pointing device or serial port configurations may need to be changed 5 First power on the projector then power on the computer Note Mouse emulation only works when all cable connections are established and the prop...

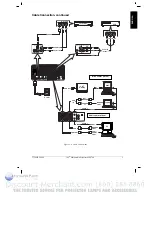
Page 11: ...T RED WHT YEL IN IN RGB IN MONITOR RS232 PC RGB 2 PC RGB 1 AUDIO IN AUDIO OUT EPS 49A MONITOR PORT CRT Display PC PC Laptop MAC OUT IN IN OUT OUT MONITOR PORT PS 2 or SERIAL PORT RGB IN CONTROL RGB OUT Power AUX SVHS AUDIO IN Laser Disc OUT OUT RED WHT OUT IN IN IN S VHS Audio Left AUDIO 1 Audio Right MAC Figure 3 4 Cable Connections Audio cable optional MAC cable optional T H E T R U S T E DS O U...

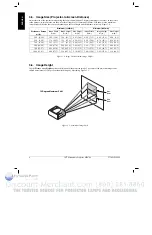
Page 12: ...3 16 9 0 80 31 5 0 60 23 6 0 24 9 5 2 50 8 20 1 76 69 3 1 32 52 0 0 54 21 3 0 99 39 0 0 74 29 1 0 30 11 8 3 00 9 84 2 11 83 1 1 57 61 8 0 64 25 2 1 18 46 5 0 89 35 0 0 36 14 2 5 00 16 40 3 48 137 0 2 60 102 4 1 06 41 7 1 96 77 2 1 47 57 9 0 60 23 6 7 00 22 97 4 85 191 0 3 62 142 5 1 47 57 9 2 73 107 5 2 05 80 7 0 83 32 7 10 00 32 81 6 90 271 7 5 16 203 2 2 10 82 7 3 88 152 8 2 92 115 0 1 18 46 5 F...

Page 13: ...is power 2 Press the Standby button 2 to illuminate the lamp A red LED indicator will turn green as an image appears and grows brighter on the screen 3 Check all ventilation slots 3 and clear away all obstructions Note Ventilation vents are located on the top and back of the projector Do not block airflow by placing objects on top of the projector 4 Adjust the Focus 4 and Zoom 5 for best image 5 P...

Page 14: ...perator touch panel keypad Figure 3 3 or the remote control keypad Figure 5 1 to display the Main Menu The menu name 1 is on the top line An arrowhead 2 at the right of a menu line indicates that this item is a sub menu that can be selected A text field 3 at the right of a line indicates that this is a value that you can change in a drop down window Info Press Enter to display the Info window To s...

Page 15: ...nu Audio Display audio submenu Tools Display tools submenu Source drop down window Select input source PC RGB1 PC RGB2 SVHS VIDEO 1 VIDEO 2 AUX According to search procedure User Interface Display user interface submenu Advanced Setup Display advanced setup submenu Info Display information window press Enter In active PC RGB mode Picture PC RGB Submenu Items Description Action Default Setting Heig...

Page 16: ...ll large off Minutes Adjust timer countdown 1 to 90 minutes 10 minutes User Interface Submenu Items Description Action Default Setting Language drop down window Select user interface language English Deutsch Français Español Italiano Nederlands Svenska English Blank Screen Color drop down window Select color of Blank Screen Black Red Green Blue Yellow Cyan Magenta White Black Graphics Activate on ...

Page 17: ...display Resets the lamp hours displayed on the Info window Test Display test submenu In active Video mode Advanced Setup Video Submenu Items Description Action Default Setting Projection drop down window Select projection orientation standard Rear Rear Ceiling Ceiling standard Color Manager Display Color Manager submenu Remote Control Remote control receiver on off on RC Address Select remote cont...

Page 18: ...eter display Parameter display window on off off Color test picture Display color test picture Frame test picture Display frame test picture Info display only Description Action Hardware Current hardware level Firmware Current firmware level VESA xxxxxxxxxx Current data or video mode Lamp bar indicator Lamp life hours Green lamp good red lamp needs replacement OK Closes the Info display by pressin...

Page 19: ...le between remote control addresses 1 2 3 4 See Appendix Drag Lock left mouse button Optimize Adjust brightness and contrast for best picture Reveal Press Reveal to cover the image on the screen with a gray mask Use the Disc Pad to reveal the image Press Reveal again to return full screen projection of image Text Not used Blank Replace projected image with white background Press again to return im...

Page 20: ...he covered image by using Disc Pad Pressing the Reveal button on the remote control a second time the reveal mode will be turned off Muting mode Activate with Mute button on IR Remote control In the muting mode the sound output of the projectors internal speakers and the external output will be muted Pressing the Mute button on the remote control a second time the muting mode will be turned off Mo...

Page 21: ...de In a User mode you can manually select the Resolution which is normally not choosable It may be necessary to correct the Horizontal and Vertical Position and the Tracking and Sync values in the Picture menu These values will be stored so the mode can be recognized the next time If you ve accidently misadjusted the values of a standard predefined data mode you can reset them by selecting Reset D...

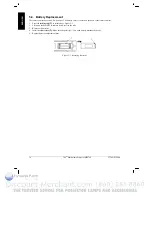
Page 22: ...ntrol 1 Press the locking tab 1 to release door Figure 5 1 2 Lift up on the door 2 to remove it and set it to the side 3 Remove old batteries 4 Install new batteries 3 Make sure the polarity on each battery matches the decal 5 Replace battery compartment door Figure 5 1 Replacing Batteries T H E T R U S T E DS O U R C EF O RP R O J E C T O RL A M P S A N DA C C E S S O R I E S ...

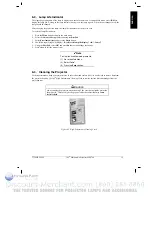
Page 23: ...or 2 Unscrew two screws 2 securing back panel 3 Remove the back panel 3 4 Separate the air filter from the back panel 4 5 Vacuum 5 the air filter to remove the dust and dirt 6 Insert the air filter in the back panel 7 Insert the back panel and secure with screws 2 Figure 6 1 Removing Air Filter Door EPS 53A AUX SVHS AUDIO IN VIDEO 1 AUDIO IN VIDEO 2 AUDIO IN MONITOR RS232 PC RGB 2 PC RGB 1 AUDIO I...

Page 24: ...el or remote control Wait for the fan motor to cycle off 2 Turn the main power switch to OFF and unplug the projector power cord 3 Set the projector on a sturdy surface with the front of the projector facing you 4 Press and hold the lamp door button 1 with your index finger Slide your finger to the right and depress the lock tab 2 Pull outward on the lamp door 4 to hinge it to the right side and a...

Page 25: ...lay Really reset lamp life display OK Cancel 5 Using the Disc Pad select OK and press Enter to acknowledge the change 6 Press Menu to exit the menu system Note To view the used remaining lamp life 1 Go to the Main Menu 2 Select Info 3 Press the Enter button 6 4 Cleaning the Projector For best performance keep your projector free of excess dust and surface dirt Use a soft cloth to remove dust from ...

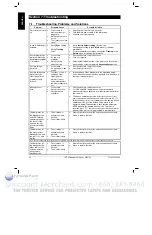
Page 26: ...work Loose cable Wrong connection Wrong power up sequence Check and secure cable connections For PS 2 and ADB Apple mouse a special adapter is necessary Only use adapters from the original manufacturer Section 8 2 The mouse emulation operates correctly only if the correct power up sequence has been used refer to section 3 5 To verify that the projector is programmed for the desired mouse emulation...

Page 27: ...g transformer to connect the antenna to the VCR Try different input source Image is disturbed or unstable Wrong Sync setting Wrong Tracking value Set to factory default setting See below Change Sync setting in the Picture menu for optimum performance For vertical interference stripes change the Tracking in the Picture menu for optimum performance No computer image projected Message Looking for sig...

Page 28: ...source Note The factory default settings of the projector can be restored by pressing Enter and Mute simultaneously on the control panel when switching on the main power switch of the projector and pressing the Standby button afterwards The projector will start immediately and the message Parameter factory settings restored displayed in the starting screen will indicate the default settings are re...

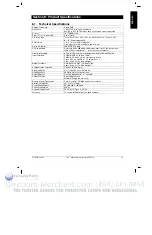
Page 29: ...3 PAL including PAL M N SECAM PAL 60 Input Terminals PC RGB RGB x 2 D Sub 15 pin PC RGB PC Audio x 2 3 5 mm stereo mini jack Video RCA x 2 SVHS x 1 Camera Aux x 1 Video Audio x 3 2 x RCA left right Output Terminals RGB Monitor RGB x 1 D Sub 15 pin Audio Audio x 1 2 x RCA left right Communication Terminals RS 232C D Sub 9 pin Scanning Rates Hor 15 86 kHz Vert 50 160 Hz Audio Speakers 20 Watts stere...

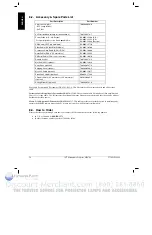
Page 30: ...able Kit optional XX 0034 1714 2 PC Audio Cable 3 5 mm stereo to 3 5 mm stereo optional 26 1012 0683 2 Ceiling Mount Kit optional 78 6969 8591 6 Mac Cable Set optional Part number DY 0205 1361 9 This kit contains a Mac mouse adapter and a Mac video cable Extension Cable Kit optional Part number XX 0034 1714 2 The extension cable kit includes a video amplifier and 20 m 65 ft video cable The kit inc...

Page 31: ...6 53 5 0 21 8 3 3 0 9 84 2 69 105 9 2 02 79 5 0 31 12 2 4 0 13 12 3 57 140 6 2 67 105 1 0 41 16 1 Long Throw Lens H X D f 88 mm Distance D m ft Width W m in Height H m in Shift X m in 4 0 13 12 0 80 31 5 0 60 23 6 0 23 9 1 5 0 16 40 1 00 39 4 0 75 29 5 0 29 11 4 6 0 19 69 1 20 47 2 0 90 35 4 0 35 13 8 7 0 22 97 1 40 55 1 1 05 41 3 0 40 15 7 8 0 26 25 1 60 63 0 1 20 47 2 0 46 18 1 9 0 29 53 1 80 70...

Page 32: ...national safety regulations and be properly approved Examples of these power cords are shown below North America UL Listed CSA Certified 15A 125VAC Germany Netherlands Spain France Greece VDE Certified 10A 250VAC Great Britain AUSTA Certified 13A 250VAC Italy IMQ or BASEC Certified 10A 250VAC Switzerland SEV Certified 10A 250VAC Australian SAA Certified 10A 250VAC Denmark Complies with Danish Stan...

Page 33: ...the address of the IR RC transmitter please press the Mode button and an address number buttons 1 2 3 or 4 simultaneously for 4 seconds on the IR RC transmitter After this you should be able to control the projector by IR RC again if you ve choosen the same address for the projector and the IR RC transmitter A 4 Resetting The Projector To Factory Default Settings The factory default settings of th...

Page 34: ...62 56 VESA 1024 x 768 43Hz 1024 x 768 35 522 86 957 45 VESA 1024 x 768 60Hz 1024 x 768 48 363 60 004 65 VESA 1024 x 768 70Hz 1024 x 768 56 476 70 069 75 VESA 1024 x 768 75Hz 1024 x 768 60 023 75 029 79 VESA 1024 x 768 85Hz 1024 x 768 68 677 84 996 95 VESA 1152 x 864 75Hz 1152 x 864 67 500 75 000 108 VESA 1280 x 960 60Hz 1280 x 960 60 000 60 000 108 VESA 1280 x 1024 60Hz 1280 x 1024 63 981 60 020 1...

Page 35: ... 3M IPC 2000 3M Multimedia Projector MP8760 29 ENGLISH T H E T R U S T E DS O U R C EF O RP R O J E C T O RL A M P S A N DA C C E S S O R I E S ...

Page 36: ...E If this product is defective within the warranty period stated above your exclusive remedy shall be at 3M s option to replace or repair the 3M product or refund the purchase price of the 3M product Limitation of Liability Except where prohibited by law 3M will not be liable for any loss or damage arising from this 3M product whether direct indirect special incidental or consequential regardless ...

Page 37: ...ce for media product news reviews do it yourself guides and manuals Informational Blog http www fixyourdlp com Video Guides http www fixyourdlp com guides User Forums http www fixyourdlp com forum FixYourDLP s Fight Against Counterfeit Lamps http www fixyourdlp com counterfeits RecycleYourLamp org Free lamp recycling services for used lamps http www recycleyourlamp org Lamp Research The trusted 3r...

Reviews: