background image

11

About Your New Printer

With your new 3M™ Portable Labeler PL300 printer, 
you can create a wide variety of high-quality, self-
adhesive labels. You can choose to print your labels in 
many different sizes, and styles. The printer uses 3M™ 
Portable Labeler Refill Cartridges in widths of 1/4” 
(6 mm), 3/8” (9 mm), 1/2” (12 mm), 3/4” (19 mm), or 
1” (24 mm). 3M™ refill cartridges are also available in 
a wide range of materials, such as flexible nylon, 
permanent polyester, vinyl, non-adhesive tag, and 
heat shrink tubes.
Visit www.3m.com/electrical


for information on the 

full line of labels and accessories for your printer.

Product Registration

Please visit www.3m.com/portablelabeler to 
complete the product registration form within seven 
days.

Getting Started

Follow the instructions in this section to start using 
your printer for the first time.

Connecting the Power

The printer can operate on battery or AC power. A 
power adapter and a rechargeable battery pack is 
included with your printer. 

The printer can operate with six AA alkaline 

batteries for power; however, alkaline batteries should 
only be used as temporary backup power.
To save power, the printer will automatically turn off 
after five minutes of inactivity. 

Connecting the Power Adapter

The printer uses a 110V-240V power adapter. 
Connecting the power adapter with the battery pack 
inserted recharges the battery pack.

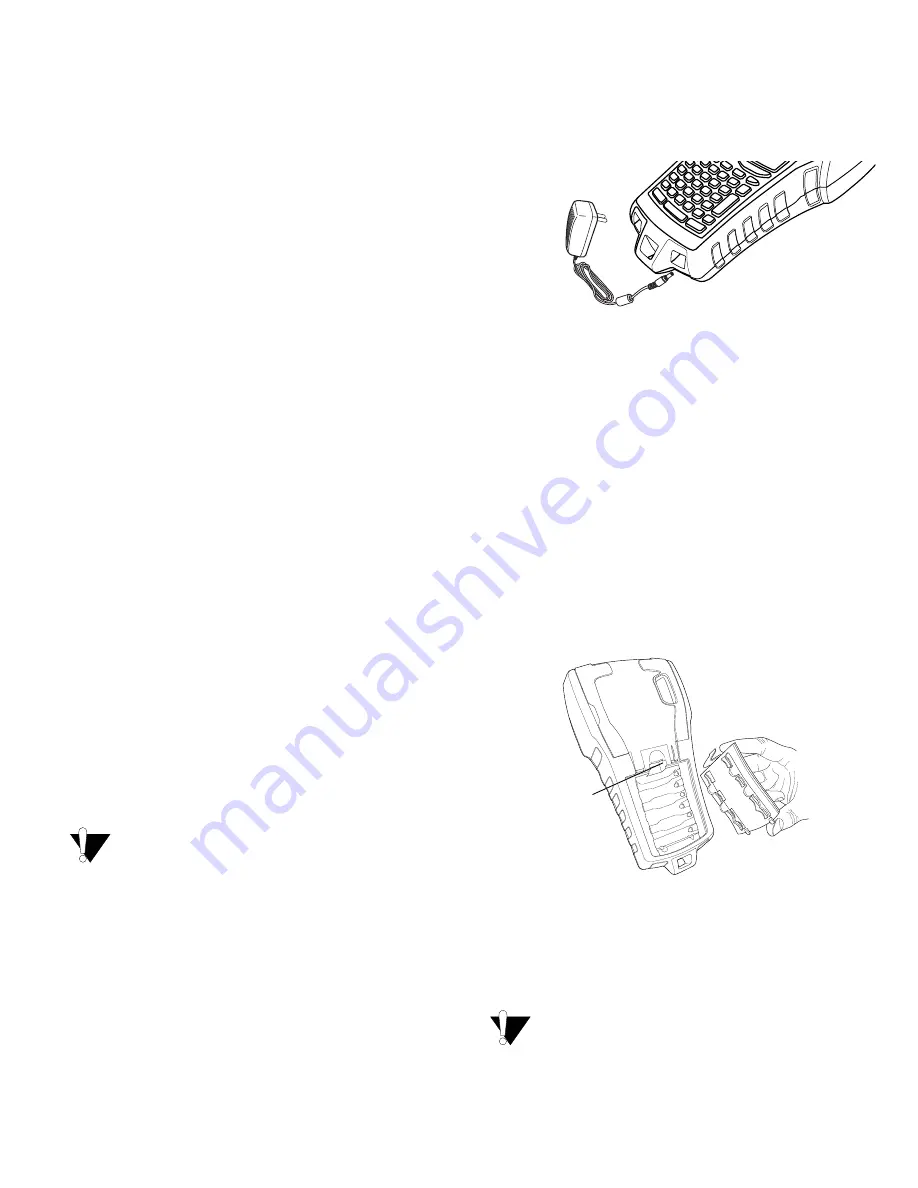
To connect the power adapter

1. Plug the power adapter into the power connector 

on the bottom of the printer. See Figure 2.

Figure 2  

2. Plug the other end of the power adapter into a 

power outlet.

Inserting the Battery Pack

The printer uses the rechargeable, Lithium-ion battery 
pack when not connected to the power adapter. As 
temporary backup power, the printer can operate 
using six AA alkaline batteries.

To insert the battery pack 

1. Press the thumb latch on the back of the printer to 

remove battery compartment cover. See Figure 3.

Figure 3  

2. Insert the battery pack into the battery 

compartment. See Figure 3.

3. Replace the battery compartment cover.

Remove the batteries if the printer will not be 

used for a long period of time.

Press thumb 
latch to open

Summary of Contents for PL300

Page 1: ...Portable Labeler PL300 User Guide ...

Page 2: ...k 12 Inserting and Removing the Tape Cartridge 12 Setting the Tape Width 12 Selecting a Language 12 Selecting Units of Measure 13 Getting to Know Your Printer 13 Power 13 LCD Display 13 Using the Backlight 13 Adjusting the Display Contrast 13 Hiding the Caption Bar 14 CAPS Mode 14 Shift Key 14 Escape Key 14 Navigation Keys 14 Backspace Key 14 Clear Key 14 Cutter Button 14 Hot Keys 14 Working with ...

Page 3: ...18 Creating Fixed Length Labels 18 Creating Patch Panel Labels 18 Creating Terminal Block Labels 18 Creating Module Labels 19 Using Fuse Multipliers 19 Printing Empty Modules 19 Creating Vertical Labels 19 Changing the Label Type 20 Changing the Label Settings 20 Printing Vertical Lines between Cells 20 Using Barcodes 20 Adding a Barcode 20 Editing a Barcode 20 Deleting a Barcode 21 Hiding Barcode...

Page 4: ...Printing Multiple Copies 24 Collating Multiple Copies 24 Pausing between Labels 24 Advancing the Label Tape 24 Adjusting Print Contrast 24 Using Printer Memory 25 Saving a Label File 25 Recalling a Label File from Memory 25 Deleting a Label File from Memory 25 Cleaning Your Printer 25 Using 3M Portable Labeler Software 26 Connecting to your Computer 26 Symbols 27 Library Text 28 Troubleshooting 30...

Page 5: ...the symbols and labels used with this product and its documentation Warning Symbol Images DANGER Indicatesapotentiallyhazardoussituation which ifnotavoided couldresultin death or serious injury WARNING Indicatesapotentiallyhazardoussituation which ifnotavoided couldresultin death or serious injury and or property damage CAUTION Indicates a potentially hazardous situation which if not avoided may r...

Page 6: ...insulated LI Battery Lithium cells must be completely discharged before disposal Battery Directive Don t throw into the normal domestic waste WEEE Don t throw this product into the normal domestic waste General Information CE mark according EMC Directive 2004 108 EC GS Mark Safety Tested ...

Page 7: ...shock Do not modify the PSU Do not use the device and PSU outdoors or in a wet environment Do not operate with a damaged cord or plug Replace power supply immediately Do not disassemble don t try to repair the product Only authorized people should do this The product is not foreseen for any servicing Incorrect reassembly may result in electric shock or fire To reduce the risks associated with expl...

Page 8: ... C for example a vehicle strong direct sunlight Do not short circuit the batteries under any circumstances Never charge batteries near highly flammable objects WARNING To reduce the risks associated with fire and explosion which if not avoided could result in serious injury or death and or property damage Stop charging the battery if charging is not completed within the specified time Never leave ...

Page 9: ...mage Use the battery only in the specified equipment Donotdischargethebatteryclosetofireoratextremelyhightemperaturesover60 C forexample avehicle strongdirect sunlight CAUTION To reduce the risks associated with various hazards which if not avoided may result in minor or moderate injury and or property damage Battery can only be used within a temperature rage of 20 C 60 C ...

Page 10: ...Feed Print of copies Escape Backspace Shift Save Insert Barcode Backlight Library Tape Exit LCD display Symbol Hot Keys Navigation keys USB connector Power connector Space bar Power Clear OK Recall Remove Settings Size CAPS Serialization Enter ...

Page 11: ...with your printer The printer can operate with six AA alkaline batteriesforpower however alkalinebatteriesshould only be used as temporary backup power To save power the printer will automatically turn off after five minutes of inactivity Connecting the Power Adapter The printer uses a 110V 240V power adapter Connecting the power adapter with the battery pack inserted recharges the battery pack To...

Page 12: ...the tape cartridge door To remove the refill cartridge 1 Gentlyliftthetapecartridgedooronthebackofthe printer 2 Press the cartridge eject button The refill cartridge is lifted from the printer 3 Gently remove the cartridge 4 Insert a new cartridge as described above 5 Reset the tape width as described in Setting the Tape Width Setting the Tape Width Each time you insert a refill cartridge into the...

Page 13: ...inter s LCD display includes a caption bar across the top showing the current label type and feature indicators on the right side showing which features are currently selected See Figure 5 Figure 5 When the text you have entered will not fit on the label as currently defined the portion of the text that will not fit is shaded If you attempt to print the label containingtextthatwillnotfit theexcess...

Page 14: ...and off so you do not need to hold down both keys together Escape Key The ESC key returns you to the previous menu from within any menu without making a selection Navigation Keys The navigation keys operate as follows Backspace Key The key removes the character to the left of the cursor Clear Key TheCLRkeyclearsallcurrenttextsettingsandformat returning the display to the General label type Cutter ...

Page 15: ...therightofthe cursor position or To the left to add a label to the left of the cursor position 3 Press OK A new blank label is inserted in the display to the left or right of the current label You can move from label to label using the arrow keys Removing Labels from a File You can remove one or more labels from a label file To remove a label 1 Press REMOVE SHIFT RECALL 2 Select one of the followi...

Page 16: ... select a style 4 Press OK and then select Done ESC Creating Multi Line Labels You can create multi line labels depending upon the width of the label tape as follows The display shows two lines of text with the Caption bar displayed or three lines with the caption bar hidden Use the arrow keys to scroll through multiple lines See Hiding the Caption Bar on page 14 To create a multi line label 1 Typ...

Page 17: ...ap label is placed horizontally along the length of the wire or cable The label text is repeated as many timesaspossibledependingonthesizeofthetextand the width of the tape To create a horizontal wrap label 1 Press H WRAP SHIFT V WRAP 2 EnterthelabellengthandpressOK SelectAUTOto have the length automatically set to fit the text 3 Select Done ESC to create the label To create multiple labels quickl...

Page 18: ...n effect until you change it To set the label length 1 Press FIXED 2 Enter the length of the label and press OK Any text that does not fit within the fixed length appears shaded in the display and will be truncated when the label is printed Creating Patch Panel Labels Patch panel mode allows you to label a row of ports on a patch panel You select the distance between ports enter the desired text a...

Page 19: ...he text for each module Use the left or right arrow key to move from module to module To create the data for the modules automatically see Creating a Series of Labels on page 22 Using Fuse Multipliers Fuse multipliers allow you to adjust the size of individual fuse modules within a module type label To adjust the size of an individual module 1 Create a module label as described in Creating Module ...

Page 20: ...between cells 1 Press SETTINGS 2 Select Vert lines and press OK 3 Select On 4 Press OK and then select Done ESC A vertical mark is printed between each cell UsingBarcodes The printer can generate the following types of barcodes You can only print a barcode on 3 4 19 mm and 1 24 mm wide label tape You can choose to print the human readable text or not and you can serialize barcodes The barcode prin...

Page 21: ...ted or deleted just like any other character you enter To insert a symbol 1 Press SYMBOL 2 Select Default if necessary 3 Select a category of symbols 4 Use the arrow keys to find the symbol you want 5 Press OK to insert the symbol on the label Inserting User Symbols Custom symbols downloaded from 3M Portable Labeler Software are stored as User symbols See Using 3M Portable Labeler Software on page...

Page 22: ...the printer from 3M Portable Labeler Software any images are stored separatelyintheprinterasgraphicfiles Youcanapply these graphic files to most labels When a graphic cannotbeusedwithacertainlabel awarningappears on the display See 3M PortableLabelerSoftwareOnlineHelp for more information about placing images on a label To add a graphic 1 Press SETTINGS 2 Select Choose graphic and press OK 3 Selec...

Page 23: ...ultaneous and press OK A box appears around the character where the cursor was positioned 4 Select the first character position you want to increment and press OK 5 Select the second character position you want to increment and press OK 6 Select the amount you want to increment these characters on each label and press OK You can choose to increment in steps up to 10 7 Select the number of times to...

Page 24: ...d normally and collated Normal A101 A101 A101 A102 A102 A102 A103 A103 A103 Collated A101 A102 A103 A101 A102 A103 A101 A102 A103 To collate multiple copies 1 Press SETTINGS 2 Select Collate multi copies and press OK 3 Select On 4 Press OK and then select Done ESC Pausing between Labels By default the printer pauses after printing each label soyoucancutthelabel Youcanturnthisfeatureoffto have the ...

Page 25: ...e label to print or edit Recalling a label replaces the current label To recall a label from memory 1 Press RECALL The memory locations are displayed 2 Usethearrowkeystomovetothememorylocation that contains the label you want and press OK A message appears confirming that you want to clear the current label text and formatting 3 Press OK Deleting a Label File from Memory When you no longer need a ...

Page 26: ...y Windows program Create labels using the step by step wizard Print labels directly from 3M Portable Labeler Software Visit www 3m com electrical for more information about obtaining the software ConnectingtoyourComputer The 3M Portable Labeler PL300 printer connects to your computer using the USB connection located on the bottom of the printer Figure 6 While data is being transferred between the ...

Page 27: ...27 Symbols The following tables list the default symbols by category Electrical Voice Data Audio Video Warning Punctuation Brackets Arrows Numbers Currency Ω Ø μ λ _ ...

Page 28: ...FRONT RIGHT GARAGE SITTING ROOM GATE SPA GUEST BATH STUDY GUEST HOUSE SUNROOM GUEST ROOM THEATER GYM UPPER HOT TUB UTILITY ROOM INSIDE YARD ANALOG PHONO AUDIO RIGHT BACK SPKR CD RIGHT FRONT SPKR CENT FRONT SPKR RIGHT OUTD SPKR CENTER BACKSPKR RIGHT SIDE SPKR DIGITAL RIGHT SURR SPKR LEFT BACK SPKR SPEAKER LEFT FRONT SPKR SUBWOOFER LEFT OUTD SPKR SURROUND LEFT SIDE SPKR TAPE LEFT SURR SPKR VOLUME CO...

Page 29: ...LESS BACK DOOR HEAT DETECTOR CCTV HIGH WATER CAMERA HORN CARBON MONOXIDE LOW TEMP CELL MOTION SENSOR CONTACT PIR CONTROLLER PHONE DOOR POOL DOOR CONTACT POWER DRIVEWAY REMOTE DUAL TECH SENSOR DUCT SHOCK SENSOR FAN CUTOFF SIREN FRONT DOOR SLIDERS GARAGE DOOR SMOKE DETECTOR GAS SPARE GATE STROBE GLASS BREAK WATER DETECTOR GROUND ...

Page 30: ...display Uneven or slanted printing The cartridge is not inserted correctly Check the tape cartridge compartment to make sure the cartridge is inserted properly See Inserting and Removing the Tape Cartridge Make sure the two levers in the tape compartment are locked on either side of the cartridge holding the cartridge in place Cannot close the tape cartridge lid The cartridge is not inserted corre...

Page 31: ...artridge Change the tape width Printing Self Lam label not allowed Self Lamlabelscanonlybeprintedon24mmSelf Laminated tape Replace the tape cartridge Change the tape width Print error The tape is jammed Open the tape cartridge lid and check that the tape is not jammed Pullasmallamountoftapefromthecartridgetomakesure the tape moves freely No response when pressing keys One of the keys may be jammed...

Page 32: ...cture for a period of one year fromthetimeofpurchase Ifthisproductisdefectivewithinthewarrantyperiod yourexclusiveremedyshallbe at3M soption toreplacethe 3M product or refund the purchase price of the 3M product Except where prohibited by law 3M will not be liable for any indirect special incidental or consequential loss or damage arising from this 3M product regardless of the legal theory asserte...

Reviews: