background image

18

Table 1  –  Inspection and Maintenance Log

Serial Number(s):

Date Purchased:

Model Number:

Date of First Use:

Inspection Date:

Inspected By:

Component:

Inspection: 

(See Section 2.2 for Inspection Frequency)

User

Competent 

Person

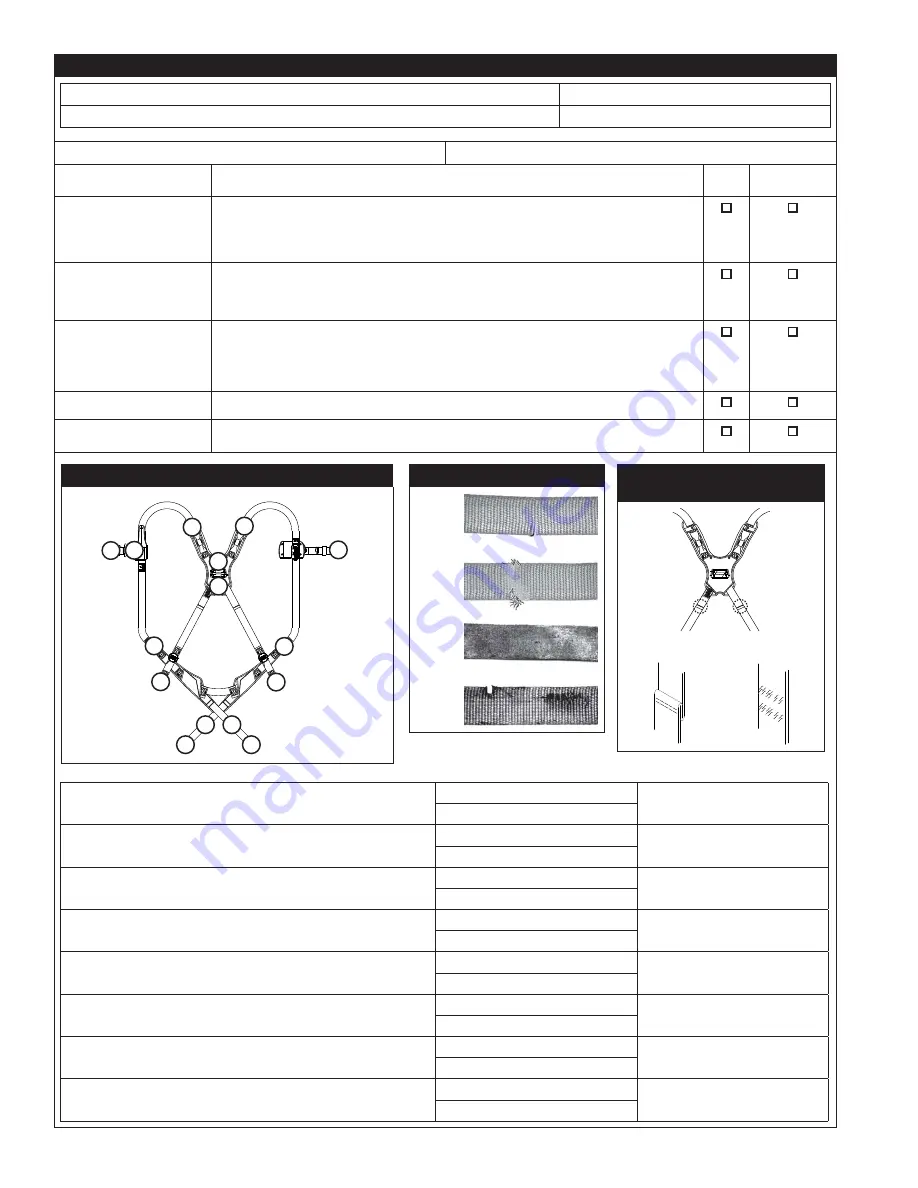
Harness Hardware

(Diagram 1)

Inspect harness hardware including buckles (1), adjusters (2), D-rings (3), Easy-Link (4), 

loop keepers (5), lanyard parking (6), etc. These items must not be damaged, broken, or 

distorted, and must be free of sharp edges, burrs, cracks, worn parts, or corrosion. PVC 

coated hardware must be free of cuts, rips, tears, holes, etc. in the coating to ensure non-

conductivity. Ensure buckles and adjusters work smoothly. 

Webbing & Stitching 

(Diagram 2)

Inspect webbing; material must be free of frayed, cut, or broken fibers. Check for tears, 

abrasions, mold, burns, or discolouration. Inspect stitching; Check for pulled or cut 

stitches. Broken stitches may be an indication that the harness has been impact loaded 

and must be removed from service.

Stitched Impact Indicators

(Diagram 3)

The Stitched Impact Indicators are sections of webbing lapped back on themselves and 

secured with a specific stitch pattern. The stitch pattern is designed to release when 

the harness arrests a fall or is exposed to equivalent force. 

If an Impact Indicator 

has been activated (indicated), the harness must be removed from service and 

destroyed.

Labels

All labels should be present and fully legible. See Figure 15.

System & Subsystem 

Components

Inspect each system component or subsystem according to the manufacturer instructions.

Diagram 1  –  Hardware

3

4

6

6

1

1

3

2

2

1

1

5

5

1

1

Diagram 2  –   Webbing

Cut

Frayed

Heavily

Soiled

Welding

Burns

Diagram 3  –  Impact 

Indicator

ü

 Good

û

 Indicated

Corrective Action/Maintenance:

Approved By:

Next inspection due:

Date:

Corrective Action/Maintenance:

Approved By:

Next inspection due:

Date:

Corrective Action/Maintenance:

Approved By:

Next inspection due:

Date:

Corrective Action/Maintenance:

Approved By:

Next inspection due:

Date:

Corrective Action/Maintenance:

Approved By:

Next inspection due:

Date:

Corrective Action/Maintenance:

Approved By:

Next inspection due:

Date:

Corrective Action/Maintenance:

Approved By:

Next inspection due:

Date:

Corrective Action/Maintenance:

Approved By:

Next inspection due:

Date:

Summary of Contents for DBI SALA ExoFit Nex 603XS1020

Page 1: ...0 603XL1020 603XXL1020 603S1022 603M1022 603L1022 603XL1022 603XXL1022 603XS1023 603S1023 603M1023 603L1023 603XL1023 603S1034 603M1034 603L1034 603XL1034 603S1036 603M1036 603L1036 603XL1036 603XS201...

Page 2: ...nt Elements Buckles and Adjusters Belt Pad 623XXXXX 643XXXXX 653XXXXX 603S2020 603M2020 603L2020 603XL2020 603S4020 603M4020 603L4020 603XL4020 603XXL4020 603S4044O 603M4044O 603L4044O 603XL4044O 603S...

Page 3: ...t SS Pass Thru SS Tongue Buckle Spring Bar Adjuster Belt Hip Pad Size Attachment Elements Buckles and Adjusters Belt Pad 663XXXXX 643S2018 643M2018 643L2018 643XL2018 643S4017 643M4017 643L4017 643XL4...

Page 4: ...4 2 A B C D E F 3 4 C B A FC B C FC 5 6 A B C D E F G A B C 7 A B C...

Page 5: ...5 8 9 CLICK CONNECT TIGHTEN LOOSEN RELEASE 1 1 1 2 A B C...

Page 6: ...6 9 3 A 3 B 3 C 3 D 3 E...

Page 7: ...7 10 1 A B 3 2 A B...

Page 8: ...8 11 A B C D E...

Page 9: ...9 12 13 A B 14 1 2 3 4 5 6...

Page 10: ...strap buckle and adjust to fit Connect waist belt DO NOT REMOVE THIS LABEL INSPECTION LOG Date Initial 1 3 2 4 5 C ONLY COMPETENT USERS SHOULD USE THIS EQUIPMENT MANUFACTURER S INSTRUCTIONS MUST BE FO...

Page 11: ...Z359 or other applicable fall protection codes standards or requirements Always consult a Competent or Qualified Person before using these systems To reduce the risks associated with working at heigh...

Page 12: ...3 Spring Bar Adjuster Belt Pad 14 Body Belt 15 Hip Pad SPECIFICATIONS Performance Maximum Free Fall Distance 2 m 6 6 ft Connecting System Maximum Allowable Fall Arresting Force 6 kN 1 349 lbf Harness...

Page 13: ...eller must provide these instructions in the language of the country in which the product will be used 1 3 TRAINING It is the responsibility of the user and the purchaser of this equipment to assure t...

Page 14: ...tions 3M snap hooks and carabiners should not be connected A To a D Ring to which another connector is attached B In a manner that would result in a load on the gate C In a false engagement where feat...

Page 15: ...Tongue through the Buckle Frame and inserting the Prong through the desired Grommet in the Tongue 3 Pass Thru Buckles A To fasten the Pass Thru Buckle Insert the Three bar portion of the buckle throu...

Page 16: ...3 8 MAKING CONNECTIONS When using a hook to connect to an anchorage or when coupling components of the system together ensure roll out cannot occur Roll out occurs when interference between the hook a...

Page 17: ...nd servicing procedures must be completed by a factory authorised service center Authorisation must be in writing Do not attempt to disassemble the unit 5 3 STORAGE AND TRANSPORT Store and transport t...

Page 18: ...mpact Indicators are sections of webbing lapped back on themselves and secured with a specific stitch pattern The stitch pattern is designed to release when the harness arrests a fall or is exposed to...

Page 19: ...orkmanship or materials 3M reserves the right to require product be returned to its facility for evaluation of warranty claims This warranty does not cover product damage due to wear abuse misuse dama...

Page 20: ...ngpo gu Seoul Phone 82 80 033 4114 Fax 82 2 3771 4271 TotalFallProtection mmm com Japan 3M Japan Ltd 6 7 29 Kitashinagawa Shinagawa ku Tokyo Phone 81 570 011 321 Fax 81 3 6409 5818 psd jp mmm com 3M c...

Reviews: