Controls and Indicators
Model C960
3M 2000 May
6
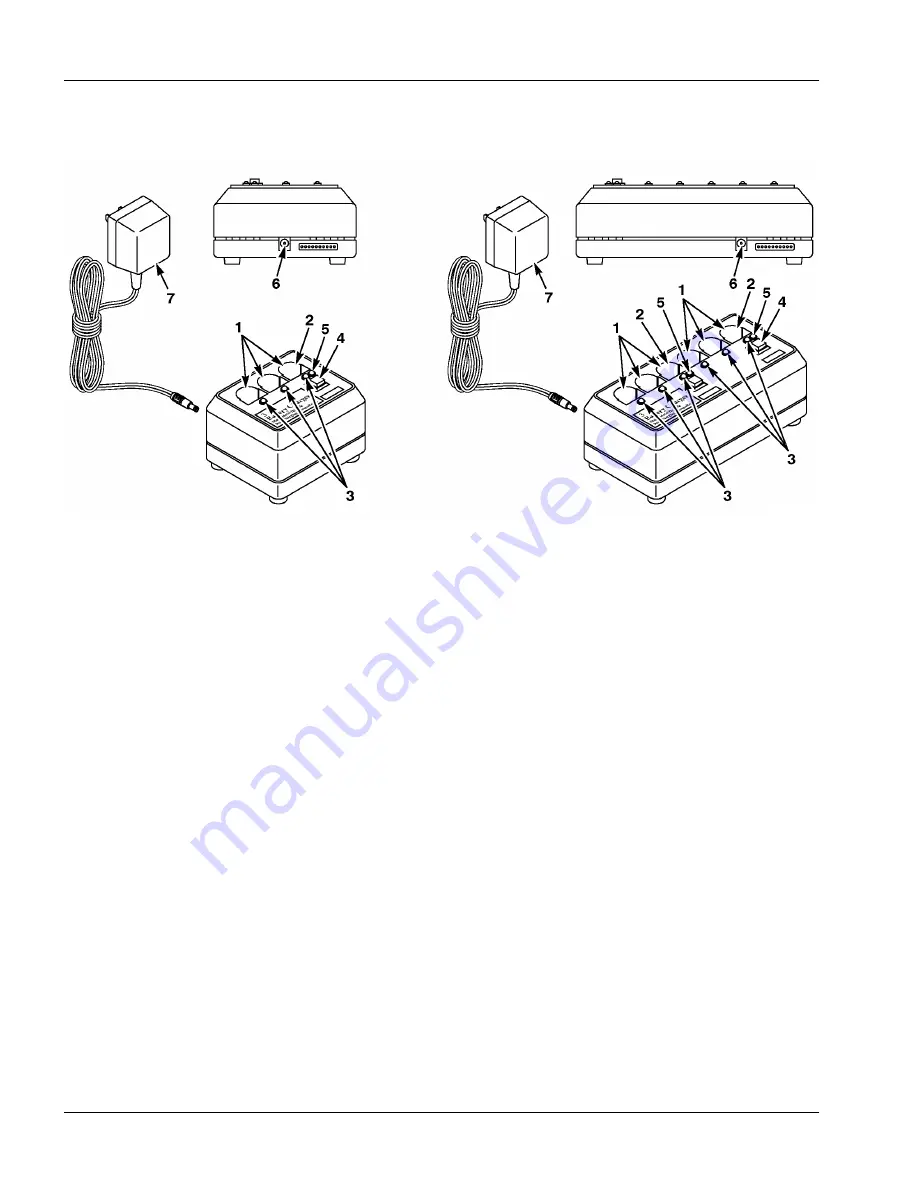
The 3–slot and 6–slot battery charger controls are shown below.
(Rear View)
(Rear View)
The charging slots hold batteries during the recharging cycle.
This dual–function slot holds a battery during conditioning and recharging
cycles. This slot functions as a conditioning slot when the conditioning button is
pressed.
The charging status indicators light RED, GREEN, or ORANGE to indicate
charging status:
RED indicates the battery is being charged.
GREEN to indicate the battery is fully charged.
ORANGE to indicate the battery is defective.
Press the conditioning button to condition a battery that is inserted in the
conditioning/charging slot.
The conditioning status indicator lights YELLOW to indicate the battery in the
conditioning slot is being conditioned.
This jack accepts the plug from the power supply cord.
The power supply provides power to the battery charger.
Battery Chargers
1
Charging Slots
2
Conditioning
and/or
Charging Slot
3
Charging Status
Indicators
4
Conditioning
Button
5
Conditioning
6
Power Supply Jack
7
Power Supply
Summary of Contents for C960
Page 3: ...Model C960 Headset Intercom System Revision History b E 3M 2000 May Blank Page ...
Page 7: ...Model C960 Headset Intercom System Table of Contents iv E 3M 2000 May Blank Page ...
Page 17: ...Model C960 Headset Intercom System Operation and Diagrams 1 10 E 3M 2000 May Blank Page ...
Page 19: ...Model C960 Headset Intercom System Operation and Diagrams 1 12 E 3M 2000 May Blank Page ...
Page 21: ...Model C960 Headset Intercom System Operation and Diagrams 1 14 E 3M 2000 May Blank Page ...
Page 22: ...Headset Intercom Systems Model C960 C860 Installation Instructions ...
Page 23: ......
Page 32: ...7 Brown Yellow Figure 7 Connecting Components to the Interconnect Module ...
Page 70: ...Headset Intercom System Model C960 Operating Instructions ...
Page 71: ......
Page 75: ...Important Information Model C960 3M 1999 May iv Blank Page ...
Page 109: ...4 Figure 2 Wiring for 3M C760 C960 Base Station with Interconnect Module ...
Page 140: ...2 5 Connect the cables from the module to the base stations as shown in Figure 1 Figure 1 ...
Page 153: ...3 Figure 2 Attenuator Connections ...
Page 156: ...2 Figure 1 Typical Installation on a Speaker Post ...


