background image

ENGLISH

Go to 
Main Menu

Go to Operator Guide
Table of Contents

3M 9700 Operator’s Guide

6

Operating The Projector

!

Do not illuminate the lamp with the projection mirror
in the down position.

To Operate Projector:

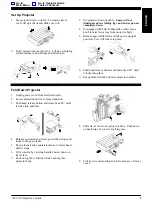
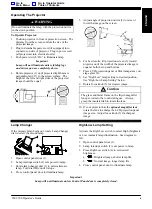
1. Position projector in front of projection screen.  The

distance from the screen controls the size of the
projected image.

2. Plug in detachable power cord (if equipped) into

connector on side of projector.  Plug in power cord
(all projectors) into electrical outlet.

3. Push power switch “On” to illuminate lamp.

Important

Lamp will not illuminate unless folding legs
and mirror pan are completely down.

4. Rotate projector (1) until projected light beam is

perpendicular (90

_

) to the screen surface.  The

height at the left and right sides of the projected
image should be equal.

5. Adjust angle of projection mirror (2) to raise or

lower the image on the screen.

6. For best results, tilt projection screen (3) toward

projector until the width of the projected image is
equal at both the top and bottom.

7. Place LCD projection panel or film transparency on

stage glass (4).

8. Set “High/Low” lamp setting to desired position.

See “High/Low Lamp Setting” below.

9. Rotate focus knob (5) for clearest image.

Caution

!

The glass and metal frame on the flip-in magnifier
lens get warm to the touch during use.  Always
grasp the insulated tab to rotate the lens.

10. If your projector has the optional magnifier lens

rotate the lens to enlarge the LCD projection panel
image size.  Adjust focus knob (5) for sharpest
image.

Lamp Changer

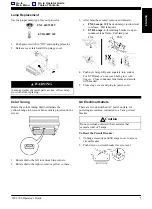
If the primary lamp burns out, rotate Lamp Changer
dial to select the second lamp.

9700–27C

1. Open control panel door (1).

2. Lamp interrupt switch (2) cuts power to lamp.

3. Rotate lamp changer dial (3) to select alternate

lamp.  Turn dial fully until it stops.

4. Close control panel door to illuminate lamp.

High/Low Lamp Setting

Activate the High/Low switch to select High (brightest)
or Low (normal) lamp illumination.  See diagram to
left.

1. Open control panel door (1).

2. Lamp interrupt switch (2) cuts power to lamp.

3. Press High/Low switch (4) to set desired

brightness.

a.

 = Brightest image, shorter lamp life

b.

 = Normal image, longer lamp life

4. Close control panel door to illuminate lamp.

Important

Lamp will not illuminate unless Control Panel door is completely closed.

Summary of Contents for 9700

Page 1: ...tprojektor Bedienungsanleitung Retroproyector Manual del operador Lavagna Luminosa Manuale d Uso Overhead Prosjekt r Bruksanvisning Overheadprojector Handleiding Retroprojector Manual do usu rio Overh...

Page 2: ...ador Esperamos que disfrute al usar este producto de alto rendimiento en sus reuni nes cursillos y demostraciones ITALIANO Vi ringraziamo di aver scelto una lavagna luminosa della 3M Questo apparecchi...

Page 3: ...7 cm x 177 cm 213 cm x 213 cm 243 cm x 243 cm 50I x 50I 60I x 60I 70I x 70I 84I x 84I 96I x 96I 9700 EVD F 342 mm 187 cm 74I 217 cm 86I 248 cm 98I 291 cm 114I 327 cm 129I 9700 EVD F 342 mm x 50I x 60I...

Page 4: ...k cord to pull plug from outlet Grasp plug and pull to disconnect 8 Let appliance cool completely before putting away or when replacing lamp 9 To reduce the risk of electric shock do not immerse this...

Page 5: ...ernal machine characteristics for the 9700 Part Identification List 1 Open Projection Head 2 Projection Mirror 3 Mirror Lift Tab 4 Triplet Lens 5 Flip In Magnifier Optional Accessory 6 Head Release Bu...

Page 6: ...Post will lock into place 6 Push head release button and rotate head 90_ until it locks into place 7 Grasp mirror lift tab and raise projection mirror Fold Down Projector 1 Unplug power cord from elec...

Page 7: ...r film transparency on stage glass 4 8 Set High Low lamp setting to desired position See High Low Lamp Setting below 9 Rotate focus knob 5 for clearest image Caution The glass and metal frame on the f...

Page 8: ...w lamp fully and squarely into socket For EVD lamp do not touch bulb glass with fingers Close condenser lens frame and secure with bracket 5 Close stage cover and plug in power cord Color Tuning Rotat...

Page 9: ...lass and Lenses Use 3M Overhead Cleaner 676 to remove surface dirt from the stage glass and projector lens Caution Cleaning the underside of the stage glass or Fresnel lens is not recommended Improper...

Page 10: ...ssible electrical problem a Replace lamp again b If new lamp fails immediately you may have an electrical problem Call for service Short lamp life Lamps seem to fail before expected life span a Defect...

Page 11: ...o de vendas da 3M ou o fornecedor onde adquiriu o seu aparelho COUNTRY COMPANY NAME ADDRESS LOCATION Austria 3M stereich Ges m b H Brunner Fieldstra e 63 A 2380 Perchtoldsdorf Belgium 3M Belgium N V...

Page 12: ...is marked with the letter L or coloured red The wire which is coloured blue must be connected to the terminal which is marked with the letter N or coloured black Replacement fuses of 10 amp should be...

Page 13: ...TA 300 Carro deluxe XX 0034 1164 0 RS 7110 70 0705 6877 2 DY 0210 0010 3 EVD 78 6969 8054 5 HA 5706 Lamp Lampe Lampe Bombilla Lampada Lampe Lamp L mpada EVD 9700 Overhead Cleaner Nettoyant pour r trop...

Page 14: ...Visual Systems Division 6801 River Place Boulevard Austin Texas 78726 9000 Printed in U S A E3M 6 96 78 6970 6359 8 Rev C...

Reviews: