background image

7

www.3GCardio.com

CARDIO

3G 

®

3G 

CARDIO

®

7

COMPUTER OPERATIONS

INCLINE

SPEED

Reset

Enter

Set

Set

Body Index

Custom

Aerobic

Fat Burn

Manual

Course

Goal

Fit Test

10

8

6

4

2

INCLINE

SPEED

2

3

4

6

8

Speed

Distance

Pace

Time

Calories

Incline

Mets

Calories/h

MP3

START

My         Zone

Heart Rate

Lo

w


 F

at

 Bu

rn    Aerobic   High

3GCardio.com

CAUTION:


Risk of injury to Persons. To avoid injury, use extreme caution 

when stepping on or off a moving belt and read Owner’s Manual prior to use.

it


to

or

or

press

the

of  the

To

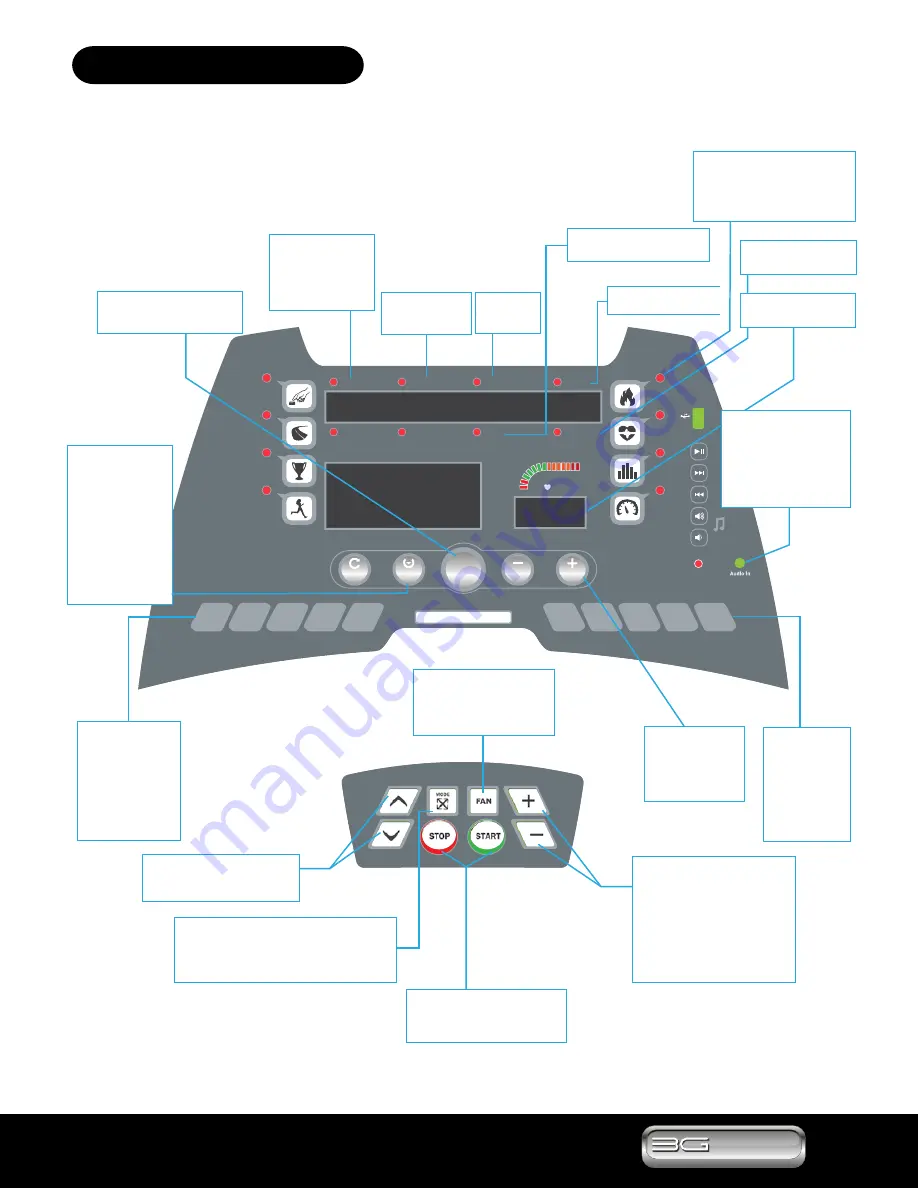
START: Starts the 

treadmill or a program.

Shows incline level 

during your workout.

Shows calories 

during your workout.

Shows time 

during your 

workout.

Shows minutes per mile during 

your workout.

PROGRAM KEYS: Press one of the 

program keys to select a program.

AUDIO IN 

Connect your MP3 

player to the console. 

MP3 compatibility is a 

standard feature. 

SPEED QUICK 

KEYS

1 – 12 MPH 

Press these to 

change the speed 

to the level shown.

SET – SET + 

Use these to adjust 

settings in different 

function modes.

INCLINE QUICK 

KEYS

Press to change 

INCLINE to 2, 4, 6, 

8 or 10.

ENTER

Press to confirm 

selection of a 

program, or to 

confirm speed 

and incline values 

when setting a user 

program.

FAN: Press to turn fan on or 

off. Press once for low, press 

again for high, then press 

again to turn off. 

MODE 

Press to display the preset or user program, or 

to display the elevation and elevation workout. 

▲ OR ▼ KEYS 

Increase or decrease INCLINE 

when pressed.

STOP / START 

Press to stop or start the treadmill.

+ OR – KEYS LOWER CONSOLE

Press to increase or decrease 

SPEED. Pressing once increases 

or decreases speed by 0.1 MPH. 

Press and hold for 2 seconds to 

increase or decrease SPEED 

quickly. 

Shows speed during 

your workout.

Shows distance during 

your workout.

Shows pulse during your 

workout.

COMPUTER OPERATIONS

Summary of Contents for Elite Runner

Page 1: ...CARDIO 3G 3G CARDIO Elite Runner Treadmill Owner s Manual ...

Page 2: ...M UP COOL DOWN 3 UNPACKING 4 ASSEMBLY INSTRUCTIONS 5 6 COMPUTER OPERATIONS 7 15 BELT ADJUSTMENT 16 CARE MAINTENANCE 17 LUBRICATION MAINTENANCE 18 TROUBLE SHOOTING 19 PARTS LIST 20 PARTS LIST BOLTS 21 EXPLODED DRAWING 22 24 WARRANTY 25 ...

Page 3: ... modify the treadmill in any way IMPORTANT SAFETY INSTRUCTIONS SAFETY IMPORTANT Read all instructions and warnings before using treadmill IMPORTANT VOLTAGE INFORMATION Before plugging the power cord into an electrical outlet verify that the voltage requirements for your area match the voltage of the treadmill that you have received The power requirements for this treadmill include a grounded dedic...

Page 4: ...rcise is reflected in your heart rate Exercise must be sufficiently rigorous to strengthen your heart muscle and condition your cardiovascular system Before starting any exercise program consult your physician HOW LONG SHOULD YOU EXERCISE Sustained exercise conditions your heart lungs and muscles The longer you are able to sustain exercise within your target heart range the greater the aerobic ben...

Page 5: ... to your buttocks as possible Hold for 15 counts and repeat with left foot up Inner Thigh Stretch Sit with the soles of your feet together with your knees pointing outward Pull your feet as close into your groin as possible Gently push your knees toward the floor Hold for 15 counts Toe Touches Slowly bend forward from your waist letting your back and shoulder relax as you stretch toward your toes ...

Page 6: ...le mast top cover Lubricant for running deck 4 WARNING Use extreme caution when assembling the treadmill Failure to do so could result in injury NOTE Each step number in the assembly instructions tells you what you will be doing Read and understand all instructions thoroughly before assembling the treadmill UNPACKING ASSEMBLY UNPACKING M6 Allen wrench Main body and Console mast M X mm pcs 6 10 2 4...

Page 7: ...ine Running belt Side rein Roller cover Side cover Safe key Pad base Handle ber frame Upper Console Safety Key Handle Bar Console Mast Right Up Right Tube Console Mast Left Up Right Tube Motor Cover Running Belt Rear Roller Leveling Feet Lift Arm Incline Side Motor Cover Side Rails 34 6 in 83 9 in 58 3 in ASSEMBLY INSTRUCTIONS ...

Page 8: ...When you find the screw holes on the side of Up Right tube align to the screw holes on the console case put in M8x15mm bolts 4 pcs of each screw them on A Insert and tighten the M4x15mm bolts and M6x10mm bolts in the Side Motor Covers Assemble the Up Right tubes onto Base Frame Assemble the handle bars into the console Assemble the Upper Console onto the Up Right tubes Screw the M8x40mm bolts onto...

Page 9: ...e console MP3 compatibility is a standard feature SPEED QUICK KEYS 1 12 MPH Press these to change the speed to the level shown SET SET Use these to adjust settings in different function modes INCLINE QUICK KEYS Press to change INCLINE to 2 4 6 8 or 10 ENTER Press to confirm selection of a program or to confirm speed and incline values when setting a user program FAN Press to turn fan on or off Pre...

Page 10: ...me Calories Incline Distance Pace Calories h Mets Speed Fan Mode Stop Start Manual Course Goal Fit Test Fat Burn Aerobic Custom Body Index Start Enter Reset Set Speed One Touch Incline One Touch Incline Indicates remaining or elapsed time of the current program Indicates total accumulated calories burned Indicates current level of incline or elevation in 1 increments with a max of 15 Indicates the...

Page 11: ...t to set exercise age next Enter 4 Set to set exercise weight next Enter 5 Set to set exercise speed next Enter 6 Set to set exercise incline next Enter 7 Set GO to start programs 8 Run the program and show LAP graph on dot matrix display Till the time count down to 0 00 Quick Start Press START to start the treadmill The display will count down 3 2 1 then the belt will start moving at the slowest ...

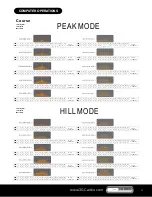
Page 12: ...13 14 16 17 17 20 21 29 SEG Total Time Speed MPH Incline VO2 Max SEG Total Time Speed MPH Incline VO2 Max 1 1 00 0 31 15 7 00 6 0 6 57 7 2 00 2 32 55 7 15 6 0 6 58 8 2 15 2 33 6 7 30 6 0 6 60 2 2 30 2 34 65 7 45 6 0 6 61 2 2 45 2 35 35 8 00 6 0 8 62 3 3 00 2 37 45 8 15 6 0 8 63 3 3 15 2 39 55 8 30 6 0 8 64 3 30 2 41 3 8 45 6 0 8 65 3 45 2 43 4 9 00 8 66 5 4 00 4 44 1 9 15 8 68 2 4 15 4 45 15 9 30 ...

Page 13: ...24 20 56 65 37 32 37 28 31 25 27 22 24 18 21 18 66 32 28 32 25 27 22 24 19 21 17 18 17 11 Fat Burn Heart Rate based training to help maximize weight loss To Use Press FAT BURN button Use SET and ENTER to adjust workout time and age The treadmill will automatically display your recommended Target Heart Rate Zone Use SET to set your desired Target Heart Rate see Target Heart Rate Zone for more infor...

Page 14: ...Body CHEST STRAP TRANSMITTER To operate HRC the user needs to wear the included wireless chest strap transmitter Custom designing your own personal workout Two custom programs are available for you to design save and reuse Choose the settings for speed incline and time of each segment and the duration of the overall workout To Use Press CUSTOM button Use SET to select Custom 1 or Custom 2 Select a...

Page 15: ...dio jack The console can also read and play MP3 music files using the built in USB port Play your favorite music through the built in speakers while you workout by loading MP3 files onto a standard USB flash drive and plugging it into the console NOTE The audio frequency can affect the accuracy of the heart rate It is recommended to turn off or turn down the volume of any audio when you are measur...

Page 16: ... 24 Cool Down 2 3 4 7 6 5 4 3 2 1 1 2 4 2 1 1 2 1 2 4 1 2 3 4 5 6 7 8 9 10 11 12 13 14 15 16 17 18 19 20 21 24 Cool Down 2 5 6 9 8 3 6 4 3 1 1 6 3 1 2 2 1 3 6 3 1 2 3 4 5 6 7 8 9 10 11 12 13 14 15 16 17 18 19 20 21 24 Cool Down 7 10 3 9 5 8 2 3 9 5 7 7 4 3 1 5 2 6 4 1 1 2 3 4 5 6 7 8 9 10 11 12 13 14 15 16 17 18 19 20 21 24 Cool Down 8 12 5 10 7 10 3 5 10 6 9 2 8 4 5 2 8 3 8 6 1 2 3 4 5 6 7 8 9 10...

Page 17: ...8 19 20 21 24 Cool Down 3 4 1 1 3 1 2 2 1 3 2 4 4 4 4 3 3 2 2 1 1 2 3 4 5 6 7 8 9 10 11 12 13 14 15 16 17 18 19 20 21 24 Cool Down 5 6 3 6 4 3 1 3 6 3 4 4 5 5 6 6 2 5 5 4 1 2 3 4 5 6 7 8 9 10 11 12 13 14 15 16 17 18 19 20 21 24 Cool Down 6 3 6 4 3 1 3 6 4 5 2 6 5 7 8 9 9 9 9 9 1 1 2 3 4 5 6 7 8 9 10 11 12 13 14 15 16 17 18 19 20 21 24 Cool Down 4 1 3 1 1 2 2 2 3 5 4 2 1 5 5 5 5 3 3 1 2 3 4 5 6 7 8...

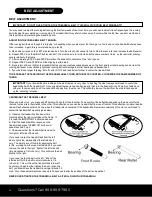
Page 18: ...s as though it is slipping or hesitating when you plant your foot during a run the tension on the running belt may have to be increased TO INCREASE THE RUNNING BELT TENSION A Place 8MM wrench on the left belt tension bolt Turn the wrench clockwise 1 4 turn to draw the rear roller and increase the belt tension B Repeat STEP A for the right belt tension bolt You must be sure to turn both bolts the s...

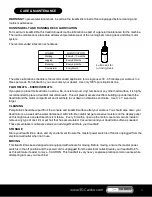
Page 19: ...m The recommended lubrication schedule as USAGE 1 6kph 6 12kph LUBRICATION Every 6 months Every 3 months Every 2 months 12 16kph Lubricant for running deck This schedule is the recommended application for a single user up to 20 30 minutes per time 3 4 times per week For lubrication you can contact your dealer CLEANING Perspiration should be wiped from the console and treadmill surface after your w...

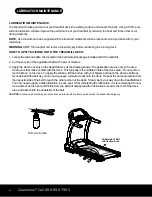
Page 20: ...venly on the treadmill deck as the drawing shows The application area is only in the area where your feet make contact with the deck This typically is the middle 2 3rds of the deck area Do not put too much silicone on the deck To apply the silicone lift the belt up with your fingers and reach the silicone bottle as far underneath the belt as you can and squeeze a small amount onto the deck Repeat ...

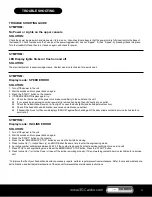
Page 21: ...nsion is it too tight Loosen the belt slightly see belt adjustment section 4 4 Check if the treadmill need lubrication see care and maintenance section 4 5 If treadmill belt runs for 10sec and displays ERROR again after checking all of the above items contact a service technician for a service call SYMPTOM Display reads INCLINE ERROR SOLUTION 1 Turn off the power to the unit 2 Wait 5 seconds and t...

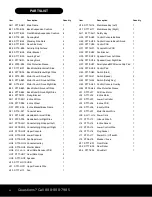
Page 22: ...pport Left 1 AG2 ST79 AG2 Console Upright Support Right 1 HO1 ST79 HO1 Upper Console 1 HO2 ST79 HO2 Lower Console 1 HO3 ST79 HO3 Fan Adjustment 1 HO4 ST79 HO4 Console Overlay 1 HO5 ST79 HO5 Monitor Board 1 HO6 ST12 HO10 Heart Rate Receiver PCB 1 HO7 ST77 HO7 Heart Rate Grips 2 HO9 ST77 HO9 Speaker 2 H10 ST77 HO10 USB 1 H11 ST01 HO11 Upper Console Wire 1 H13 ST77 H13 Fan 1 Item Description Quantity...

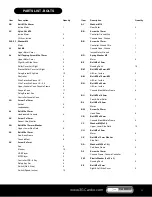
Page 23: ...itor 10 USB Player 6 MP3 Player 2 Controller PCB 8 Key 5 Safety Key Set 4 Switch Start Stop 6 Switch Speed Incline 12 Item Description Quantity AY Washer M10 Rear Roller 3 BB Screw 4 x 10mm Controller Ground Wire 1 Console Case Ground 1 BB Screw 4 x 15mm Controller Ground Wire 1 Console Case Ground 1 Incline Motor Ground 1 BD Spring Washer M8 Motor 4 BE Bolt M8 x 35mm Running Deck 10 BM Bolt M10 x...

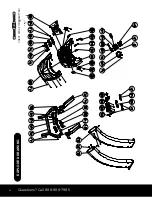
Page 24: ...22 Questions Call 888 888 7985 EXPLODED DRAWING 22 CHEST STRAP TRANSMITTER optinal ...

Page 25: ...23 www 3GCardio com 3G CARDIO EXPLODED DRAWING 23 J23 J28 J06 ...

Page 26: ...24 Questions Call 888 888 7985 EXPLODED DRAWING 24 ...

Page 27: ... purchased the treadmill You may also call 3G Cardio 1 888 888 7985 Monday through Friday 9 00 a m to 5 00 p m Arizona time Ask to speak to the service department and please have your serial number date of purchase original bill of sale and location of purchase available This warranty shall not apply to a 3G Cardio Elite Runner Treadmill which is subject to misuse neglect accident or unauthorized ...

Page 28: ...CARDIO 3G 3G CARDIO 3G Cardio Fitness Equipment 14647 So 50th Street Suite 110 Phoenix AZ 85044 1 888 888 7985 www 3GCardio com ...

Reviews: