background image

3DGence INDUSTRY F340   |   51

version 1.0/07.2017

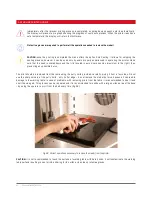
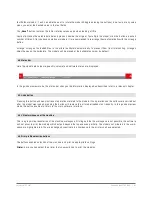
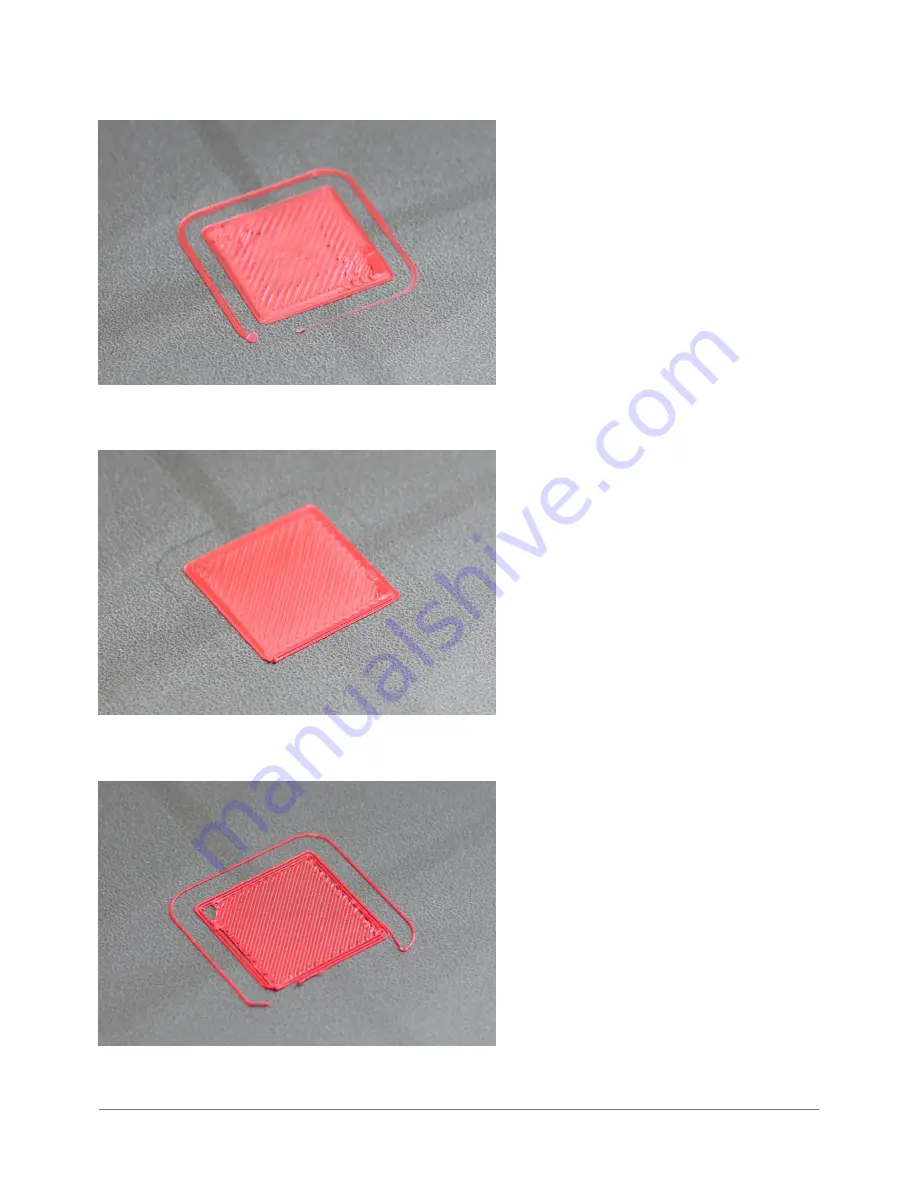
Hotend too low

The material is pushed out of the hotend while 

printing the first layer. It leads to deformation of 

the base of the printed model. It’s an indication to 
recalibrate the heatbed.

Hotend in correct position

The material is laid out regularly. Whole surface of 
the model’s base  is covered with plastic and the 

upper surface of the first layer is a regular, flat and 

lithe plane.

Hotend too high 

The distance between the heatbed and the hotend 
is too large. It causes a poor adhesion of the ma-
terial to the heatbed. It may lead to the model to 
be peeled off during printing. It’s an indication to 
recalibrate the heatbed.

Summary of Contents for INDUSTRY F340

Page 1: ...USER MANUAL 3DGence INDUSTRY F340 ...

Page 2: ...2 3DGence INDUSTRY F340 ...

Page 3: ...der chamber 1 6 Dual head module 1 7 Power supply management 1 7 1 Master switch 1 7 2 Printer power switch 1 7 3 Emergency stop button 1 8 Memory card 1 9 Smart Material Manager System 2 Set composition 3 User interface 3 1 Standby menu 3 2 Menu during operation 4 Menu structure III PREPARING TO OPERATION 1 Installing 3DGence Slicer 1 1 Updating firmware 2 Connectingand turning the printer on 3 P...

Page 4: ...nt profile selection buttons 4 6 Loaded model 4 7 Virtual buildplate of the machine 4 8 Arrow indicating the physical front of the machine 4 9 Printer axis preview 4 10 Prepare to print button 5 Preview mode of gcode 5 1 View options 5 2 Options for previewing layers 5 3 Undo button 5 4 gcode file preview 5 5 Status bar 5 6 File saving button 6 Advanced settings 6 1 Access to advanced settings 6 2...

Page 5: ...he module 2 2 Module exchange VII ADDITIONAL INFORMATION 1 Autocalibration and autocompensation VIII MAINTENANCE 1 Indications for calibrating the heatbed 2 Dual head module calibration 2 1 Precision axes alignment 2 2 X Y calibration dual head module offset 3 System errors and troubleshooting IX GLOSSARY 73 73 74 75 75 76 76 77 77 77 77 79 81 83 ...

Page 6: ... The mission of 3DGence is to offer only top professional devices and solutions This manual includes information necessary to ensure correct and safe operation Prior to using the device it is neces sary to read and understand the whole content of this manual A supplemental document to this manual is avaiable on the website It is forbidden to use the printer by people who have not read the manual A...

Page 7: ...tain the most accurate printing performance automatic material type detection and as a result a top print quality For more information on SMM system please refer to section 4 Operating the device The 3DGence company does not restrict the use of uncertified materials this however makes it impossible to use the SMM system 3DGence takes no responsibility for the quality of prints performed using off ...

Page 8: ...over the heated chamber of the device or open the front door of the device during operation touch live electrical parts touch linear guides or ball screws during device operation operate the device with wet hands put any objects on or under the printer table both during and out of printer operation put any liquid containers on the device leave the operating device without a supervision of an adult...

Page 9: ...ase of failure unsuccessful print by providing unobstructed access to the emergency stop button Heated table hotend and chamber are hot even after printing is completed fig 3 Check the temperature on the display before touching those parts or allow at least 30 minutes after turning off to cool down e g in order to clean it remove the model etc 4 2 Carrying the device To provide users safety and to...

Page 10: ...10 3DGence INDUSTRY F340 Fig 4 Position of lifting handles Fig 5 Position of lifting handles handle handle handle handle handle handle ...

Page 11: ... load provide sufficient amount of free space by taking into account device outer dimensions fig 6 and 7 provide access from all sides of the printer for maintenance the device should be kept away from other heat sources direct and long term exposure to sunlight should be avoided installation site should be equipped with a mains socket rated 240 V 6A 50 60 Hz it is recommended to use a UPS to prev...

Page 12: ...ny objects or print remains in the printer working area that could cause jamming or damage to the machine check X and Y axes to verify if nothing obstructs their movements Check if toothed belts are tensioned and do not show any visible damage It can be done through the open printer front door once the device is off and cooled down check if the Z axis stop fig 8 is not damaged broken or bent and i...

Page 13: ... figures below including the descriptions of the most important device components Re ferring to figures and terms will make it easier to understand the terms used in 3D printing 1 1 Outline II DEVICE DESCRIPTION 1 PRINTER CONSTRUCTION Fig 9 3DGence INDUSTRY F340 front view 1 Emergency stop button 2 LCD display 3 Filament chamber handle 4 Vibroisolator 5 Chamber s door 6 Power button 5 6 1 2 3 4 ...

Page 14: ...14 3DGence INDUSTRY F340 Fig 10 3DGence INDUSTRY F340 left side view 7 Emergency stop button 8 NFC reader 9 Thermostat display 10 Filament chamber cover handle 11 Filament chamber s door 7 8 9 10 11 ...

Page 15: ...3DGence INDUSTRY F340 15 version 1 0 07 2017 12 14 13 Fig 11 3DGence INDUSTRY F340 rear view 12 Service cover 13 Fuse 14 Power cable slot ...

Page 16: ...16 3DGence INDUSTRY F340 Fig 12 3DGence INDUSTRY F340 right view 15 USB A port 16 USB B port 15 16 ...

Page 17: ...DGence INDUSTRY F340 17 version 1 0 07 2017 Fig 13 3DGence INDUSTRY F340 top view 17 Filament chamber cover 18 Heatbed 19 Dual head module 20 Rectangular bellows 21 Working chamber s doors 17 20 19 18 21 ...

Page 18: ...18 3DGence INDUSTRY F340 Fig 14 3DGence INDUSTRY F340 izometric view 22 Filament spool holder 23 Protective cover 24 SD card slot 25 Heatbed 22 23 25 24 ...

Page 19: ...3DGence INDUSTRY F340 19 version 1 0 07 2017 Fig 15 3DGence INDUSTRY F340 front view 26 SD card slot 27 LCD display 28 Heatbed 29 Dual head module 30 Power button 27 26 28 29 30 ...

Page 20: ...into account when designing a printing model Fig 16 Marking of printer axes 1 3 Printing bed The entire movable printing bed is marked with a brighter color Darker color represents the actual printing space A heatbed provides a good print adhesion even when the device is operated for dozens of hours with no breaks The actual printing bed is installed on a movable mount making it possible to extend...

Page 21: ...amber there are two spool holders for installing filament spools They are connected to the meas urement system that performs real time measurement of the available material weight Apart from spool holders there is a heater adjusting the temperature inside the filament chamber 1 4 1 Filament chamber temperature adjustment The temperature inside the filament chamber is adjustable This option can be ...

Page 22: ...els For more information on installing materials and operating extruders refer to section 4 of the PREPARING FOR OPERATION chapter 1 6 Dual head module The 3DGence INDUSTRY F340 printer is fitted with two hotends installed in a revolver based modular system The module fitted with two hotends can be quickly and easily removed from the device and replaced with a new one suitable for printing with ot...

Page 23: ...rotector 1 7 2 Printer power switch The main utility printer power switch is located in the front right bottom corner of the device fig 21 Turning on the printer power initializes its display turns the working area lighting and sets the T0 head in its working po sition Once the work is finished and the device is cooled down it can be used to turn the device off For more information on how to start...

Page 24: ...n the top of the device fig 22 Pressing the button results in immediate power cut off to all motors heaters and the controller After pressing the button remains in the pressed position until it is turned clockwise The device operation is disabled until the emergency stop button is reset 1 Fig 22 Location of the emergency stop button 1 ...

Page 25: ...ial holders For more information on operating SMM system refer to OPERATING THE DEVICE section 4 2 SET COMPOSITION The 3DGence INDUSTRY F340 comes with a supply of consumables and a set of necessary accessories The set consists of 3DGence Slicer 6 kilograms of ABS filament 4 kilograms of HIPS supporting material spatula for removing prints tweezers protective gloves SDHC Class 10 memory card pendr...

Page 26: ...ains an initialization screen is displayed indicating that the printer is being prepared to operation Once the initialization is completed the display shows a main standby menu The left side of the menu shows information on temperatures and the status of print cooling fans They are from top to bottom ...

Page 27: ...p the SD card manager screen containing the saved files available to print G code The list of files can be navigated using arrows on the right Alternatively a file can be chosen by pressing directly its name The background of selected file is highlighted in light gray The system immediately displays the information on time necessary to print the file and the consumables needed for the project for ...

Page 28: ...uder available is the option Unload Change If the selection triggers the procedure of filament removal If the extruder is empty the Load option is available which triggers the pro cedure of loading a new material MANUAL CONTROLS The MANUAL CONTROLS key transfers the user to manual control screen with some of the printer functions described below Tool 0 head setting corresponding to extruder 0 in w...

Page 29: ... is inside the chamber In some cases using the options listed above results in homing the Z axis and then setting it in a desired position It can lead to damage to the device MENU The MENU key in standby mode triggers different advanced options of the 3DGence INDUSTRY printer They are described in detail below PREPARE The PREPARE key sends the operator to menu for printer preparation operations Th...

Page 30: ...described above in the instructions TUNE The TUNE icon allows the user to introduce precision changes to the basic print parameters Speed Override percentage print speed 100 means a default print speed resulting from the machine code By pressing and keys you can increase or decrease the print speed The key marked with RESET symbol restores the default 100 value Flow Override percentage of the mate...

Page 31: ...s users to set any temperature to the printing bed in the range 40 160 C Chamber allows users to set any temperature to the device chamber in the range 20 85 C Fan Settings menu that allows to define the behavior of print cooling fans The two available options include Fan Override enabling this option ON sets the fans to power values preset in the printer The commands resulting from the machine co...

Page 32: ...the offset that may occur between nozzles tips set in working positions An improper setting is presented in the figure 23 CAUTION the Offset X Y and Z values refer always the T1 head position to absolute T0 head position Y Offset similarly to X Offset Y Offset defines the position difference for extruder 1 nozzle in relation to 0 nozzle in Y axis at the working position Z Offset similarly to X Off...

Page 33: ...esponding to the pad thickness The parameter can adopt negative values then the print start point will be set lower closer to the table CAUTION negative Z offset values can never exceed the first layer thickness Pressure sensitivity of the measurement point for the Z axis autocompensation It allows for defining the value of head pressure during height measurement Sensitivity can be adjusted within...

Page 34: ... you can turn on off the working area lighting BEEPER the printer is fitted with an acoustic signaling device informing the operator for instance of chamber reaching a preset temperature or when the printing bed scanning is completed A beep indicates also when some errors occur described in more detail in MAINTENANCE chapter section 5 By pressing the BEEPER key you can turn the acoustic signaling ...

Page 35: ...oblem is solved by the operator when it can be resumed SLEEP MODE settings for printer sleep mode Time set with defines the period after which the printer goes into sleep mode Pressing the RESET button restores the default value Sleep mode means that the device goes into the status of reduced power consumption turns off its lighting and changes the display screen into the following To return to th...

Page 36: ...ule version installed in the device 3 2 Menu during operation The 3DGence INDUSTRY printer menu is subject to significant changes when the device is in printing mode Some menu options available in the standby mode are unavailable during printing The description of all menu aspects in the operation mode is available below The main menu of the working device is as follows On the left it is the same ...

Page 37: ...rrupted process cannot be resumed MATERIAL STATUS Material Status key calls up a screen with information and operations related to installation removing and changing consumables All the information included in this screen is presented separately on the left for extruder 0 while on the right for extruder 1 The following description is related to material coming from the 3DGence Base of Certified Ma...

Page 38: ...dit the temperature of printing bed and working chamber Fan Controls settings of print cooling fans Fan Override enabling this option ON sets the fans to power values preset in the printer The commands resulting from the machine code will be ignored Fan Enabled Disabled selecting this option stops the print cooling fans No command regarding the behavior of print cooling fans included in the machin...

Page 39: ...3DGence INDUSTRY F340 39 version 1 0 07 2017 ...

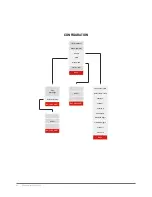
Page 40: ...40 3DGence INDUSTRY F340 Speed override Flow override Temperatures Fan Speed Fan Settings BACK RESET BACK TUNE Tool 0 Tool 1 Bed Chamber BACK BACK Fan enabled disable d Fan override ON OFF BACK BACK OFF ...

Page 41: ... Tool 1 Y offset Tool 1 Z offset Measure T1 offset BACK Autocompensation Printing module Original X Original Y Print X Print Y BACK Reset to default Save Reset to default Save Z offset Pressure Reset BACK Save Probe position X Probe position Y BACK RESET BACK RESET BACK RESET BACK RESET PRINT XY ORIGINAL XY ...

Page 42: ...RATION Auto tool change BACK POWRÓT Force sensor value Drivers temp value Endstop X BACK BACK POWRÓT RESET HW test SMM Sleep mode Factory reset Defect threshold Endstop Y NFC address Encoder 1 Encoder 2 Filament weight 1 Filament weight 2 BACK POWRÓT RESET Endstop Z ...

Page 43: ...3DGence INDUSTRY F340 43 version 1 0 07 2017 ...

Page 44: ...ged 8 Press the Upload key Loading the new software may take a few minutes During the loading process printer display can show colorful artifacts graphical noise this is however completely normal Update success will be confirmed by an appropriate message displayed on the computer screen 9 Now you can disconnect the USB cable from the printer and turn off the printer 10 Turn on the printer and perf...

Page 45: ...ures to equalize before turning the printer on Printer startup 1 Make sure that all printer packaging components are removed 2 Install the cable gland on its thread from the printer side 3 Lay the power cord to a fused mains socket and plug it in 4 Switch the fuse located at the back of the device to ON fig 24 5 Make sure that the emergency stop button is in unlocked position If the emergency stop...

Page 46: ... if toothed belts are not damaged or worn Check if Z axis stop Figure 28 is not bent damaged or broken and if it is aligned with the Z axis endstop notch 2 If there is a filament inside the head remove it see Filament removal and then cool the head down to the temper ature below 50 C 3 Remove all contamination and material remains from the T0 head nozzle and from the table by using a putty knife n...

Page 47: ...ion If the material is installed at first use the Filament removal option its procedure description is available below 2 If no fragments of previously used material are present in the holder or in PTFE tubing the material installation should be continued From the MATERIAL STATUS level select the LOAD MATERIAL option located under the specific extruder 0 or 1 A semi automatic manager is started whi...

Page 48: ... position the working table in the central position fig 26 6 Place the filament spool on the holder Its free end should be passed through the cleaner and PTFE tubing then push until it gets to the encoder By turning the encoder wheel clockwise place the filament at the height of the extruder knurl as shown in the following figure Fig 26 Unlocking the extruder Fig 27 Proper filament position during...

Page 49: ...erted in the head If necessary clean the knurl surface 3 Repeat the procedure of material loading Make sure that the end of the filament is not deformed Cut it at an angle of 45 degrees to make material loading easier 4 2 Removing the material 1 Printer bed positions automatically in its central position Prior to starting the procedure make sure that it is empty 2 Cut the material right in front o...

Page 50: ...3 From the main menu choose the PRINT option 4 From the file manager choose a file to be printed Use the arrows on the right side of the menu to navigate the files A file can be chosen by pressing directly its name 5 Confirm your selection by pressing the PRINT key 6 The device will start the procedure of heating automatically When appropriate temperatures are achieved the printing process starts ...

Page 51: ...d Hotend in correct position The material is laid out regularly Whole surface of the model s base is covered with plastic and the upper surface of the first layer is a regular flat and lithe plane Hotend too high The distance between the heatbed and the hotend is too large It causes a poor adhesion of the ma terial to the heatbed It may lead to the model to be peeled off during printing It s an in...

Page 52: ... zero position maximum to the right thus preventing any possible burns The print should be removed from the table using the putty knife provided carefully prying it from a few sides Do not use the sharp corners of the putty knife only its flat edge do not remove the model by force because it can lead to damage to the working table In case of problems with removing prints from the table it is recom...

Page 53: ...ng any errors The threshold of error amounting by default to 70 can be changed to any other value from the range from 1 to 100 However it is not recommended to set the threshold higher than 70 because it can lead to unnecessary suspension in printer operation To change the error threshold 1 Go to MENU Configuration SMM Defect Threshold 2 By using keys set a desired value When a material feed error...

Page 54: ...it of melted burned material that could be located on the external part of the nozzle 5 1 Cleaning the hotends To do this 1 Start the Preheat option from the printer menu It will provide a good access to the head by using the Manual Controls option Middle or Down 2 Provide a good access to the head by using the Manual Controls Middle or Down 3 By using a non flammable material or tweezers gently r...

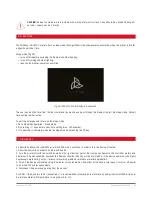
Page 55: ... to completely disable the sleep mode by pressing the Off key Fig 29 INDUSTRY printer display in sleep mode 7 TURNING OFF As described above the INDUSTRY printer is fitted with 3 switches In order to turn the device off safely 1 Allow the device to cool down its table and heads 2 Turn the printer off with the switch located on the right bottom part of the front panel Power to the controller motors...

Page 56: ... will be assessed and or printed in the company s headquarters The produc er will suggest a solution advice initiate maintenance activities if required prepare gcode executable file or update printing profiles accordingly The software should be downloaded from the producer s website The recommended hardware requirements to initialize the software are as follows Windows 7 or later screen resolution...

Page 57: ...odel 4 Select the material you want to use to make your model 5 Select the visual quality expected better quality means longer printing time 6 Select your models desired durability 7 Prepare your file with the Prepare to print button 8 Save the executable gcode file to SD card with the Save File button which replaces the Prepare to print button in the bottom right corner 9 The file can be read out...

Page 58: ... given time e g as you have not selected any model are greyed out Add Model enables to locate and import a file in stl format to the software You can select several files to be imported simultaneously You can also use the function of dragging stl files onto the main software window The models can be removed from the workspace by left clicking them and using Delete Model button or pressing Delete o...

Page 59: ...mouse button selects or deselects the model The right mouse button enables to rotate the camera The right mouse button with the keyboard Shift pressed enables to move the camera The mouse scroll wheel enables zooms the view in or out Move enables the user to move the selected model in the virtual workspace Text fields marked X Y and Z move the model by 1 mm each press when using the buttons or any...

Page 60: ...y result in the software producing invalid files and a resulting errors Scale changes the model size Text fields marked X Y and Z enable to scale the model 1 mm or 1 using the buttons or any value when you enter the desired value in the text fields The size in millimetres may be irrational e g 3 33 3 mm but it is displayed rounded to two decimal places The Uniform button when activated will apply ...

Page 61: ...layed In the gcode preview mode the status bar changes the information displayed as described later in a relevant chapter Pressing this button undoes most recent operations related to the models If no operations on the solids were carried out after the model was loaded pressing the button will remove the stl model loaded most recently In the gcode preview mode the button enables to return to the m...

Page 62: ...mode if available and material to be used for the model The work modes also known as Print Profiles enable to print using one or more print heads The materials or combina tions thereof depend on the selected machine and work mode New materials are added by the producer on an ongoing basis and are being published via software updates To use the latest profiles and full material base we recommend en...

Page 63: ...fically to achieve the required result The selectable options in this menu change dynamically depending on the selected material and the Visual Quality option Increased durability means more material will be used for the printout and the model will have higher overall strength It will be more susceptible to deformation related to material shrinkage and will have longer printing duration The Solid ...

Page 64: ...ery small buildplate area it may break off which is why this parameter should be decreased in such a case More supports mean longer printing time and more stable printout while fewer supports mean shorter printing time and less print stability Values 0 and 90 will disable supprt generation The Lighter Support option enables the user to force the support generation algorithm change The Auto value l...

Page 65: ... is completed the software will enter the path preview mode to display the paths to be carried out by the printer as de scribed in the subsequent chapter The solid appearance in the main software window shows the graphic representation of the printhead movements This view enables to preview the generated layers verify print settings and save the gcode executable file The model and print profile mo...

Page 66: ...e preview is used to check if the model will be printed correctly For example if the entire large model rests solely on a few square millimetres of its base it is likely to overturn in the course of printing In such circumstancesyou should go back to the main interface and increase the amount of supports generated In this mode the status bar displays the following information 1 Model name or the a...

Page 67: ... advanced options The currently loaded advanced profile is displayed on the status bar Please remember that using any materials and printsettings not provided by the producer makes the user fully liable The producer shall not be held liable for any failures resulting from such activities especially with respect to the printhead and material guiding system The producer discourages from using printi...

Page 68: ... freely Please note that the profiles created by means of different software versions may not be compatible In such circumstances please verify the print settings as this may entail the risk of machine damage or print quality deterioration The profiles may be shared also with the producer via the service request form If the user has created a profile for any non certified material the activities a...

Page 69: ...ersion 1 0 07 2017 6 4 Advanced profiles step by step 1 Select Custom profile from the profile list 2 Confirm the threat warning message 3 Select your advanced setup file Make sure the profile is prepared for the printer you own ...

Page 70: ...ettings edition window will appear To save and activate press Save and Activate 5 Activating the Custom profile will prevent you from changing predefined print quality settings 6 Prepare your file with the Prepare to print button ...

Page 71: ...inted in the company s headquaters The producer will suggest a problem solution advice start maintenance activities whenever required prepare an error free gcode executable file or updatie print profiles If the user needs any settings for a specific material or any other quality settings they may request them using the tech nical support form If the user created an initial profile corresponding to...

Page 72: ... each boot up On the same station several software versions may be installed simultaneously with no adverse effects The print profile updates are always going to be published for the latest software version The update status appears on the progress bar immediately after the software is started beside the Prepare to print button Checking for updates the software checks for any available updates You...

Page 73: ...ic for this module With this solution the replacement of module does not require re calibrating the printer while its operation can be started immediately after the replacement By default the 3DGence INDUSTRY F340 printer is fitted with one STANDARD printing module This is a module adapted for printing using ABS and HIPS materials The modular structure of the system allows users to take advantage ...

Page 74: ...end mechanical nozzle s blockade cooling fans threaded mounting hole Fig 36 Dual head module back side 2 UNIT INSTALLATION AND REPLACEMENT CAUTION the module must not be installed or removed from the device while the power is on It may result in damage to the printer Fig 37 Schematic diagram of the printing module ...

Page 75: ...sess if materials are installed If not it will go right away to step no 5 4 If materials are identified the printer will start their removal according to the filament removal procedure successively for T0 and then for T1 Follow the on screen instructions Your selection to remove materials should be confirmed by pressing the CONTINUE key 5 The machine will start cooling down its heating devices It ...

Page 76: ... measurement of the printing bed surface in about 200 points with a pressure sensor integrated into the printing module Based on the measurement a virtual table curve map is created that makes up a base for autocalibration and autocompensation It is saved in the printer memory and is subject to change only after a complete working scan is performed fig 38 Autocompensation of the bed consists in si...

Page 77: ...e VIII MAINTENANCE 1 INDICATIONS FOR CALIBRATING THE HEATBED 2 DUAL HEAD MODULE CALIBRATION 2 1 Precision axes alignment The 3DGence INDUSTRY F340 printer as one of the few is fitted with a unique system for high precision dimensional cor rection of the printed model The device is factory calibrated for ABS printing material at an accuracy of 0 1 mm During printing by using materials with differen...

Page 78: ...of this action will make a base for further operations 1 Go to Calibration menu and then to XY Calibration 2 The Original X and Original Y boxes should contain X and Y dimensions of the model compliant with a CAD model If the com pensation is based on other model than the calibration cross it is necessary to enter target values for X and Y dimensions of the model as per the CAD model 3 The Print X...

Page 79: ...0 printer has a possibility to calibrate the offsets to 0 01 mm XY offsets calibration a after finishing the printing process the user should measure the rifts in both axes Alternatively one could use a sheet of paper 0 1 mm business card 0 4 mm credit card 0 8 mm b the next step is to introduce variables to the printer by adding a measured value in mm to the currently introduced one MENU CALIBRAT...

Page 80: ...f another measurement with use of feeler gauge and calibration of the printing module point B Example In order to verify XY offsets the DUAL OFFSET TEST gcode was printed The width of rafts within both axes was measured on a printed model the result 0 6 mm in X axis and 0 4 mm in Y axis Complying to the axes turnaround the user should set the offset to 0 6 mm for the X and 0 4 mm for the Y then sa...

Page 81: ...5500 units This value can be read by selecting the Hardware Test option in Configuration menu The force reading is located under the Force Sensor item E202 endstop position error for Z axis position Incorrect endstop position on vertical axis The maximum value for the distance between the head and the bed has been reached After homing the Z axis the Home Z option in Manual controls menu the distan...

Page 82: ...rror for the extrusion quality sensor position T0 T1 In case of multiple instances of this error please contact the technical support department Encoder T0 T1 Magnitude Fail Encoder T0 T1 Magnetic field Fail problem with the position of magnetic element of the ex trusion quality sensor In case of error please contact the technical support department Strain Gauge Fail communication error of printin...

Page 83: ...adhesion surface to the bed by generating additional external brims of the solid at the level of the first layer of the print The more brim lines will be added the larger will be the adhesion surface Typically from 5 to 20 brim lines are used The brim should be used in case of problems with detaching prints from the bed CAD Computer Aided Design collective term for various computer aided design pr...

Page 84: ...ers is generated by slicing software slicers It stores all the data on subassembly temperatures and the revs of motors in a precision sequence that results in moving the head and defines the extruder behavior The code commands are sent line by line to the printer controller processor during the printing process The processor interprets the code based on its software and sends specific signals to p...

Page 85: ... by a special setting of electric A and B electromagnets grouped around a metal gear linked with the motor shaft Stepper motors make up the main drive of the 3DGence INDUSTRY F340 printer because of their high precision of position control Skirt additional material printed around the model at a distance of a few millimeters from it at the very beginning of the print The Skirt does not make an inte...

Page 86: ...86 3DGence INDUSTRY F340 ...

Page 87: ......

Reviews: