


UP Plus 3D Printer User Manual
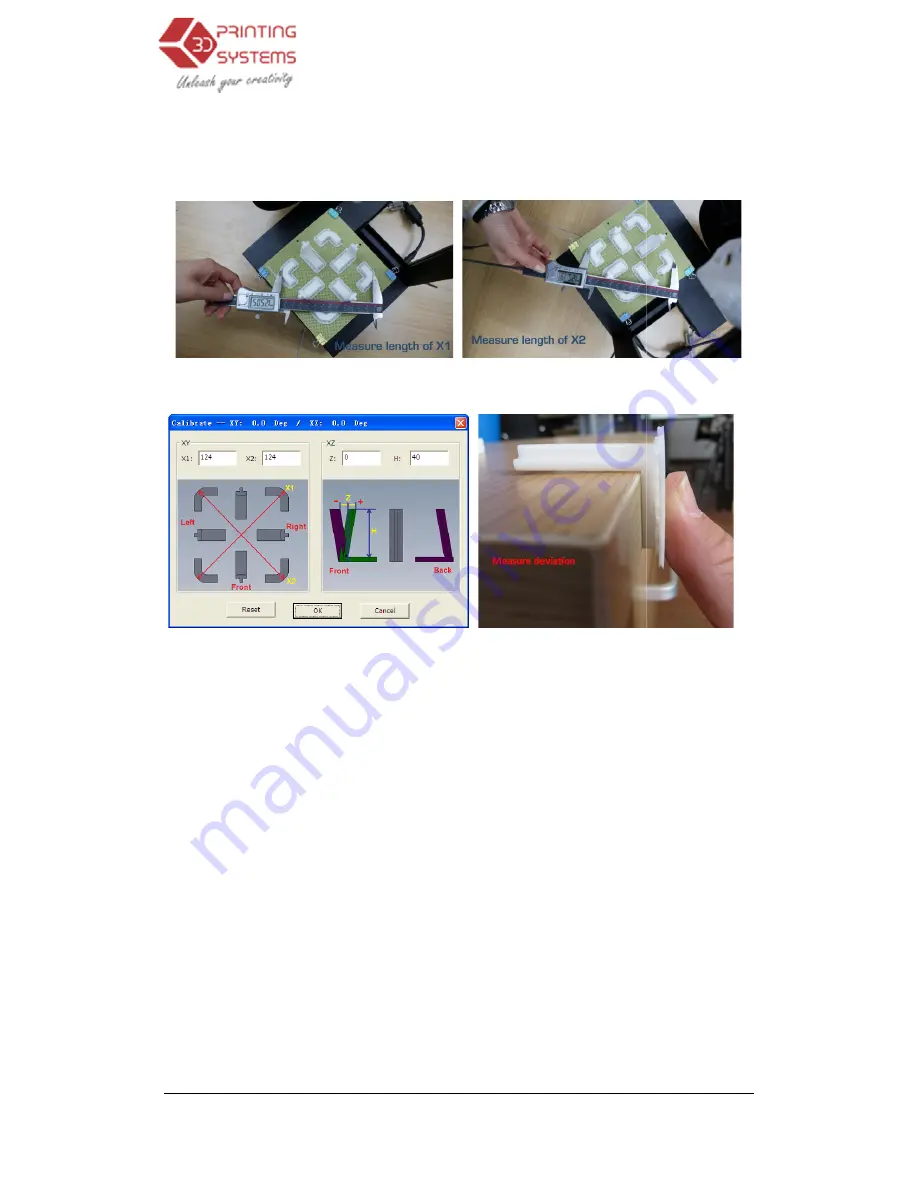
After the calibration model is printed, measure the X1 and X2 length
below.
Open the “Calibrate” box form the “3D Print” menu
Then enter the measured X1 and X2 values into the appropriate boxes.
IMPORTANT NOTE:
Befo
button, otherwise the new values get added to the old ones. Before you enter any new values, the
bar at the very top of the screen should read: XY: 0.00 deg / XZ: 0.00 deg.
Next, take down the Front Centre ‘L’ shaped component
value into the Z box. If it deviates to the right side, the value
itive value. If the deviates to the left, the value
Finally, measure the height of Front
Enter the exact measured value into the “H” box of the “Calibrate dialogue box.
Click “OK” to record all these values and exit t
6.3 Cleaning the outside of the
After a lot of printing, the nozzle may be covered with a layer of oxidized
of the nozzle. When the printer is printing, this oxidized ABS may melt on the nozzle, and may cr
ate discolored spots in the model. To avoid this you need to regularly clean the nozzle.
3D Printer User Manual v 2013.1.31
After the calibration model is printed, measure the X1 and X2 length, as shown in the pictures
Open the “Calibrate” box form the “3D Print” menu.
enter the measured X1 and X2 values into the appropriate boxes.
Before you enter any new calibration values, always click the “Reset”
button, otherwise the new values get added to the old ones. Before you enter any new values, the
bar at the very top of the screen should read: XY: 0.00 deg / XZ: 0.00 deg.
Centre ‘L’ shaped component, and measure its deviation. Put the exact
value into the Z box. If it deviates to the right side, the value to be put into the Z box will be a po
itive value. If the deviates to the left, the value to put into the Z box will be a negative value.
Finally, measure the height of Front Center component, which should be 40mm if it is not scaled.
Enter the exact measured value into the “H” box of the “Calibrate dialogue box.
Click “OK” to record all these values and exit the calibration window.
outside of the nozzle
After a lot of printing, the nozzle may be covered with a layer of oxidized black ABS
. When the printer is printing, this oxidized ABS may melt on the nozzle, and may cr
model. To avoid this you need to regularly clean the nozzle.
.1.31
, as shown in the pictures
re you enter any new calibration values, always click the “Reset”
button, otherwise the new values get added to the old ones. Before you enter any new values, the
, and measure its deviation. Put the exact
be put into the Z box will be a pos-
x will be a negative value.
be 40mm if it is not scaled.
ABS on the outside
. When the printer is printing, this oxidized ABS may melt on the nozzle, and may cre-
model. To avoid this you need to regularly clean the nozzle.


