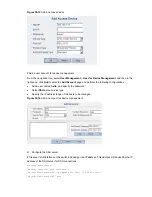


After the key pair is generated, you need to upload the pubic key file to the server through FTP or TFTP
and complete the server end configuration before you continue to configure the client.
# Establish an SSH connection to the server 10.165.87.136.
[SwitchA] ssh2 10.165.87.136
Username: client001
Trying 10.165.87.136 ...
Press CTRL+K to abort
Connected to 10.165.87.136 ...
The Server is not authenticated. Do you continue to access it?(Y/N):y
Do you want to save the server's public key?(Y/N):n
Later, you will find that you have logged into Switch B successfully.
When Switch Acts as Client and First-Time Authentication is not Supported
Network requirements
As shown in
Figure 55-32
, establish an SSH connection between Switch A (SSH Client) and Switch B
(SSH Server) for secure data exchange. The user name is client001 and the SSH server’s IP address is
10.165.87.136. The
publickey
authentication mode is used to enhance security.
Network diagram
Figure 55-32
Switch acts as client and first-time authentication is not supported
Configuration procedure
z
Configure Switch B
# Create a VLAN interface on the switch and assign an IP address for it to serve as the destination of
the client.
<SwitchB> system-view
[SwitchB] interface vlan-interface 1
[SwitchB-Vlan-interface1] ip address 10.165.87.136 255.255.255.0
[SwitchB-Vlan-interface1] quit