background image

25

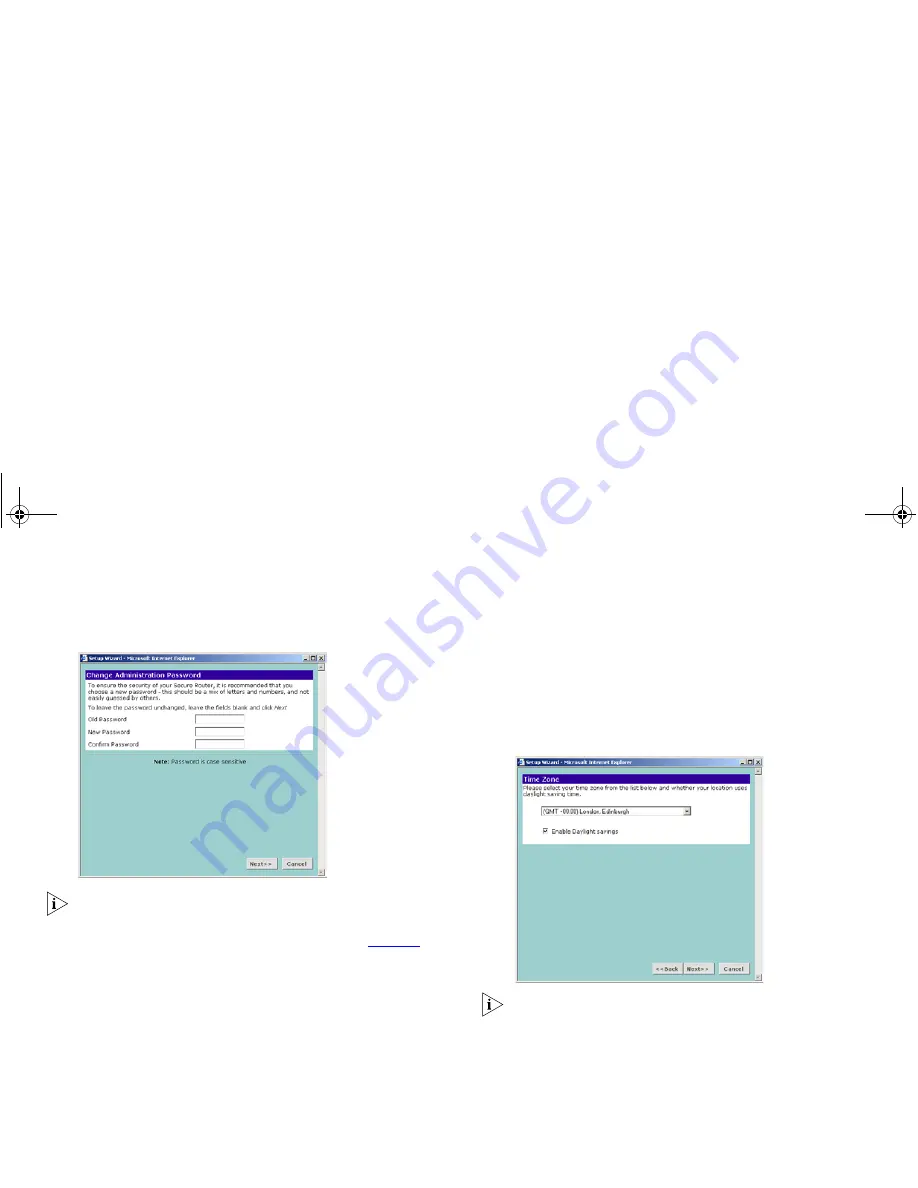
Figure 14   

Change Administration Password Screen

Choose a password that you can remember but that others are 
unlikely to guess. Remember that the password is case sensitive.

Click 

Next

 to display the 

Time Zone

 setup screen (

Figure 15

).

Setting the Time Zone

The Router sets its time automatically when it connects to the 
Internet. This time is used when recording information log files.

To set the Router to your local time:

1

Select your time zone from the drop-down menu.

2

Check the 

Enable Daylight Saving

 box to automatically adjust the 

time seasonally.

3

Click 

Next

 to continue.

To set the Router to World Time (UTC):

1

Select 

(GMT) Greenwich Mean Time

 from the drop-down menu.

2

Ensure that the 

Enable Daylight Saving

 box is cleared.

3

Click 

Next

 to continue.

Figure 15   

Time Zone Screen

The Daylight Savings option automatically adjusts the system 
clock for summer and winter time. To disable this feature ensure 
that the 

Enable Daylight Saving

 box is cleared.

dua08609-5aaa01.book  Page 25  Thursday, September 11, 2003  12:15 PM

Summary of Contents for OfficeConnect

Page 1: ...dua08609 5aaa01 book Page 1 Thursday September 11 2003 12 15 PM ...

Page 2: ... provided on any licensed program or documentation contained in or delivered to you in conjunction with this User Guide Unless otherwise indicated 3Com registered trademarks are registered in the United States and may or may not be registered in other countries 3Com the 3Com logo and OfficeConnect are registered trademarks of 3Com Corporation Intel and Pentium are registered trademarks of Intel Co...

Page 3: ...wering Up the Router 17 Connecting the Secure Router 17 Setting Up Your Computers 19 Obtaining an IP Address Automatically 19 Windows 2000 XP 2003 Server 19 Windows 95 98 20 Macintosh OS 8 5 9 x 20 Disabling PPPoE and PPTP Client Software 20 Disabling Web Proxy 21 Running the Setup Wizard 23 Accessing the Wizard 23 Setting the Password 24 Setting the Time Zone 25 Auto Configuration Settings 26 Int...

Page 4: ...ime Zone 68 Diagnostics Tools 68 Loading and Saving the Router Configuration 69 Upgrading the Firmware of your Router 69 Viewing Status and Logs 70 Obtaining Support and Feedback for your Router 72 Troubleshooting 75 Basic Connection Checks 75 Browsing to the Router Configuration Screens 75 Connecting to the Internet 76 Forgotten Password 76 Alert LED 77 Recovering from Corrupted Software 77 Frequ...

Page 5: ...on 87 Important Safety Information 87 Wichtige Sicherheitshinweise 87 Consignes importantes de sécurité 88 Obtaining Support for your Product 91 Register Your Product to Gain Service Benefits 91 Purchase Value Added Services 91 Troubleshoot Online 91 Access Software Downloads 91 Contact Us 92 Telephone Technical Support and Repair 92 End User Software Licence Agreement 95 3Com Corporation END USER...

Page 6: ...6 dua08609 5aaa01 book Page 6 Thursday September 11 2003 12 15 PM ...

Page 7: ...r Cables are referred to as Twisted Pair Cables throughout this guide Conventions Table 1 and Table 2 list conventions that are used throughout this guide Table 1 Notice Icons Icon Notice Type Description Information note Information that describes important features or instructions Caution Information that alerts you to potential loss of data or potential damage to an application system or device...

Page 8: ... Router User Guide Part Number DUA08609 5AAA0x Page 24 Do not use this e mail address for technical support questions For information about contacting Technical Support please refer to Obtaining Support for your Product on page 91 Words in italics Italics are used to Emphasize a point Denote a new term at the place where it is defined in the text Identify menu names menu commands and soft ware but...

Page 9: ...e Internet outlet and harness the combined power of all of your computers OfficeConnect Secure Router The OfficeConnect Secure Router is designed to provide a cost effective means of sharing a single broadband Internet connection amongst several computers The Router also increases your network security by acting as a firewall preventing unauthorised external access to your network and by creating ...

Page 10: ...rtual Private Networks VPNs Initiates and terminates IPSec connections Terminates PPTP and L2TP over IPSec connections Provides hardware accelerated encryption for IPSec VPNs including L2TP over IPSec Shared Internet connection No need for a dedicated always on computer serving as your Internet connection Cross platform operation for compatibility with Windows Unix and Macintosh computers Easy to ...

Page 11: ...quirements Your OfficeConnect Secure Router requires that the computer s and components in your network be configured with at least the following A computer with an operating system that supports TCP IP networking protocols for example Windows 95 98 NT Me 2000 XP Unix Mac OS 8 5 or higher An Ethernet 10 Mbps or 10 100 Mbps NIC for each computer to be connected to the four port switch on your Route...

Page 12: ...On for 2 seconds then off The Router has detected and prevented a hacker from attacking your network from the Internet Continuously on A fault has been detected with your Router during the start up process See Troubleshooting on page 75 The Alert LED will be on for a period of between three and five seconds during the power on self test This is normal and no cause for alarm 2 Power LED Green Indic...

Page 13: ... that is supplied with this Router Do not use any other adapter 6 Ethernet Cable DSL port Use the supplied patch cable to connect the Router to the 10 100 port on your cable or DSL modem This port will automatically adjust for the correct speed duplex and cable type You can connect your Cable DSL modem using either straight through or crossover cables 7 Four 10 100 LAN ports Use suitable cable wit...

Page 14: ...14 dua08609 5aaa01 book Page 14 Thursday September 11 2003 12 15 PM ...

Page 15: ...direct sunlight and away from sources of heat Cabling is away from power lines fluorescent lighting fixtures and sources of electrical noise such as radios transmitters and broadband amplifiers Water or moisture cannot enter the case of the unit Air flow around the unit and through the vents in the side of the case is not restricted We recommend you provide a minimum of 25mm 1in clearance Using th...

Page 16: ...te IP information as described below Dynamic IP Address DSL or Cable Dynamic IP addressing or DHCP automatically assigns the Router IP information This method is popular with Cable providers This method is also used if your modem has a built in DHCP server PPPoE DSL only If the installation instructions that accompany your modem ask you to install a PPPoE client on your PC then select this option ...

Page 17: ...g the Secure Router The first step for installing your Secure Router is to physically connect it to a cable or DSL modem in order to be able to access the Internet Figure 6 Connecting the Secure Router To use your Secure Router to connect to the Internet through an external cable or DSL modem Figure 6 1 Use the supplied cable to connect the Router s Ethernet Cable DSL port to your Cable DSL modem ...

Page 18: ... your computer Once your computer is ready to use check that the LAN Port Status LED on the Router is illuminated You have now completed the hardware installation of your Router You now need to set up your computers so that they can make use of the Router to communicate with the Internet dua08609 5aaa01 book Page 18 Thursday September 11 2003 12 15 PM ...

Page 19: ...0 XP 2003 Server If you are using Windows 2000 Windows XP or Windows 2003 Server use the following procedure to change your TCP IP settings Windows XP and 2003 Server specific instructions in brackets 1 From the Windows Start Menu select Settings Control Panel select Control Panel directly from the Start menu in Windows XP 2 Double click on Network and Dial Up Connections Network and Internet Conn...

Page 20: ...m the desktop select Apple Menu Control Panels and TCP IP 2 In the TCP IP control panel set Connect Via to Ethernet 3 In the TCP IP control panel set Configure to Using DHCP Server 4 Close the TCP IP dialog box and save your changes 5 Restart your computer Disabling PPPoE and PPTP Client Software If you have PPPoE or PPTP client software installed on your computer you will need to disable it To do...

Page 21: ...use with the Router Disabling Web Proxy Ensure that you do not have a web proxy enabled on your computer Go to the Control Panel and click on Internet Options Select the Connections tab and click on LAN Settings at the bottom Make sure that the Use Proxy Server option is unchecked dua08609 5aaa01 book Page 21 Thursday September 11 2003 12 15 PM ...

Page 22: ...22 dua08609 5aaa01 book Page 22 Thursday September 11 2003 12 15 PM ...

Page 23: ...your Router in to the location or address box of your browser Figure 10 The default URL for the Router is http 192 168 1 1 If you have changed the IP address of the unit you should substitute this for the default address within the URL Figure 10 Web Browser Location Field Factory Default The Login screen as shown in Figure 11 should appear in your browser If it does not refer to Troubleshooting on...

Page 24: ...t to continue You will now be guided through the setup of your Router Setting the Password When the Change Administration Password screen Figure 14 appears type the Old Password then a new password in both the New Password and Confirm Password fields The default password for the Router is admin It is case sensitive and must be entered as the Old Password the first time you configure the Router 3Co...

Page 25: ...ur local time 1 Select your time zone from the drop down menu 2 Check the Enable Daylight Saving box to automatically adjust the time seasonally 3 Click Next to continue To set the Router to World Time UTC 1 Select GMT Greenwich Mean Time from the drop down menu 2 Ensure that the Enable Daylight Saving box is cleared 3 Click Next to continue Figure 15 Time Zone Screen The Daylight Savings option a...

Page 26: ...t settings manually continue at Internet Settings below If you chose one of the automatic configuration options continue at Choosing your LAN Settings on page 29 Internet Settings The Internet Settings window allows you to set up the Router for the type of Internet connection you have Before setting up your Internet connection mode have the modem configuration supplied by your ISP to hand Figure 1...

Page 27: ... text box otherwise leave the box blank 6 Click Next to continue Dynamic IP Address Mode To setup the Router for use with a dynamic IP address connection Figure 19 Hostname Screen 1 If your ISP requires the addresses of a Primary and Secondary DNS Server then enter them in the fields labelled Primary DNS Address and Secondary DNS Address If your ISP does not require one of the fields to be filled ...

Page 28: ... directly to the cable or DSL modem Otherwise select No 5 Click Next to continue Continue at Choosing your LAN Settings on page 30 PPPoE Mode To setup the Router for use with a PPP over Ethernet PPPoE connection use the following procedure Figure 21 PPPoE Screen 1 Enter your PPP over Ethernet user name in the PPPoE User Name text box 2 Enter your PPP over Ethernet password in the PPPoE Password te...

Page 29: ...use with a PPTP connection use the following procedure Figure 22 PPTP Screen 1 Enter your PPTP server address in the PPTP Server Address text box 2 Enter your PPTP user name in the PPTP User Name text box 3 Enter your PPTP password in the PPTP Password text box 4 If your ISP requires the address of a Primary DNS Server then enter it in the field labelled Primary DNS Address 5 If your ISP requires ...

Page 30: ...k that uses different values 2 Enter your chosen subnet mask in the Subnet Mask field This should be large enough to contain all your computers and other network devices The default 255 255 255 0 allows for 254 devices including the Router 3 If you are going to set up an IPSec VPN with another Router you must set your subnet mask to 255 255 255 0 See Configuring VPNs on page 58 Activating DHCP The...

Page 31: ...nge will vary depending on the LAN settings entered in the LAN IP Address screen To disable DHCP select Do not enable the DHCP server Click Next when you have finished Viewing the Summary When you complete the Setup Wizard a configuration summary will display See Figure 25 below Verify the configuration information of the Router and click Finish to save your settings and restart the Router Figure ...

Page 32: ...ins the settings you want to change and follow the instructions from that point Your Router is now configured You can start using your Router straight away or further configure your Router see Router Configuration on page 33 dua08609 5aaa01 book Page 32 Thursday September 11 2003 12 15 PM ...

Page 33: ...des such as PPPoE connection dynamic IP address allocation and static IP address settings Also allows you to configure LAN IP address and subnet mask information set up DHCP server parameters and display the DHCP client list Advanced Networking allows you to set up Network Address Translation NAT static routing dynamic routing and dynamic DNS Firewall allows configuration of the Router s firewall ...

Page 34: ...tice board and to change your Password You can also gain access to the Configuration Wizard See Accessing the Wizard on page 23 for details Viewing the Notice Board The Notice Board shown in Figure 27 below is used to display important messages For example you would be warned if you had disabled the firewall feature or if the LAN and Internet addresses or subnets conflicted Figure 27 Notice Board ...

Page 35: ...new password again in the Confirm Password field 4 Click Apply to save the new password The password is case sensitive Setup Wizard Figure 29 Wizard Screen Click the WIZARD button to launch the configuration wizard Refer to Running the Setup Wizard on page 23 for information on how to run the wizard Network Settings The Network Settings menu allows you to view and amend your Router s Connection to...

Page 36: ...ynamic IP Address on page 38 If you select PPPoE PPP over Ethernet see Configuring a PPPoE connection on page 39 If you select PPTP used by some providers mostly in Europe see Configuring a PPTP connection on page 40 If you are using One to One NAT your method of connection will already be fixed to Static To change to another method of address allocation you must first turn off One to One NAT See ...

Page 37: ...your PC then select this option To configure the Router you will need to know the following Username Password Service Name if required by your ISP PPTP DSL or Cable PPTP is used by some providers mostly in Europe If the instal lation instructions that accompany your modem ask you to setup a dialup connection using a PPTP VPN tunnel then select this option To configure the Router you will need to k...

Page 38: ...ss The address of your ISP s secondary Domain Name Service server The second server is optionally provided by an ISP in case of failure of the primary server Click Apply to save any changes you have made Configuring a Dynamic IP Address If your ISP has allocated you a dynamic address using DHCP you will have selected Dynamic IP address automatically allocated as your IP Allocation Mode Figure 32 D...

Page 39: ...Address Your ISP may require you to have a particular MAC address This will be the MAC address of the computer you first used to connect with your ISP Click Apply to save any changes you have made Configuring a PPPoE connection If your ISP has allocated you a dynamic address using PPPoE you will have selected PPPoE PPP over Ethernet as your IP Allocation Mode Figure 33 PPPoE Setup Screen Your ISP ...

Page 40: ...nection Since the Router firmware contains its own PPPoE client you no longer need to run PPPoE client software on your computer to access the Internet You can simply start your browser and connect to the Internet immediately after setting up your cable or DSL modem Configuring a PPTP connection If your ISP has allocated you a dynamic address using PPTP you will have selected PPTP used by some Eur...

Page 41: ...modem click Suggest to select an IP address on the same subnet as the PPTP server LAN Settings The LAN Settings screen allows you to change the TCP IP settings of your Router and its DHCP server Figure 35 Unit Configuration Screen Changing the LAN Settings These settings will have been entered during the set up wizard when the device is first used You only need to change these if you reconfigure y...

Page 42: ...k box is ticked To disable the DHCP Server ensure that the Enable check box is cleared Click Apply to validate your changes Set the IP Pool Start Address and IP Pool End Address to the first and last address you want the Router to allocate to computers The IP address pool must be contained within the subnet as defined in Changing the LAN Settings on page 41 The default start and end addresses are ...

Page 43: ...o be reallocated to another machine If you have spare or expired IP addresses in the pool you will not need to release addresses The IP Address Host Name and MAC Address indicate the address that has been allocated They identify the machine by name and by the unique number MAC Address of the machine s network card The Fixed Association check box allows you to freeze the relationship between an IP ...

Page 44: ...e NAT Every address on the Internet pool is linked to an address in the LAN pool The Router will respond to all the addresses in the Internet pool Figure 38 One to Many and One to One NAT 192 168 1 100 172 16 57 52 192 168 1 101 172 16 57 53 192 168 1 102 172 16 57 54 192 168 1 100 192 168 1 101 172 16 57 52 192 168 1 102 One to Many NAT One to One NAT dua08609 5aaa01 book Page 44 Thursday Septemb...

Page 45: ...k Apply to save your changes Setting up One to One NAT The following criteria must be met to be able to use One to One NAT You must have a static Internet IP address for every computer on your network plus one for the Router itself The addresses must be in one continuous block in the same subnet You must have selected Static IP Address as your IP Allocation Mode and have given your Router the firs...

Page 46: ...s in total shared between LAN and WAN interfaces WAN side static routes are only available if the mode of connection to your ISP is Static or Dynamic DHCP Client mode To set up Static Routing 1 Select New on the right side of the screen to open the Static Routing configuration dialogue box 2 Enter the IP address of the Destination Network e g 192 168 20 0 3 Enter the IP address of the Subnet Mask ...

Page 47: ...RIP protocols the Router determines the network packets route based on the fewest number of hops between the source and the destination The RIP protocol regularly broadcasts routing information to other devices on the network Setting up Dynamic Routing To set up Dynamic Routing 1 Select a Service from the pull down list 2 Click Apply to save your changes The list of all routes static and dynamic a...

Page 48: ...Provider from the pull down list 4 Enter the DNS Host Name 5 Click Apply to save your changes Configuring the Router On the main frame of the Firewall setup screen is a menu with four tabs Virtual Servers PC Privileges Special Applications and Advanced These enable you to set the access to and security of your network The Virtual Servers Menu Selecting the Firewall option on the main menu displays...

Page 49: ...an FTP host allowing others outside of your office network to download files of your choosing Or if you have created a Web site you can configure one of your computers as a Web server so that others can view your Web site If you are using One to Many NAT you can only have one server of each type on your network To have more than one server of a type for example more than one web server visible to ...

Page 50: ...for different computers on your network restricting this access and controlling your users access to outside resources Select PC Privileges to display the PC Privileges setup screen This is shown in Figure 47 below The Router s DHCP server has been enhanced to support PC Privileges If you want to control access to the Internet on a user by user basis then you should either use the Router s DHCP se...

Page 51: ...et radio button 2 Click New to display the PC Privileges setting screen 3 Enter the IP address of the computer in the PC s IP Address text box 4 Check the box of a service to authorize it Clear the box to deny the service See Figure 49 Figure 49 PC Privileges Setup Screen 5 Either Enter the additional services that you wish to allow in the except specify ports box and set the drop down box to Allo...

Page 52: ...d to access a test server on port 8000 To allow this Enter the number 8000 in the except specify ports box Click Apply to save your changes and close the PC Privileges window VPN connections to other networks are unaffected by settings in PC Privileges To allow or deny VPN connections to other networks see Configuring VPNs on page 58 Special Applications Select Special Applications tab to display ...

Page 53: ...Router uses to recognize that the application has started Additionally there are two buttons outside the table Help displays the online help page for this screen New creates a new special application See Adding and Editing Special Applications below Adding and Editing Special Applications 1 Click on the New button to create a new special application or on the name of a special application to edit ...

Page 54: ...Hosts Allowed box is checked Otherwise leave it clear Your application provider can provide you with this information CAUTION Selecting Multiple Hosts Allowed weakens the security that your Router s firewall is able to provide and should only be used if the special application requires it Timeout Enter the number of seconds the Router should wait for the first reply from the special application se...

Page 55: ... devices to ensure that everything is working correctly By default the Router has PING disabled so that it does not respond to PING requests This makes the device more diffi cult to find on the Internet and less prone to attack This feature is enabled by clicking on the check box so that a tick can be seen and then selecting Apply 3Com recommends that you leave Allow PING from the Internet disable...

Page 56: ... Settings screen and check the required content filter mode Select the Allow Block Lists tab to display the Allow Block List screen See Figure 55 below Figure 55 Allow Block Lists screen To set up a list of sites 1 Click EDIT to display the Content Filtering Edit List See Figure 56 below 2 Enter the URLs of sites that are allowed to be viewed or blocked depending on the chosen content filtering mo...

Page 57: ...ch PCs have the content filtered 1 Check the Control which PCs have their web access filtered box 2 Check the Filtered or Full Access box against each PC as required See Figure 57 below Figure 57 Filter Policy Settings Screen To set up a New Filter Policy 1 Click New to open the Filter Poilcy Settings screen Figure 58 2 Enter the PC s IP address 3 Check a Policy for that PC Figure 58 Filter Policy...

Page 58: ...n of two protocols A user is authenticated using L2TP and encrypts data using IPSec See L2TP Configuration on page 59 L2TP does not support gateway to gateway connections and is only suitable for connecting remote users PPTP Server Enabled PPTP Point to Point Tunnelling Protocol is an encrypted VPN protocol like IPSec It is not as secure as IPSec but is easy to administrate PPTP does not support g...

Page 59: ... example if the IP address keeps changing 3 In the L2TP Configuration field enter the Domain Name as an IP address A Domain Name locates a website on the Internet The IPSec Shared Key This is the key for the connection and is a combination of letters numbers and punctuation and can be up to 64 characters in length 3Com recommends that the key and password are not the same The user will need to kno...

Page 60: ... with PPTP The connections made by PPTP will appear to come from these addresses The addresses must be in a continuous range In the Address Pool for PPTP and L2TP clients field enter The first LAN address you wish to reserve for PPTP clients in the First Remote IP Address field and The last LAN address you wish to reserve for PPTP clients in the Last Remote IP Address field If both PPTP and L2TP o...

Page 61: ...iting VPN Connections below Adding and Editing VPN Connections This screen also allows you to add new IPSec L2TP over IPSec and PPTP connections and to edit existing ones When adding or amending values on this screen remember that both sides of an IPSec L2TP over IPSec or PPTP connection must contain the same information An IPSec L2TP over IPSec or PPTP connection cannot therefore be activated unt...

Page 62: ...ation and can be up to 64 characters in length Figure 61 IPSec Connection Remote User Access Encryption type choose the encryption type from DES 3DES or AES 3DES is more secure than DES but may take longer to encrypt and decrypt AES provides the highest security but will take longer than 3DES to encrypt and decrypt 3DES and AES are not shipped with the Router as standard due to international restr...

Page 63: ...ame as the Remote IPSec Server ID in the box above Remote Network address enter the LAN IP address of the remote network This is the first IP address of a subnet one below the first address available for use Figure 62 IPSec Connection Gateway to Gateway If the remote device has a LAN IP address of 192 168 1 1 and a subnet mask of 255 255 255 0 then the LAN IP address of the remote subnet is 192 16...

Page 64: ...onnection making the tunnel more secure but slowing data transfer To enable perfect forward secrecy ensure that the Use Perfect Forward Secrecy box is checked To keep the same key for the length of a connection leave the box unchecked Use IKE keep alive when checked the gateway will attempt to ensure that this tunnel remains operational once it has been established even if there is no traffic on i...

Page 65: ...outer One b Enter 192 168 1 0 on Router Two 10 In this example the Remote Subnet Mask is a default setting of 255 255 255 0 this is the subnet mask on the LANs of the two devices 11 Enter a password in the Tunnel Shared Key field in both Gateways e g TYP0249 23b 12 Choose 3DES as the Encryption Type 13 Choose SHA 1 as the Hash Algorithm 14 Choose Diffie Hellman Group 2 1024 bit in the Exchange Key...

Page 66: ...Routes The IPSec Routes tab is only displayed when IPSec Enabled is selected on the VPN Mode screen This screen allows you to add and replace networks in the existing IPSec Route See Figure 65 To do this 1 Select edit to display the Edit Route screen Figure 66 2 Click in the table and add a new Network and Subnet Mask entry 3 Leave the Negotiate all subnets whenever tunnel is triggered check box b...

Page 67: ...ade See Figure 67 Restart Pressing the Restart the Gateway button has the same effect as power cycling the unit No configuration information will be lost but the log files will be erased This function may be of use if you are experiencing problems and you wish to re establish your Internet connection Figure 67 Restart Screen dua08609 5aaa01 book Page 67 Thursday September 11 2003 12 15 PM ...

Page 68: ...splaying the correct time in the log files If you use Daylight saving tick the Enable Daylight savings box and then click Apply Figure 68 Figure 68 Time Zone Screen The Router reads the correct time from NTP servers on the Internet and sets its system clock accordingly The Daylight Savings option automatically adjusts the clock to daylight savings time as appropriate to your time zone Diagnostics ...

Page 69: ...nt to reset the settings on your Router to those that were loaded at the factory click RESET You will lose all your configuration changes The Router LAN IP address will revert to 192 168 1 1 and the DHCP server on the LAN will be enabled You may need to reconfigure and restart your computer to re establish communication with the Router Upgrading the Firmware of your Router The Upgrade facility all...

Page 70: ...on continuously or flashing slowly after a failed upgrade refer to Troubleshooting on page 75 Viewing Status and Logs Selecting Status and Logs from the Main menu displays the Status and Logs screens in your Web browser The Status and Logs screen displays a tabular representation of your network and Internet connection Status to display the current unit status including a summary of the configurat...

Page 71: ... and security threats logged by the Router Figure 72 Status Screen You may be asked to refer to the information on the Status screen if you contact your supplier for technical support Figure 73 Routing Table screen Figure 74 Usage Monitor Screen dua08609 5aaa01 book Page 71 Thursday September 11 2003 12 15 PM ...

Page 72: ...at provide information and support concerning the Router Figure 76 Figure 76 Support Screen The feedback links screen which contains an Internet link to the 3Com website so that you can provide feedback on the product Figure 77 3Com is always looking for product improvements If you would like to help us by providing feedback please do so by dua08609 5aaa01 book Page 72 Thursday September 11 2003 1...

Page 73: ... clicking on the Provide Feedback button on the Support Feed back screen which will connect you to 3Com s website Figure 77 Feedback Screen dua08609 5aaa01 book Page 73 Thursday September 11 2003 12 15 PM ...

Page 74: ...74 dua08609 5aaa01 book Page 74 Thursday September 11 2003 12 15 PM ...

Page 75: ...not have status LEDs in which case a diagnostic program may be available that can give you this information Refer to the documentation supplied with your NIC for details Ensure that you have configured your computer as described in Setting Up Your Computers on page 19 Restart your computer while it is connected to the Router to ensure that your computer receives an IP address When entering the add...

Page 76: ...Check PC Privileges to see if you have allowed your PCs to connect to the Internet See PC Privileges on page 50 Forgotten Password If you can browse to the Router configuration screen but cannot log on because you do not know or have forgotten the password follow the steps below to reset the Router to it s factory default configuration Warning all your configuration changes will be lost and you wi...

Page 77: ...his indicates that the Router has detected a hacker attack from the Internet and has prevented it from harming your network You need take no specific action on this unless you decide that these attacks are happening frequently in which case you may wish to discuss this with your ISP The Router logs such attacks and this information is available through the configuration screens Recovering from Cor...

Page 78: ... switches connected to the Router 3Com OfficeConnect hubs and switches provide a simple reliable means of expanding your network contact your supplier for more information or visit http www 3com com Does the Router support virtual private networks VPNs The Router fully supports VPNs It is capable of Initiating and terminating IPSec connections Terminating L2TP over IPSec and PPTP connections Provi...

Page 79: ... do not wish to change this then you should use the Discovery program on the Router CD ROM to detect and configure your Router Windows Installation 95 98 XP 2000 2003 Server NT 1 Insert the Router CD ROM in the CD ROM drive on your computer A menu will appear select Gateway Discovery Discovery will find the Router even if it is unconfigured or misconfigured Figure 78 Discovery Welcome Screen dua08...

Page 80: ...re 79 the serial number of the unit has been replaced with xxxxxxxxxx 3 Figure 79 shows an example Discovered Devices screen Highlight the Secure Router by clicking on it and press Next Figure 80 Discovery Finish Screen 4 Click on Finish to launch a web browser and display the login page for the Router dua08609 5aaa01 book Page 80 Thursday September 11 2003 12 15 PM ...

Page 81: ...er sub networks and a subnet mask is a number that enables a device to identify the sub network to which it is connected For your network to work correctly all devices on the network must have The same sub network address The same subnet mask The only value that will be different is the specific host device number This value must always be unique An example IP address is 192 168 100 8 However the ...

Page 82: ...llows computers on your network to obtain an IP address and subnet mask automatically DHCP assigns a temporary IP address and subnet mask which gets reallocated once you disconnect from the network DHCP will work on any client Operating System such as Windows XP Windows 98 or Windows NT 4 0 Also using DHCP means that the same IP address and subnet mask will never be duplicated for devices on the n...

Page 83: ... Automatic IP addressing support was introduced by Microsoft in the Windows 98 operating system and is also supported in Windows 2000 XP NT Private IP Addresses The following address ranges have been reserved by the Internet Engineering Task Force IETF for private use 10 0 0 0 10 255 255 255 172 16 0 0 172 31 255 255 192 168 0 0 192 168 255 255 The Router has a default subnet of 192 168 1 0 192 16...

Page 84: ...84 dua08609 5aaa01 book Page 84 Thursday September 11 2003 12 15 PM ...

Page 85: ...4 in Weight Approximately 537 g 1 18 lbs VPN Tunnels Two Standards Functional ISO 8802 3 IEEE 802 3 Safety UL 60950 EN 60950 CSA 22 2 60950 IEC 60950 EMC EN 55022 Class B EN 55024 AS NZS 3548 B FCC Part 15 Class B ICES 003 Class B VCCI Class B CNS 13438 Class A Environmental EN 60068 IEC 68 Category 5 screened cables must be used to ensure compliance with the Class B requirements of this standard ...

Page 86: ... Router complies with the IEEE 802 3i u and x specifications Cable Specifications The Secure Router supports the following cable types and maxi mum lengths Category 3 Ethernet or Category 5 Fast Ethernet or Dual Speed Ethernet Twisted Pair shielded and unshielded cable types Maximum cable length of 100m 327 86 ft Category 5 cables are required for a 100BASE TX connection dua08609 5aaa01 book Page ...

Page 87: ...itions WARNING There are no user replaceable fuses or user serviceable parts inside the Router If you have a physical problem with the unit that cannot be solved with problem solving actions in this guide contact your supplier WARNING Disconnect the power adapter before moving the unit WARNING RJ 45 ports These are shielded RJ 45 data sockets They cannot be used as telephone sockets Only connect R...

Page 88: ... RJ 45 Datenstecker angeschlossen werden Consignes importantes de sécurité AVERTISSEMENT Les avertissements présentent des consignes que vous devez respecter pour garantir votre sécurité personnelle Vous devez respecter attentivement toutes les consignes Nous vous demandons de lire attentivement les consignes de sécurité ci après avant d installer ou de désinstaller l appareil AVERTISSEMENT Faites...

Page 89: ...être résolu par les actions de résolution de problèmes présentés dans ce manuel veuillez contacter votre fournisseur AVERTISSEMENT Débranchez l adaptateur électrique avant de désinstaller cet appareil AVERTISSEMENT Ports RJ 45 Il s agit de prises de données femelles blindées RJ 45 Vous ne pouvez pas les utiliser comme prise de téléphone Branchez uniquement des connecteurs de données RJ 45 dans ces...

Page 90: ...90 dua08609 5aaa01 book Page 90 Thursday September 11 2003 12 15 PM ...

Page 91: ...ct and support information Troubleshoot Online You will find support tools posted on the 3Com web site at http www 3com com 3Com Knowledgebase helps you troubleshoot 3Com products This query based interactive tool is located at http knowledgebase 3com com and contains thousands of technical solutions written by 3Com support engineers Connection Assistant helps you install configure and troubleshoo...

Page 92: ... outside of the package will be returned to the sender unopened at the sender s expense If your product is registered and under warranty you can obtain an RMA number online at http eSupport 3com com First time users will need to apply for a user name and password Telephone numbers are correct at the time of publication Find a current directory of support telephone numbers posted on the 3Com web si...

Page 93: ...ca Telephone Technical Support and Repair From the Caribbean Central and South America call Antigua Argentina Aruba Bahamas Barbados Belize Bermuda Bonaire Brazil Cayman Chile Colombia Costa Rica Curacao Ecuador Dominican Republic Guatemala Haiti Honduras Jamaica Martinique Mexico Nicaragua Panama Paraguay Peru Puerto Rico Salvador Trinidad and Tobago Uruguay Venezuela Virgin Islands 1 800 988 211...

Page 94: ...ort form html Portuguese speakers enter the URL http lat 3com com br support form html English speakers in Latin America should send e mail to lat_support_anc 3com com US and Canada Telephone Technical Support and Repair 1 800 876 3266 Country Telephone Number dua08609 5aaa01 book Page 94 Thursday September 11 2003 12 15 PM ...

Page 95: ...xcept as set forth above you may not assign or transfer your rights under this Agreement Modification reverse engineering reverse compiling or disassembly of the Software is expressly prohibited However if you are a European Union EU resident information necessary to achieve interoperability of the Software with other programs within the meaning of the EU Directive on the Legal Protection of Compu...

Page 96: ...und to be invalid illegal or unenforceable the validity legality and enforceability of any of the remaining provisions shall not in any way be affected or impaired and a valid legal and enforceable provision of similar intent and economic impact shall be substituted therefor ENTIRE AGREEMENT This Agreement sets forth the entire understanding and agreement between you and 3Com and supersedes all pr...

Page 97: ...vice name blank unless your ISP requires it Bell Century Tel Citizens Primus Prodigy Snet Sprint FC Verizon First World Brightnet Earthlink Ameritech Covad Mindspring Sympatico DSL USwest Qwest SNet Internet Connection Types Characteristics Popular ISPs PPTP Cable or DSL always on Some European ISPs require a PPTP tunnel to authenticate their network KPN Netherlands Austria Telecom Static DSL DSL ...

Page 98: ...98 dua08609 5aaa01 book Page 98 Thursday September 11 2003 12 15 PM ...

Page 99: ...f duplex Auto negotiation is defined in the IEEE 802 3 standard for Ethernet and is an operation that takes place in a few milliseconds Bandwidth The information capacity measured in bits per second that a channel can transmit The bandwidth of Ethernet is 10 Mbps the bandwidth of Fast Ethernet is 100 Mbps Category 3 Cables One of five grades of Twisted Pair TP cabling defined by the EIA TIA 586 st...

Page 100: ...one lines to send and receive data at high speeds Ethernet A LAN specification developed jointly by Xerox Intel and Digital Equipment Corporation Ethernet networks use CSMA CD to transmit packets at a rate of 10 Mbps over a variety of cables Ethernet Address See MAC address Fast Ethernet An Ethernet system that is designed to operate at 100 Mbps Firewall Electronic protection that prevents anyone ...

Page 101: ...t is a flexible protocol with a wide range of encryption options IPSec is commonly used for both connections between separate private networks and for connections between remote PCs and private networks ISP Internet Service Provider An ISP is a business that provides connectivity to the Internet for individuals and other businesses or organizations LAN Local Area Network A network of end stations ...

Page 102: ...PPoE Point to Point Protocol over Ethernet Point to Point Protocol is a method of secure data transmission originally created for dial up connections PPPoE is for Ethernet connections PPTP Point to Point Tunnelling Protocol PPTP is a simple VPN encryption protocol based on the Point to Point protocol It is most frequently used to connect remote PCs to private networks RIP Routing Information Proto...

Page 103: ...LANs than a bridge and are generally more sophisticated TCP IP Transmission Control Protocol Internet Protocol This is the name for two of the most well known protocols developed for the interconnection of networks Originally a UNIX standard TCP IP is now supported on almost all platforms and is the protocol of the Internet TCP relates to the content of the data travelling through a network ensuri...

Page 104: ...104 dua08609 5aaa01 book Page 104 Thursday September 11 2003 12 15 PM ...

Page 105: ...ernet port 13 cable DSL modem connecting to 17 cable DSL status LED 13 category 3 cables 99 category 5 cables 99 changing the admin password 35 client 99 configuring computers 19 configuring the Router 33 connecting the cable DSL modem 17 connecting to the Internet 36 Consignes importantes de sécurité 88 content filtering 56 57 creating a virtual server 49 CSA statement 111 D data encryption stand...

Page 106: ...g 38 dynamic routing 47 E End User Software Licence Agreement 95 Ethernet 100 Ethernet port cable DSL 13 LAN 13 F Fast Ethernet 100 FCC statement 111 feedback 8 filter policy 57 finding the Router 79 firewall 9 defined 100 disabling 55 settings 48 firmware upgrading 69 front panel diagram 12 full duplex 100 G Gateway defined 100 firewall 9 Gateway to Gateway connection 64 getting help 34 giving fe...

Page 107: ...tatus LED 12 LED alert 12 cable DSL status 13 LAN status 12 power 12 loading Router configuration 69 local area network 101 login screen 23 logs viewing 70 M MAC address 101 Macintosh OS 8 5 9 x setting up 20 main menu accessing 33 media access control 101 multiple hosts 54 N NAT configuring 33 44 defined 102 network address remote 63 network address translation 33 44 102 network defined 102 netwo...

Page 108: ...ing 20 editing 66 users 58 private IP addresses 83 privileges setting 50 protocol defined 102 R rear panel diagram 13 remote network address 63 remote User ID 62 restarting the Router 67 restoring Router configuration 69 RJ 45 defined 102 Router changing the password 35 connecting the cable DSL modem 17 installation information 16 positioning 15 powering up 17 restarting 67 Router configuration 33...

Page 109: ...cal specifications 85 time zone setting 68 wizard 25 traffic 103 trigger port 54 Triple DES 99 tunnel shared key 62 63 65 66 U upgrading firmware 69 usage monitor 70 User ID 62 UTC world time 25 V VCCI statement 111 viewing status and logs 70 virtual DMZ 49 virtual private network 103 virtual servers 48 creating 49 VPN defined 103 example 64 VPN mode 58 W WAN See wide area network web proxies disa...

Page 110: ...ard auto configuration 26 defined 103 DHCP 30 Internet settings 26 LAN settings 30 launching manually 24 setup 23 summary 31 world time UTC 25 dua08609 5aaa01 book Page 110 Thursday September 11 2003 12 15 PM ...

Page 111: ... antenna Relocate the equipment with respect to the receiver Move the equipment away from the receiver Plug the equipment into a different outlet so that equipment and receiver are on different branch circuits Consult the dealer or an experienced radio television technician for help The user may find the following booklet prepared by the Federal Communications Commission helpful How to Identify an...

Page 112: ...DUA08609 5AAA01 Published September 2003 dua08609 5aaa01 book Page 112 Thursday September 11 2003 12 15 PM ...

Reviews: