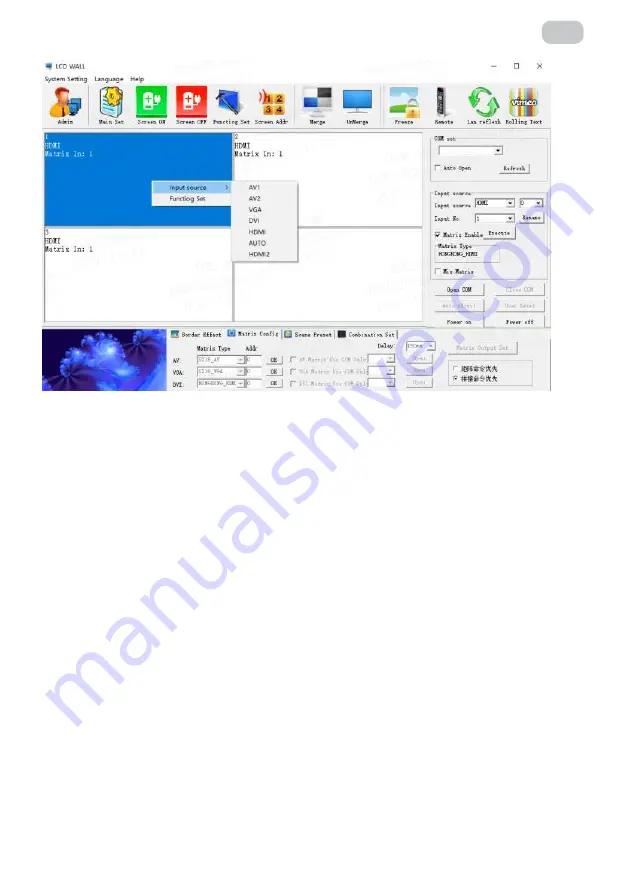
background image

– 67 –

RU

Рис. 4

3.6 Объединение

Для нескольких видеостенных дисплеев, например 2 на 2, после выбора экрана 4 
выберите источник сигнала из списка источников сигнала, а затем нажмите кнопку 
«Execute» (Выполнить), чтобы завершить процедуру. Нажмите кнопку «Image Freezing» 
(Заморозить изображение), чтобы заморозить текущее изображение, и нажмите кнопку 
еще раз, чтобы отменить заморозку.

Summary of Contents for VE55L-A

Page 1: ...DISPLAY User Manual V2 0 VE55L A FOR VE55L A...

Page 2: ...ype in your area please consult the local dealer or electric power company To better protect the product in the thunderstorm weather or when this unit is not utilized for a long time or when unattende...

Page 3: ...acturer or original parts with same characteristics and performance Usage of unlicensed parts may cause fire shock and or other hazards 15 Safety inspection When maintenance service is completed pleas...

Page 4: ...facturer s instruction Both opening and ventilation holes in the unit casing are designed for ventilation Do not plug these opening and ventilation holes Insufficient ventilation may cause overheating...

Page 5: ...input signal randomly DP can output loop through to the next screen DP input port and this function can replace distributor and matrix front signals access is 4 k which means that it has replaced the...

Page 6: ...6 EN 1 4 System Connection Mode The structure of the system The block diagram of the screen wall 2 by 2...

Page 7: ...ontrol 1 Check whether the port settings of the videowall software are correct 2 Check whether there is a damage in the serial line and whether it is a good connection between the product and the PC i...

Page 8: ...80 60hz HDMI 4K HDMI digital signal input Up to 3840x2160 60hz DP input DP digital signal input Up to 3840x2160 60hz VGA input VGA analog signal input Up to 1920x1080 60hz DP output DP Daisy Chain out...

Page 9: ...9 EN 55 inch 3 5mm Bezel Model...

Page 10: ...omputer for the software is properly connected to the controller Both the relevant signal lines of the controller and power line are connected correctly System operation procedure 1 open the power sup...

Page 11: ...ing controlled unit through the keyboard or the mouse clicking or dragging Function zone contains commonly used function buttons User s title zone the users can change the displays of the title accord...

Page 12: ...esponding ID number 3 Click modify to complete the modification of the screen serial number Note When this function modifies the again number read the machine code displayed on the screen and modify t...

Page 13: ...its 2 by 2 for example after selecting the 4 screen select the signal source in the signal sources click the execute button to complete the procedure You also can click on the image freezing to freeze...

Page 14: ...14 EN Fig 5 Fig 6 After Merge there will be physical seams between the units you can select the eliminate the border and set up corresponding values to compensate borders between pictures...

Page 15: ...shows the effect of removing frames This function of removing frames is not used This function of removing frames is used This function of removing frames is not used This function of removing frames...

Page 16: ...Fig 10 3 8 Matrix Enable 1 Select Matrix Enable and select the matrix input No Fig 9 Fig 10 2 Select the matrix type and configure the matrix ID Note different matrix selection has the different time...

Page 17: ...presets of Scene Select whose names can be modified Scene Select to be saved then click Save Scene and the model is saved The load Scene can call the users saved mode The polling mode of the scenes c...

Page 18: ...ftware settings 1 Click the Admin button and enter the super Administrator Password 111111 in the pop up dialog box Fig 12 Fig 13 2 Click the Main Set button and make the following settings in the pop...

Page 19: ...enu the two options of Video and VGA are set by different signal sources and each of the settings in the videowall unit will display correspondingly 3 10 1 Picture Setting When Video is selected in Ad...

Page 20: ...GA is selected in Adjust Object HPosition VPosition Clock Phase can be set 3 10 3 Color Temp Whether you choose Video or VGA you can set the white balance 3 10 4 System adjustment Under the System men...

Page 21: ...s button the blue screen mode hits and when there is no signal the display is blue screen Receive a signal signal after normal display Black Screen On When this button is clicked the black screen mode...

Page 22: ...mplete the modification of the address 3 10 6 software upgrading 1 Copy the software MERGE bin to the root directory of the USB stick without changing the file name 2 Insert the USB disk into the USB...

Page 23: ...s feature is temporarily unavailable 3 10 8 Panel adjustment Adjustment as shown in Figure 21 it is recommended to have a professional adjust Fig 22 3 11 Function Set 1 Click the Admin button and ente...

Page 24: ...24 EN Fig 23 2 Click the Funtiog Set button and make the following settings in the pop up dialog box Fig 24 Serial port Network port Control mode Server settings IP Adress...

Page 25: ...Title Set Fig 25 Fig 26 Title Users can modify according to their own needs User name Users can modify according to their own needs Company URL Users can modify according to their own needs can be cha...

Page 26: ...ntrol software click on the bottom left corner of the LOGO image area according to the user has set up a LOGO URL etc click Open it will be connected to the set URL 3 13 Language Customers can choose...

Page 27: ...rwise you have to insert to each screen one by one 5 3 Screen Address Setting 1 Press MENU on remote controller below OSD will pop up Fig 29 Fig 30 Refer to input source in use select input For exampl...

Page 28: ...by left and right button on MENU OSD Set video wall matrix setting For example if you want to set up 2x2 matrix then set Start Row to 1 Sart Col to 1 End Row to 2 End Col to 2 Counter Row to 2 Counte...

Page 29: ...29 EN Company Name Malead Limited Company address Flat Rm 9 25 F Concordia Plaza 1 Science Museum Road Tsimshatsui Kowloon Hong Kong Material plastic metal Warranty 36 months Made in China...

Page 30: ...30 UA 1 2 3 4 5 6 7 8 9 10 11...

Page 31: ...31 UA 12 13 14 15 16...

Page 32: ...UA 1 1 1 178 1 2 4K DP Loop Display Port Loop 90 180 270 1 3 55 ADS 1920 1080 Full HD 2 500 1200 1 178 8 3 5 VGA DVI D HDMI x2 DisplayPort RJ45 RS232 DisplayPort RJ45 RS232 1214 684 94 28 VESA 400x400...

Page 33: ...33 UA 1 4 The structure of the system 2 2...

Page 34: ...34 UA 1 5 1 2 3 1 2 3 4 1 2 VGA DVI 1 2 VGA DVI 3 4 5 DVI DDC...

Page 35: ...35 UA 2 2 1 DVI DVI 1920x1080 60 HDMI MHL HDMI 1920x1080 60 HDMI 4K HDMI 3840x2160 60 Display Port DP DP 3840x2160 60 VGA VGA 1920x1080 60 Display Port DP DP 3840x2160 60 RS 232 RJ45 RS 232 RJ45...

Page 36: ...36 UA 2 2 55 3 5...

Page 37: ...37 UA 3 3 1 Windows98 2000 NT XP WIN7 Vista 2 0 1 VGA 256 10M RS232 3 2 RS232 1 2 Lcdwall Exe 1...

Page 38: ...38 UA 1 3 3 1 2 2 Refresh COM Open 1 2...

Page 39: ...39 UA 3 Click modify to complete the modification of the screen serial number 3 2 2 XP 2 2 2 2 3 4 ID 1 ID 1 2 3 Modify ID ID ID System Settings 111111 3 5 Freeze...

Page 40: ...40 UA 4 3 6 2 2 4 Execute Image Freezing...

Page 41: ...41 UA 5 6 Eliminate the border...

Page 42: ...42 UA 7 This function of removing frames is not used This function of removing frames is used 3 7 Execute 8 7...

Page 43: ...43 UA Fig 10 3 8 1 Matrix Enable 9 10 2...

Page 44: ...44 UA 3 9 16 Save Scene Load Scene 11...

Page 45: ...45 UA 3 10 1 Admin 111111 12 13 2 Main Set...

Page 46: ...ted in Adjust Object only Brightness Contrast and Color Restore can be set 14 15 Video VGA 3 10 1 Adjust Object Video Brightness Contrast Color Sharpness Tint Color Restore Adjust Object VGA Brightnes...

Page 47: ...you choose Video or VAG you can set the white balance Fig 17 16 17 3 10 2 Adjust Object Video HPosition Hsize VPosition Vsize Adjust Object VGA HPosition VPosition Clock Phase 3 10 3 Video VGA 3 10 4...

Page 48: ...48 UA 18 19 20 Backlight Auto ADC VGA Blue Screen On Black Screen On Factory Reset 3 10 5 Screen Add 19...

Page 49: ...49 UA 21 01 01 1 20 2 Screen Add 3 Modify 3 10 6 1 MERGE bin USB 2 USB USB 3 Software Update 21 USB 3 10 7...

Page 50: ...50 UA 3 10 8 22 22 3 11 1 Admin 111111...

Page 51: ...51 UA 23 24 2 Function Set Serial port Network port Control mode Server settings IP Adress...

Page 52: ...52 UA 3 12 System Settings Title Set 25 26 Title User name Company URL URL User LOGO...

Page 53: ...53 UA 4 RJ45 to interface line sequence 27 28 Open URL 3 13 4 RJ45 TX RX GND 2 3 5...

Page 54: ...54 UA 5 5 1 Commented VG72 Commen 5 2 1 RJ45 IN 5 3 1 MENU 29 30 Input HDMI2 HDMI2 MENU...

Page 55: ...Commented Comment 31 32 2 MachineCode Ten Thousands Thousands Hundreds Tens Ones MENU 3 Video wall matrix setting 2x2 Start Row 1 Start Col 1 End Row 2 End Col 2 Counter Row 2 Counter Col 2 Merge MENU...

Page 56: ...56 UA 9 25 1 18 04073 36 5...

Page 57: ...57 RU 1 2 3 4 5 6 7 8 9 10 11...

Page 58: ...58 RU 12 13 14 15 16...

Page 59: ...RU 1 1 1 178 1 2 4K DP Loop Display Port Loop 90 180 270 1 3 55 ADS 1920 1080 Full HD 2 500 1200 1 178 8 3 5 VGA DVI D HDMI x2 DisplayPort RJ45 RS232 DisplayPort RJ45 RS232 1214 684 94 28 VESA 400x400...

Page 60: ...60 RU 1 4 The structure of the system 2 2...

Page 61: ...61 RU 1 5 1 2 3 1 2 3 4 1 2 VGA DVI 1 2 VGA DVI 3 4 5 DVI DDC...

Page 62: ...62 RU 2 2 1 DVI DVI 1920x1080 60 HDMI MHL HDMI 1920x1080 60 HDMI 4K HDMI 3840x2160 60 Display Port DP DP 3840x2160 60 VGA VGA 1920x1080 60 Display Port DP DP 3840x2160 60 RS 232 RJ45 RS 232 RJ45...

Page 63: ...63 RU 2 2 55 3 5...

Page 64: ...64 RU 3 3 1 Windows98 2000 NT XP WIN7 Vista 2 0 1 VGA 256 10M RS232 3 2 RS232 1 2 Lcdwall Exe 1...

Page 65: ...65 RU 1 3 3 1 2 2 COM Refresh Open 1 2...

Page 66: ...66 RU 3 Click modify to complete the modification of the screen serial number 3 2 2 XP 2 2 2 2 3 4 ID 1 ID 1 2 ID 3 Modify ID ID ID System Settings 111111 3 5 Freeze...

Page 67: ...67 RU 4 3 6 2 2 4 Execute Image Freezing...

Page 68: ...68 RU 5 6 Eliminate the border...

Page 69: ...69 RU 7 This function of removing frames is not used This function of removing frames is used 3 7 Execute 8 7...

Page 70: ...70 RU Fig 10 3 8 1 Matrix Enable 9 10 2...

Page 71: ...71 RU 3 9 16 Save Scene Load Scene 11...

Page 72: ...72 RU 3 10 1 Admin 111111 12 13 2 Main Set...

Page 73: ...ted in Adjust Object only Brightness Contrast and Color Restore can be set 14 15 Video VGA 3 10 1 Adjust Object Video Brightness Contrast Color Sharpness Tint Color Restore Adjust Object VGA Brightnes...

Page 74: ...you choose Video or VAG you can set the white balance Fig 17 16 17 3 10 2 Adjust Object Video HPosition Hsize VPosition Vsize Adjust Object VGA HPosition VPosition Clock Phase 3 10 3 Video VGA 3 10 4...

Page 75: ...75 RU 18 19 20 Backlight Auto ADC VGA Blue Screen On Black Screen On Factory Reset 3 10 5 Screen Add 19...

Page 76: ...76 RU 21 01 01 1 20 2 Screen Add 3 Modify 3 10 6 1 MERGE bin USB 2 USB USB 3 Software Update 21 USB 3 10 7...

Page 77: ...77 RU 3 10 8 22 22 3 11 1 Admin 111111...

Page 78: ...78 RU 23 24 2 Function Set Serial port Network port Control mode Server settings IP Adress...

Page 79: ...79 RU 3 12 System Settings Title Set 25 26 Title User name Company URL URL...

Page 80: ...80 RU 4 RJ45 to interface line sequence 27 28 User LOGO Open URL 3 13 4 RJ45 TX RX GND 2 3 5...

Page 81: ...81 RU 5 5 1 Commented VG72 Commen 5 2 1 RJ45 IN 5 3 1 MENU 29 30 Input HDMI2 HDMI2 MENU...

Page 82: ...Commented Comment 31 32 2 MachineCode Ten Thousands Thousands Hundreds Tens Ones MENU 3 Video wall matrix setting 2x2 Start Row 1 Start Col 1 End Row 2 End Col 2 Counter Row 2 Counter Col 2 Merge MENU...

Page 83: ...83 RU 9 25 1 18 04073 36 5...

Page 84: ...ion of Consumers Rights 5 No warranty is given with respect to any consumer violation of the operating rules set forth in the instructions 6 The product warranty service is cancelled from the in the f...

Page 85: ...85 UA 2E 1 2 60 3 4 5 6 7 36 __________________________________________________________________ 18 04073 0 800 300 345 044 230 34 84 390 55 12 www erc ua service...

Page 86: ...86 RU 2E 1 2 60 3 4 5 6 7 36 _____________________________________________________________...

Page 87: ...eller stamp Date of application Date of completion Cause of damage Coupon 3 Seller stamp Date of application Date of completion Cause of damage Product information Product Model Serial number Seller I...

Page 88: ......

Reviews: