background image

247securityinc.com

1.866.693.7492

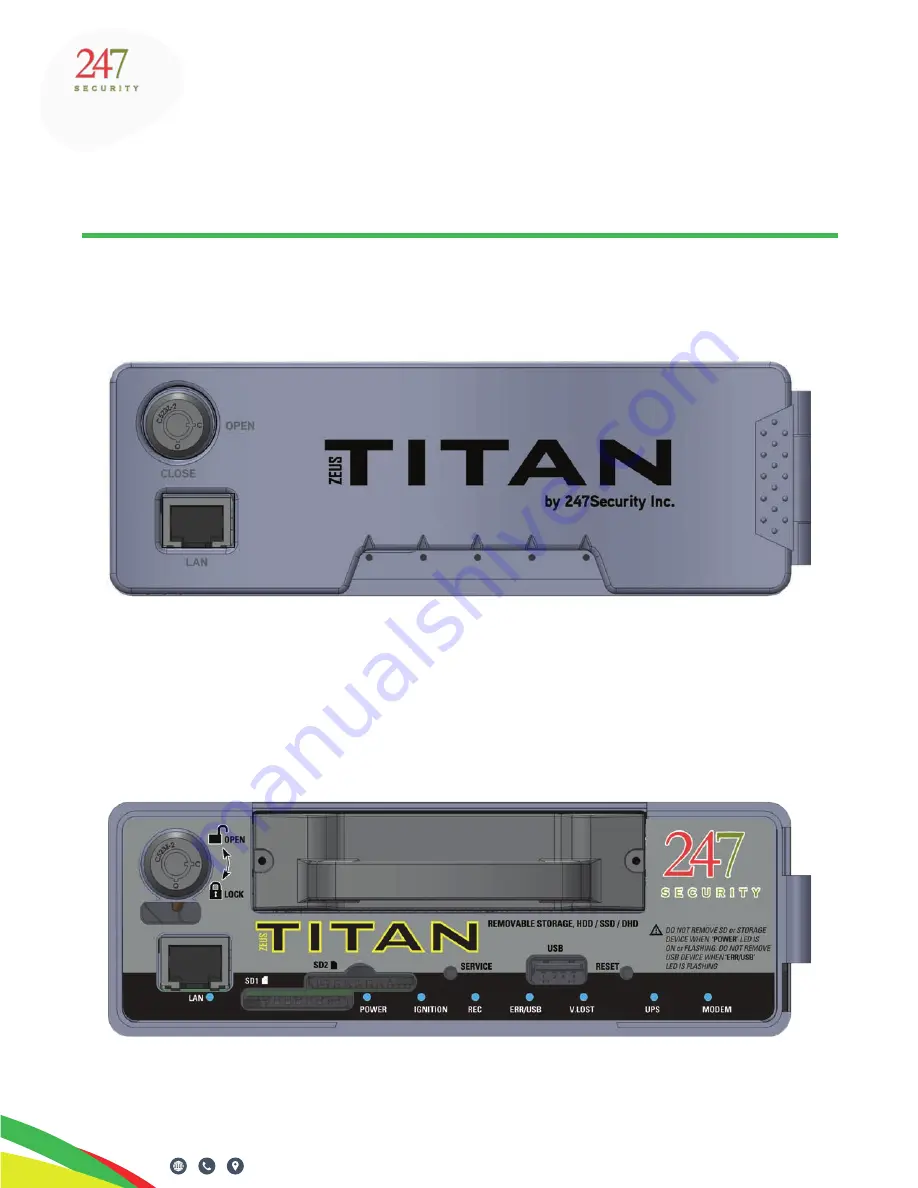
Front - Door Closed

Front - Door Open

OVERVIEW

247securityinc.com | 1.866.693.7492 | 1455 Alderman Drive, Alpharetta GA 30005, USA

Pg. 4 of 47

Overview

Summary of Contents for ZEUS TITAN

Page 1: ...USER MANUAL Zeus Titan Desktop App 247securityinc com 1 866 693 7492 ...

Page 2: ...e of the art Zeus TITAN and the DVRViewer Pro software DEFINE the mobile video surveillance industry Zeus TITAN feature A dynamic bit rate Configurable frame rate up to 30 fps per camera Image quality control Real time previewing on all channels Alarm triggers Sensor configuration Easy retrieval and transfer of video files over Modem WiFi LAN GPS tracking In addition ZEUS allows end users to indep...

Page 3: ...ion Overview Operation Configuration Zeus Titan Configuration Menus System Configuration Menu Camera Configuration Menu Sensor Configuration Menu Network Menu Status Menu Tools Menu Reference Appendix Connections Specifications Page 2 Pages 4 5 Pages 6 7 Pages 8 11 Pages 12 36 Pages 13 19 Pages 20 26 Page 27 Page 28 Page 29 Pages 30 36 Page 37 41 Pages 42 44 Pages 45 47 ...

Page 4: ...247securityinc com 1 866 693 7492 Front Door Closed Front Door Open OVERVIEW 247securityinc com 1 866 693 7492 1455 Alderman Drive Alpharetta GA 30005 USA Pg 4 of 47 Overview ...

Page 5: ...nc com 1 866 693 7492 1455 Alderman Drive Alpharetta GA 30005 USA Pg 5 of 47 Retrofit Notes If replacing a ZEUS PT with a ZEUS TITAN there are a few important changes TITAN uses a different power cable than PT SD Cards are not recommended as a storage media use a DHD2 ...

Page 6: ...er you don t need to retrieve the media storage tray from the vehicle The media storage tray DHD see below can be removed and inserted without turning the vehicle ignition off but the POWER and REC LEDs must be off This process is necessary so that the ZEUS can properly close all video audio files and safely turn the HDD hard disc drive power off This process will take roughly 15 to 30 seconds to ...

Page 7: ... the door Turn the key to the Lock position The ZEUS will now turn the HDD power on detect the new media and start recording again If viewing videos connect the media tray to the computer with the supplied cable Refer to the DVRViewer Pro User Manual for more information You can retrieve video from the DVR wirelessly through a wireless network access point Refer to the TouchDown manual for more in...

Page 8: ... DVRViewer 4 After disconnecting from TITAN return your laptop PC to dynamic IP settings as necessary An Ethernet Crossover Cable is included with the unit This is how the installer views the cameras for aiming purposes A crossover Ethernet cable is slightly different than a normal Ethernet cable the connection is not between a PC and a network device per se such as a router switch modem but betwe...

Page 9: ...e should be no other numbers in the TCP IP properties window 14 Left click on OK 15 Left click on Close 1 Drag the mouse pointer to the top right or bottom right hot corner until the five Charms appear along the right edge of the screen Drag the mouse pointer and click on Search you can also access the Search charm through the keyboard shortcut Windows logo Q the search pane will open type Control...

Page 10: ...e automatically 13 There should be no other numbers in the TCP IP properties window 14 Left click on OK 15 Left click on Close SETTING UP YOUR PC WINDOWS 11 1 Click the Start button in the lower left corner 2 Type network connections click on View Network Connections 3 Right click Local Area Connection and click Properties 4 Left click on Internet Protocol Version 4 TCP IPv4 5 Click the Properties...

Page 11: ...nning Open DVRViewer Pro and login The user admin has the password 247SECURITYINC Click View Playback and select Configure Configure TITAN as needed Note Some settings should not be changed unless the user has specific knowledge or is under the direction of 247SecurityInc tech support If unsure make no changes without contacting tech support 4 RETURN THE IP SETTING TO DYNAMIC You may not have to s...

Page 12: ... solid The bus can be idling or in Accessory mode The DVR setup is divided into six major sections System Camera Sensor Network Status and Tools The TITAN DVR will already have been configured at the factory for your specific system requirements but of course can be updated as needed Note that some settings can impact the proper functioning of the DVR and require specific knowledge before changing...

Page 13: ...ters such as the name of the DVR time zone shutdown delay etc Also the G Force set up parameters are here if the Drive Safe module is attached to the DVR SYSTEM CONFIGURATION MENU 247securityinc com 1 866 693 7492 1455 Alderman Drive Alpharetta GA 30005 USA Pg 13 of 47 CONFIGURATION MENUS ...

Page 14: ...dmin and cannot change DVR TIME ZONE Select the time zone where the vehicle is operating from the drop down menu A best practice is to include the bus number as part of the DVR Server Name The field accepts letters numbers with a maximum of 16 characters Note DO NOT USE spaces or symbols When you open Live Look in under the View Playback menu in DVRViewer Pro a list of all connected ZEUS TITAN DVR...

Page 15: ... View and play back of video Video recording stops and SmartServer upload occurs The recommended setting is 2400 seconds or 4 hours MAXIMUM FILE SIZE MB MAXIMUM FILE TIME S These parameters determine the maximum size of the video files that are recorded and saved on the removable hard drive s In the field Maximum File Size MB you can enter values ranging from 10 MB to 500 MB In the field Maximum F...

Page 16: ...arkers each has a separate wiring configuration PRE LOCK TIME S POST LOCK TIME S Pre Lock Time and Post Lock Time in seconds defines how many seconds are included in the event before and after the button push or triggered event For instance with settings of 60 in both fields if the Event Marker Button was pressed at 8 30am the video event file is marked from 8 29am until 8 31am It is recommended t...

Page 17: ... an external third party GPS system to input its information to TITAN for inclusion with the video In another scenario TITAN may be replacing an older DVR that used an external GPS ENABLE Tab101 SHOW TAB101 PEAK ON OSD If this option is enabled and Tab101 is installed TITAN will collect G Force information for integration with video DVRViewer Pro can navigate videos based on Tab101 information Par...

Page 18: ...ke Up Time It allows TouchDown processes to begin and finish before the SSD copies video to the HDD Titan will turn on at the set time set in the next field and copy SSD files to the HDD If there s no TouchDown system set this to Right Away After Shut Down WAKE UP TIME SETTING If By Wake Up Time is selected above this field sets the Wake Up Time when TITAN will turn on and start moving video from ...

Page 19: ...A 30005 USA Pg 19 of 47 CONFIGURATION MENUS DRIVE SAFE G FORCE SET UP If the TAB101 option is checked as listed above the G Force parameters will then appear on the system set up page after a system re boot The TAB101 detailed settings are not to be reset except by a qualified technician or installer ...

Page 20: ... 693 7492 The TITAN DVR can record up to 16 cameras Select a camera by clicking on its tab CAMERA CONFIGURATION MENU 247securityinc com 1 866 693 7492 1455 Alderman Drive Alpharetta GA 30005 USA Pg 20 of 47 CONFIGURATION MENUS ...

Page 21: ...nless the camera is a stop arm camera and is to be used for automatic SAV detection Check the box to enable Consult with the installer and 247Security regarding automatic SAV detection CAMERA IP ADDRESS If Camera Type above is set to Analog this field will be blank If IP is selected enter an IP address This setting should be set by the installer A best practice is to use 192 168 1 1xx with consecu...

Page 22: ...MAIN AND SECOND CAMERA STREAMS TITAN can take a camera feed and route it to two destinations Systems are normally installed with the MAIN stream directed toward a high quality recording on the DVR and the SECOND stream to the Live View option Since Live View will use cellular modems that incur bandwidth charges the DVR can be configured with more cost effective options SECOND STREAM RECORDING MODE...

Page 23: ... the recorded video and like RESOLUTION above the higher the detail larger files sizes Frame rate is adjustable from a minimum 1 fps to 30 fps maximum for each individual camera TITAN can process a maximum of 300fps at full resolution 1920x 1080 over all cameras To conserve video storage it is recommended to select 20FPS for camera1 4 and 15 FPS for camera 5 8 SECOND STREAM FRAME RATE Frame rate i...

Page 24: ...es smaller bit rates result in smaller file sizes but less picture quality If unsure go with the recommended setting above SECOND STREAM BIT RATE It is recommended to leave this setting as the default for Live View purposes 128 Kbps PICTURE QUALITY The default setting of high is recommended As with other settings a higher setting provides better picture and larger file sizes BRIGHTNESS CONTRAST HU...

Page 25: ...w many seconds of video to include in a triggered event prior to the time the trigger occurred Post Recording Time defines how many seconds of video are included in the triggered event after the time the trigger occurred For the above example if the sensor got triggered at 12 00 00 the event would include 30 seconds of video before the trigger and 30 seconds after the trigger from 11 59 30 to 12 0...

Page 26: ...coordinates are still recorded in a log file on the video storage media RECORDING NOTIFICATION TITAN has four digital outputs that can be used to configure alarms By default Recording status is sent to Digital Output 1 Video Lost status is sent to Digital Output 2 You can control the LED mode by clicking on the Mode drop menu and selecting either flashing by interval on or off when the event occur...

Page 27: ...cked then TITAN detects 1 as the active state of the sensor Please make sure you understand how your sensors work before connecting them to the digital inputs POWER CONTROL ENABLE This option is intended for trained installers only Do not adjust unless you have specific knowledge of this setting When checked TITAN will assign Sensor 9 as Power Ignition after rebooting This means that the sensor 9 ...

Page 28: ...e of each setting The default Ethernet IP address of ZEUS TITAN is 192 168 1 100 It must be modified if there are more than two vehicles with DVRs or if there is an external WiFi bridge If this IP address is modified the user will NOT be able to access the DVR if the IP address is lost The Network POE1 2 Always On option is used to send constant power to TITAN over the POE Power Over Ethernet inte...

Page 29: ...m the top this tab informs the user which firmware versions are currently loaded version of Tab101 number of cameras sensors and alarms the DVR currently supports and the current DVR time as well as your local computer time The local computer time is extracted from the computer currently connected to the DVR The Synchronize DVR Time button will synchronize the DVR time with the local time on the c...

Page 30: ...a configuration file from one TITAN and then upload and apply it onto another Much like copying and pasting you can then alter only the required settings to make that TITAN unique Once the DVR has been configured click the Download button to save your settings to a file on your desktop or a location of your choice Navigate to the location on your computer where you want to save the file Click the ...

Page 31: ...ing multiple DVRs with same hardware and software Generally the installer configures the first DVR and then uses the configuration file to quickly make the changes to other DVRs in the fleet To upload a configuration file click the Choose File button navigate to the configuration file you wish to upload and click Open Click the Upload button to start the process The following message will display ...

Page 32: ... to DVR and Save Current Configuration a Follow the first 2 steps from CONNECT TITAN TO PC LAPTOP on page 8 b Launch your browser and delete all browsing history including history temp files cookies and web form information or go to Configure DVR in DVRVIewer Pro c Go to http 192 168 1 100 to access DVR setup d At the login page type admin as the User Name and admin as the Password e Go through ea...

Page 33: ...wer Pro e Verify new settings by comparing to what you recorded at Step 2e f Download a new configuration file g Launch DVRViewer Pro click on View Playback and select Live Look in h Verify the live view of cameras i Verify the Record LED on the Event Marker is on indicating that DVR is currently recording video j Turn the key lock to the OPEN position and wait for TITAN to shut down Close your br...

Page 34: ...NNECT TITAN TO PC LAPTOP on page 8 b Launch your browser Delete all browsing history including history temp files cookies and web form information c Go to http 192 168 1 100 to access DVR setup You should now be at the login page d Type admin as the User Name and admin as the password e Go through each page and manually record on paper all the settings it is very important to record the correct DV...

Page 35: ... 47 g After about 6 minutes more messages will display such as h Remove the Force Power on plug and wait for 60 seconds until TITAN restarts i Click Close to close the browser page j Re open your browser clear the cache and browsing history k Go to http 192 168 1 100 again to access DVR setup I Verify the new MCU version on the status page ...

Page 36: ...u check the boxes for Enable Smart Upload and Enable External Wi Fi b Click the Apply button and wait for the changes to be initiated 3 Restart TITAN a Disconnect your laptop PC from TITAN b Hard restart TITAN by unplugging the power cable Wait 5 seconds then reconnect power cable 4 Verify Connection to TouchDown a Use the POE cable see 10 100BASET LAN CONNECTOR and POE Connector on page 42 and wi...

Page 37: ...ing disk The SSD is formatted in FAT32 and the HDD is formatted in EXT3 DHD and DHD2 are available in 1 or 2 terabyte sizes For DHD recording Enable DHD Recording must be selected on the System configuration menu See page 18 for details DHD Recording Process The cameras are only recorded on to the SSD part of the DHD once the vehicle has stopped the content begins to transfer to the HDD part of th...

Page 38: ...uploading requested video and data from the HDD to your TouchDown server Note that this feature can be enabled disabled on the setup page Unlocking the door Unlocking the door will initiate a shut down procedure 1 Zeus TITAN stops recording or transferring data all resources are released 2 All disks are un mounted 3 Power is turned off REFERENCE APPENDIX STATUS INDICATORS POWER This LED indicates ...

Page 39: ...e Requires a data contract and DVP2 LOCK AND DHD ON OFF The OPEN LOCK mechanism has two functions It secures the hard drive DHD to prevent unauthorized access Internal circuitry will safely shut down TITAN before removing the hard drive Users MUST wait until all lights are off on DVR before removing the hard drive Turn the key to position LOCK to lock media storage or OPEN to unlock NOTE TITAN wil...

Page 40: ...nds to complete The feature is helpful when access to video is needed but vehicle is required to remain running The user can remove the media storage and insert another one so that the needed video can be retrieved right away 1 Turn the key to the OPEN position TITAN will close all video audio files and safely turn the hard drive power off Open the door and wait until all lights are off Note the i...

Page 41: ...247securityinc com 1 866 693 7492 247securityinc com 1 866 693 7492 1455 Alderman Drive Alpharetta GA 30005 USA Pg 41 of 47 REFERENCE APPENDIX WIRELESS VIDEO RETRIEVAL Refer to the TouchDown manual ...

Page 42: ...Ground 10 VCC POE 12VDC Pg 42 of 47 Connections 10 100BASE T LAN CONNECTOR and POE Connector The DVR has a 10 pin RJ50 port labeled as LAN and has a default static IP address of 192 168 1 100 The port is used to connect to the DVR for Setup Live View and Video PlayBack USB 2 0 CONNECTOR Note The USB port is for future functionality Connector type 4 pin friction lock header Pin Number Pin Out 1 VCC...

Page 43: ...e system will then go into Standby mode for the set period then through its normal shutdown procedures before completely powering down TITAN has an on board battery system UPS or uninterruptable power supply for providing backup power for up to 15 minutes after the main power has been lost The UPS battery will also keep the DVR running in case of voltage spikes greater then 16VDC and voltage drops...

Page 44: ...ensors can be wired to this connector This connector also provides 12VDC OUT on pin 4 with a built in 0 75A fuse An optional second I O cable is required GP I O General Purpose Input Output This connector provides 5 digital inputs and 1 digital output The digital inputs are labeled as DI_1 DI_2 DI_3 DI_4 and DI_5 The digital output is labeled as DO_3 End users can assign any sensors to one of thes...

Page 45: ...ls can be independently set to record a maximum 30 fps Simultaneous channels Up to 8 channels can record simultaneously at 30fps with AHD1080p 1920xx1080 resolution plus 8 IP Camera channels additional equipment required Pg 45 of 47 Specifications VIDEO Recording Channels Up to 10 audio channels Cameras have built in microphones with noise reduction processing Each audio recording channel synchroni...

Page 46: ...onnected Five Standard ALARMS Up to 4 alarms can be connected PHYSICAL SPECIFICATIONS Housing Ionized Aluminum for rugged applications Form Factor Depth 184 mm 7 25 inches Width 159 mm 6 25 inches Height 51 mm 2 inches Not including shock and vibration isolator Weight Approximately 1 3 kg 2 8 lb Not including shock and vibration isolator POWER Power Supply 12V Intelligent Power Circuit ESD Protect...

Page 47: ...nge backup power Over voltage protection up to 110VDC Ignition Signal Power Down Timer Software configurable delay power off signal from 1 14400 seconds 4 hours Software configurable sleep mode after power down 50mA current draw Power Consumption Typical 10W DVR draws less than 24ma when off ENVIRONMENT Temperature Range 30 C to 55 C 22 F to 131 F operating temperature Relative Humidity 10 to 90 n...

Page 48: ...USER MANUAL 247securityinc com 1 866 693 7492 1455 Alderman Drive Alpharetta GA 30005 USA 247securityinc com 1 866 693 7492 ...

Reviews: