background image

EN

DE

FR
ES

IT

EN

DE

FR
ES

IT

4

5

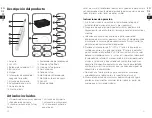
Included Items

1 x Manicure & Pedicure Device
1 x Power Adapter 
10 x Attachments Made from 
Sapphire and Felt

1 x Carrying Bag                     
1 x Instruction Manual
10 x Attachments Made of 
Sandpaper

Before using the Professional Manicure & Pedicure Kit for the first 
time, check the package contents to ensure all parts are free of 
visible damage.

Operating Instructions 

1. This manicure & pedicure kit is intended only for the treatment of 

hands (manicure) and feet (pedicure).

2. Make sure the manicure & pedicure device is switched off before 

plugging into power and fitting attachments.

3. Select an attachment and push into the top of the manicure 

& pedicure device. A clicking sound will be heard when 
the attachment has correctly engaged. To remove, pull the 
attachment straight out of the device.

4. Push the switch from “O” (Off ) to “L” (Left, anti-clockwise rotation) 

or “R”(Right, clockwise rotation) to turn the device on. The LED will 
light up blue. The two buttons marked with plus (+) and minus (-) 
allow the speed of rotation to be selected. It is recommended to 
start the manicure & pedicure device at low speed and increase 
it as required. The device will start with the lowest speed setting 
(setting 1) the first time it is turned on after being plugged into 
power.  

5. Do not exert heavy pressure and always guide the attachments 

carefully over skin and nail surfaces. 

6. Move the manicure & pedicure device under light pressure in 

circular movements slowly over the body parts being treated.

Notes: 

•  The attachments will have a reduced effect if the skin is softened  

or moist. For this reason, it is not recommended to take a bath 
or  shower immediately before using the manicure & pedicure  
device.

•  In order to retain the skin’s natural protection, do not remove 

too much skin from calluses. Removing too much skin may also   
cause calluses to grow back much harder. 

•  Always ensure the attachment heads can rotate freely. If they 

become jammed or are blocked from rotating, the device will 
become very hot and suffer damage.

•  After every use, apply moisturizing cream to the skin parts 

treated. 

Important:

Always continue checking the results of the manicure or pedicure 
while in progress. This is particularly important for diabetics as 
their hands and feet may be less sensitive.

Attachments and Instructions 

1. Sapphire Disk (fine)

A fine-grained sapphire disk for filing and treatment 
of thinner nails such as fingernails.
•  Only the inner sapphire disk rotates, while the outer 

support is stationary, enabling precise filing of the 
nails without the risk of burning the surrounding 
skin due to the fast rotation of the disk.

2. Sapphire Disk (coarse)

A coarse-grained sapphire disk for filing and 
treatment of thicker nails such as toenails.
•  As with the find-grained disk, only the inner 

sapphire disk rotates, enabling precise filing of the 
nails without the risk of burning the surrounding 
skin. Always work from the outside of the nail to the 
tip.

Summary of Contents for Beautural 719UK-0003

Page 1: ...Belmont Street Ontario CA USA 91761 Customer Service 1 909 391 3888 www 1byonebros com Professional Manicure Pedicure Kit Instruction Manual Bedienungsanleitung Manuel d utilisation Manual de instrucc...

Page 2: ...ot use this kit if it shows signs of damage or does not function properly In these cases contact Customer Services SAFETY INSTRUCTIONS A considerable amount of heat may be generated on the skin during...

Page 3: ...n places from where it can fall into a bath or wash basin Never immerse the manicure pedicure device in water or other liquids If the manicure pedicure device drops into water unplug it from power imm...

Page 4: ...es 6 Move the manicure pedicure device under light pressure in circular movements slowly over the body parts being treated Notes The attachments will have a reduced effect if the skin is softened or m...

Page 5: ...face and remove the unwanted layer of nail using slow circular movements Apply light pressure 9 Hardened Skin Remover For removing large scale and thick hardened skin or calluses on the soles and heel...

Page 6: ...he attachments with a slightly moistened cloth You can also moisten the cloth with mild soap to remove more stubborn dirt and grim If necessary to improve hygiene the attachments can be cleaned with a...

Page 7: ...ster Sorgfalt Fragen Sie im Zweifelsfall Ihren Arzt Dieser Manik re Pedik re Kit darf nur f r den Zweck verwendet werden f r den er entwickelt wurde Jede unsachgem e Verwendung kann gef hrlich sein Sc...

Page 8: ...re vorgesehen 2 Vergewissern Sie sich dass das Manik re Pedik re Ger t ausgeschaltet ist bevor Sie das Ger t in die Steckdose stecken 3 W hlen Sie einen Aufsatz und dr cken Sie ihn auf die Oberseite...

Page 9: ...vorsichtig auf den Behandlungsbereich zu und schneiden Sie den Nagelteil ab 3 Geh rteter Hautentferner Zum Entfernen von gro er und dick geh rteter Haut oder Schwielen auf den Sohlen und Fersen der F...

Page 10: ...n um den nat rlichen Hautschutz zu erhalten Lichtanzeige Das Manik re Pedik re Set hat 13 Geschwindigkeitsstufen mit 5 Anzeigeleuchten ndern Sie die Drehzahl durch Dr cken der Tasten Einstellung 1 200...

Page 11: ...lez galement transmettre ce manuel d utlisation au nouveau propri taire ATTENTION Ce kit Professionel de Manicure et P dicure est destin l usage domestique uniquement Ce kit ne doit pas tre utilis par...

Page 12: ...dans une baignoire ou d un lavabo Ne jamais immerger la manicure p dicure dans de l eau ou tout autre liquide Si la manicure p dicure tombe dans l eau d brancher le produit imm diatement S assurer que...

Page 13: ...s mouvements circulaires sur les parties de votre corps que vous souhaitez traiter Remarques Les accessoires ont un effet moindre sur les peaux douces ou mouill es Pour cette raison il n est pas recom...

Page 14: ...les de doigts de pieds pais Utiliser le disque cylindrique horizontalement et retirer les couches d ongles non d sir es avec des mouvements lents circulaires Utiliser avec une pression l g re 7 Cone d...

Page 15: ...la nettoyer Nettoyer les accesoires avec un chiffon l g rement humide Vous pouvez galement humidifer le chiffon avec un savon doux pour retirer les taches Il est galement possible de nettoyer les acc...

Page 16: ...kit de manicura y pedicura debe usarse nicamente para el prop sito para el cual ha sido dise ado y de la manera descrita en las instrucciones de uso Cualquier uso inapropiado puede ser peligroso Apagu...

Page 17: ...el tratamiento de manos manicura y pies pedicura 2 Aseg rese de que el dispositivo de manicura y pedicura est apagado antes de enchufarlo en los accesorios de alimentaci n y montaje 3 Seleccione un a...

Page 18: ...d de calor 2 Fresa de llama Para eliminar u as encarnadas Gu e cuidadosamente la fresa de llama hacia el rea de tratamiento y corte la parte de la u a afectada 3 Removedor de piel endurecida Para quit...

Page 19: ...de la piel no elimine los callos por completo Luces de indicaci n El dispositivo de manicura y pedicura tiene 13 ajustes de velocidad con 5 luces indicadoras Cambie la velocidad de rotaci n presionand...

Page 20: ...descritto e conserva questo manuale per consultazioni ulteriori Se vendi o regali questo kit fornisci anche questo manuale al nuovo proprietario ATTENZIONE Il kit per manicure e pedicure professional...

Page 21: ...ndini Non immergere mai il dispositivo per manicure e pedicure in acqua o altri liquidi Se il dispositivo per manicure e pedicure cade in acqua scollegalo dalla presa di corrente immediatamente Assicu...

Page 22: ...ubito prima di usare il dispositivo per manicure e pedicure Per preservare la naturale protezione cutanea non rimuovere troppa pelle dai calli Togliere troppa pelle potrebbe far poi venire callosit an...

Page 23: ...ta testina va usata su aree estese Muovi la testina sulla zona delle piante o dei talloni da trattare Fai movimenti circolari e premi delicatamente Applica crema idratante dopo ogni trattamento sconsi...

Page 24: ...ine montabili con un panno appena inumidito Puoi ammorbidire il panno con sapone delicato per rimuovere lo sporco ostinato Se necessario per aumentare l igiene puoi pulire le testine con panni o spugn...

Page 25: ...g of your issue please call or email us for assistance Phone 1 909 391 3888 Mon Fri 9 00am 6 00pm PST Email ushelp 1byonebros com CA To ensure speedy handling of your issue please email us for assista...

Reviews: