background image

20 

sec.

Device doesn’t work correctly

If the LED is still flashing after 10 minutes, call our free technical helpline on: 0721 9600 (free from 
the 1&1 landline and mobile networks)
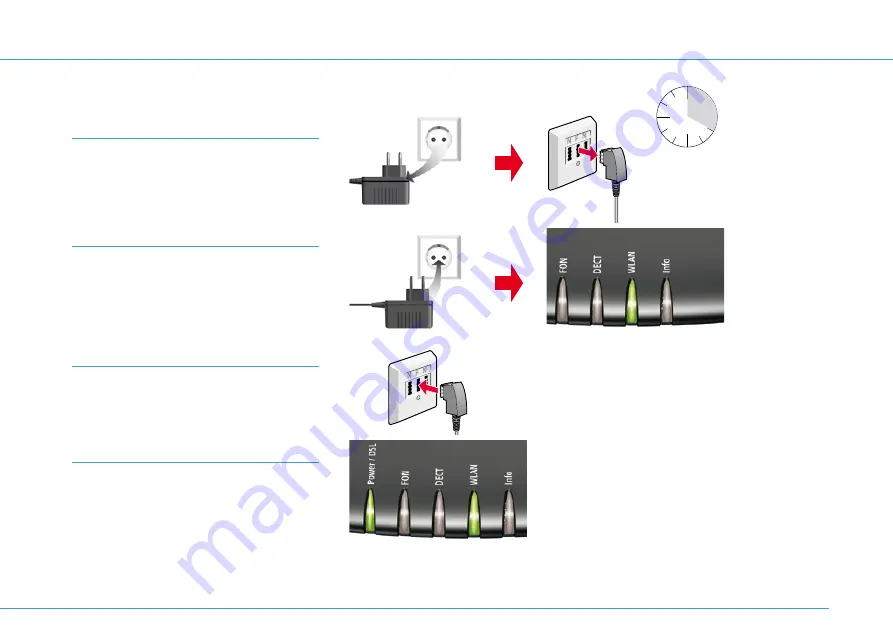
Step 1 

Unplug the 1&1 HomeServer from the mains 
and from the telephone socket. 

Wait for 20 seconds. 

Step 2 

Plug the 1&1 HomeServer back into the 
plug socket and wait until the WLAN LED is 
permanently illuminated. The Power / DSL 
LED will continue to flash. 

Step 3 

Now connect the 1&1 HomeServer to the 
telephone socket. 

Step 4 

Wait until the Power / DSL LED is 
 permanently  illuminated. 

25

Summary of Contents for FRITZ!Box 7490

Page 1: ...QUICK START GUIDE 1 1 HOMESERVER AVM FRITZ Box 7490 Connect HomeServer Connect device Enter 1 1 Start Code Connect telephone Help and contact information ...

Page 2: ...tion you receive everything that you need to set up your own home network You can for example store your data centrally so that it can be accessed by all of the computers in your household This quick start guide summarises all of the key information you need to get started with 1 1 to ensure the process is as pleasant and smooth as possible You can also find valuable tips and tricks in our detaile...

Page 3: ...tive connection Wi Fi connection Enter 1 1 Start Code Connect telephone Analogue telephone Cordless telephones DECT ISDN telephone Troubleshooting 20 No internet connection Device doesn t work correctly Telephone calls are not working properly No incoming calls Slow Wi Fi connection Wi Fi interference Accessories to improve range Reset 1 1 HomeServer to factory settings Recycling and disposal 30 R...

Page 4: ...trike which could lead to surge damages to connected electronic devices Do not install the 1 1 HomeServer during a storm In the case of storms unplug the 1 1 HomeServer from the mains socket and from the DSL or VDSLconnection If moisture or liquid reaches the 1 1 HomeServer it could lead to electric shocks or short circuits Only ever use the 1 1 HomeServer inside buildings Do not allow any liquids...

Page 5: ... socket Do not use any extension cables between the telepho ne socket and the 1 1 HomeServer Do not extend the cable linking the telephone socket to the 1 1 HomeServer The longer this cable is the more likely there will be external interferences to the connection Use 1 1 Start Code The 1 1 Start Code guarantees a complete installation and the smooth running of your DSL connection You can only set ...

Page 6: ...unknetz der 1 1 Telecom GmbH unter 0721 96 00 Ich wünsche Ihnen viel Spaß beim Surfen mit 1 1 Freundliche Grüße aus Montabaur Ihre Denise Kleis Leiterin Kundenkommunikation Ihr 1 1 Anschluss Ihre Zugangsdaten Montabaur 01 05 2017 1 1 Kundenservice Telefon 0721 96 00 E Mail support 1und1 de 1 1 Telecom GmbH Elgendorfer Str 57 56410 Montabaur 7 Check the package contents Technical requirements In or...

Page 7: ...Flashing Internet is now connecting or has been deactivated Festnetz Permanently illuminated Active telephone connection via the internet Flashing Messages in the 1 1 Mailbox WLAN Permanently illuminated Wi Fi activated Flashing Wi Fi is connecting or has been deactivate WPS in progress Info Flashing There are new messages on an answering machine The firmware is being updated Shines red There is a...

Page 8: ...T DSL TEL FON1 FON2 LAN1 LAN2 LAN3 LAN4 Power FONS0 1 1 Ho me S e r v e r 5 0 0 0 0 4 3 5 6 9 10 8 7 FRITZ Box 7490 Einfache Einrichtung mit http fritz box WLAN Netzwerkschlüssel WPA2 1234 5678 901234567890 Serien Nummer CWMP Account N A Nur mit Netzteil 311P0W091 Artikel Nummer A Buttons Type plate underneath the device Ports Device overview 8 ...

Page 9: ...se the set up assistant to change the Wi Fi settings e g from the data you have been using to date page 13 3 2x Analogue telephone port TAE 4 DSL VDSL port 5 2 x Analogue telephone port RJ11 6 ISDN port 7 LAN 1 4 Gigabite LAN 1 000 Mbit s PC network 8 USB 3 0 port for printers external storage HSPA LTE modem and other USB devices 9 Power supply socket 10 USB 3 0 port for printers external storage ...

Page 10: ...meServer with a computer tablet or smartphone page 12 Connect telephone Connect one analogue or up to six DECT telephones page 18 Enter 1 1 Start Code Set up the 1 1 HomeServer with the 1 1 Start Code page 14 1 2 4 3 Initial set up Turn on your 1 1 HomeServer on the day that your 1 1 DSL is being connected connection date 10 ...

Page 11: ... seconds Step 2 Plug the long end of the DSL cable into the port labelled DSL on your 1 1 HomeServer Step 3 Plug the other end of the DSL cable into the port labelled F on the telephone socket Note Only connect the 1 1 HomeServer to the master telephone socket Ask a technician to remove all other telephone sockets where possible as these may interfere with the signal and affect your connection The...

Page 12: ... on your computer Connection either via a network cable LAN or wireless Wi Fi Set up wireless connection at the touch of a button WPS Ensure that the WLAN LED is illuminated on the 1 1 HomeServer If so press the WLAN button Press the WLAN WPS button on the 1 1 HomeServer and start the WPS connection e g WPS button push WPS button on your device e g computer smartphone tablet WPS WPS Wi Fi Protecte...

Page 13: ... Windows symbol Settings Network and Internet Wi Fi Show available networks macOS Apple symbol System Preferences Network Wi Fi Instructions by operating system smartphone or tablet Apple iOS Settings Wi Fi Google Android Menu Settings Wi Fi Windows 10 Mobile Settings Network and Wireless Wi Fi Connect computer via Wi Fi 1 Turn on Wi Fi on your computer Follow the steps listed in the table 2 The a...

Page 14: ...ion page does not open automatically enter http fritz box or http 192 168 178 1 into the address line of your browser FRITZ Box password The password provides ac cess to the user interface Step 3 Set a FRITZ box password 3 The data protection declaration will appear Make your choice and click on OK 3a Step 2 Press a button DECT or WLAN WPS on the 1 1 HomeServer 14 ...

Page 15: ...ie Ihre Internetverbindung und Telefonie bequem ein Dies ist mit 1 1 Hardware und aktuellen Produkten des Herstellers AVM möglich Sollte eine Einrichtung über den 1 1 Start Code nicht möglich sein können Sie Ihren Router mit der Inter netzugangskennung und dem Internetpasswort auch manuell konfigurieren Wird anschließend keine Internetverbindung aufgebaut setzen Sie bitte ein H vor Ihre Kennung z ...

Page 16: ...ortfahren Continue to set up your telephone devices and Wi Fi settings and click on Weiter Continue 7 Step 8 You can now set up new telephones and answering machines You can find out more in the DSL user guide Click on Weiter Continue 8 Step 9 You can change the Wi Fi settings for your 1 1 HomeServer e g to the name and pass word from your previous DSL router Click on Weiter Continue 9 16 ...

Page 17: ... set up assistant 11 You have now set up your device and your DSL connection You can now surf the web and once you have connected a telephone to the FON connection or via DECT you can also make phone calls Please see the 1 1 DSL user guide available online at www 1und1 de handbuch dsl for information about how to set up additional telephones and allocate phone numbers and how to change the network...

Page 18: ...1 into the port labeled FON S0 on the 1 1 Home Server Make sure that you plug the cable into the socket precisely as shown 4 Connect telephone The telephone number that you gave to or received from 1 1 when placing your order will be set up for 1 1 telephone calls once you have entered the 1 1 Start Code Analogue telephone Plug the telephone cable TAE into the port labelled FON on the side of the ...

Page 19: ...u are requested to press the registration paging button on the base station press and hold the DECT button A on the 1 1 HomeServer until the Info LED starts to flash The default DECT pin for the 1 1 HomeServer is 0000 Connect USB devices Please see the Home network chapter of the 1 1 DSL user guide for information about how to connect USB devices e g a USB printer or USB external hard drive 19 ...

Page 20: ...start the device page 25 No phone line connection or faulty phone line Telephone not connected correctly Plug the telephone in properly DECT telephone doesn t work Activate DECT on your 1 1 HomeServer Open up the FRITZ Box user interface Click on DECT Base station Tick the DECT box and click Confirm Telephone numbers allocated incorrectly Allocate the telephone numbers correctly to the devices see...

Page 21: ...rference Avoid sources of interference choose a different location page 27 No LAN connection Check that the cables between your 1 1 HomeServer and your device are plugged in correctly Check the sockets and cables for damage LAN connection working but cannot log in Check your firewall settings and make sure your security software isn t blocking access 1 1 HomeServer not working properly or not resp...

Page 22: ...SLL A B Incorrect cabling Most faults are due to issues with the cables Ensure that the DSL cable is plugged into the DSL port on the 1 1 HomeServer A and that the other end of the cable is plugged into the port labelled F on the telephone socket B 1 1 HomeServer not connected to the internet No internet connection Step 1 Open your browser and go to http fritz box Step 2 Enter your password and cl...

Page 23: ...nmelden Log on Step 2 Click on Diagnose Funktion Diagnostics Run 2 Step 3 Click on Starten Start 3 The diagnostics tool will now check the device and all the connections If a fault is discovered further tools will be displayed which you can use to seek out the error This will take you to the overview page for the 1 1 HomeServer If there is a green light in front of Internet the 1 1 HomeServer is c...

Page 24: ...oad the latest firmware 2 Go to http fritz box and click on System Update 3 Click on the menu symbol B on the top right and activate the Erweiterte Ansicht Detailed view C 4 Click on the FRITZ OS file 5 Enter your password and click on Einstellungen sichern Save settings Update from data storage device If you don t have an internet connection you can download the update using a different internet ...

Page 25: ...Step 1 Unplug the 1 1 HomeServer from the mains and from the telephone socket Wait for 20 seconds Step 2 Plug the 1 1 HomeServer back into the plug socket and wait until the WLAN LED is permanently illuminated The Power DSL LED will continue to flash Step 3 Now connect the 1 1 HomeServer to the telephone socket Step 4 Wait until the Power DSL LED is permanently illuminated 25 ...

Page 26: ...es update regularly so you can see any changes as they occur Try moving a device to see if this improves the connection speed 2 Measure speed with the 1 1 Control Center app Under WLAN Verbin dung Wi Fi connection in the 1 1 Control Center app you can find tools to help you measure and improve the quality of your Wi Fi network You can download the 1 1 Control Center app from the Google Play Store ...

Page 27: ...e 1 1 HomeServer and the device The 1 1 HomeServer emits a signal at two frequencies 2 4 GHz and 5 GHz and automatically switches to the frequency with the better signal conditions Place your 1 1 HomeServer away from obstacles and in a central position this is a key requirement for ensuring you receive the best possible Wi Fi signal Remove objects that may interfere with the signal Firmware update...

Page 28: ... Fi or depending on the repeater via LAN The Wi Fi repeater must be positioned so that it can effectively receive the Wi Fi signal emitted by the 1 1 HomeServer identified by at least three LEDs illuminating on the Wi Fi repeater Powerline adapter larger distances Powerline adapters relay data via the household electricity grid You need at least two adapters one receives the signal at the 1 1 Home...

Page 29: ...the factory settings Do not under any circum stances unplug the device from the power socket it can damage the firmware The 1 1 HomeServer is ready for use as soon as the Power DSL LED is permanently illuminated Step 1 Click on System Sicherung System Security 1 in the 1 1 HomeServer menu Step 2 Click on Werkseinstellungen Factory settings 2 Step 3 Click on Werkseinstellungen laden Restore factory...

Page 30: ...dispo sed of properly and in an environmentally friendly way For more information about disposal and where you can find a collection point run by our disposal partner please visit www 1und1 de entsorgung or see your 1 1 Control Center You can also take regular quantities of old devices and electronic components that are over 25 centimetres in length to your local waste disposal site for old electr...

Page 31: ...ly use the form in the 1 1 Control Center to contact technicians customer support staff or the billing team https control center 1und1 de Forum Or take a look in our 1 1 Forum You can interact with other customers there https forum 1und1 de Free telephone support If you have technical questions about a product you can contact our experts 24 7 throughout the duration of your contract Simply dial 07...

Page 32: ...t Nr 56396 Stand 04 19 DE110 01 40 00204 EN YOUR 1 1 USER GUIDE The up to date detailed 1 1 DSL user guide is always available online It can also be downloaded as a PDF Telephone home network Wi Fi cloud security email Manage your contract 1 1 Control Center Questions and answers MacOS X Windows 10 iOS Android You can find detailed information about services and troubleshooting here ...

Reviews: