background image


4.5 Mounting the camera in the housing: 

Remove the lens cap and wrist strap. Check the white dots on the control ¡Flash on¡, ¡On/OFF)¡ and 
¡Aspect Ratio¡ are facing the Housing Cover Lid.  
Slide the camera into the body along the rubber packing. Make sure the camera body reach the limit and 
test the function of the On/Off button on the body of the housing. 
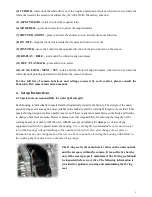
Align the bulkhead cable as shown below and check the cable is not jammed under any button or over the 
o-ring 


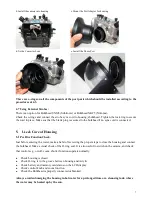
Slide the hot shoe plug into the hot shoe   


Replace the  lid and  make sure the  lever  is perpendicular to the side wall of the housing. Lock the lid  by 
press down the lever and turn until the lever is parallel to the side wall of the housing. 

After replacing and locking the lid, make a final visual inspection of the main O-ring for contamination.   

Note: If the O-ring is in good contact, a thin black line, about 0.5 to 1mm in width


should be visible, 

where the O-ring is in contact with the lid. Follow this line all


the way round the edge of the seal, as a 

final check that the seal is good. 

 
4.6 Mounting the Converter Lens and Dome Port (Optional)


The  10Bar  LX3  housing  interchangeable  port  system  is  designed  to  accommodate  dry  converter  lens  for 
use underwater. The installation procedure is as follows: 


a. Remove the cover ring on the camera lens and mounting the lens adaptor   


Summary of Contents for LUMIX LX3

Page 1: ...or closure the double o rings and key hole lock design provide ease of use and added security Now you can use small cameras with the feel and function of professional housings 2 Specifications Test Pressure Housings individually tested to 10 Bar 90 m 300 ft Recommended working pressure 60 m Closure Design Double O rings Key hole Lock Body Material 6061 Aluminum Acrylic Overall Size 134 x 152 x 112...

Page 2: ...3 BULKHEAD 14 LOCKING LEVER 15 HOUSING BODY 16 HOUSING LID 17 PORT 3 2 Control Details 1 FLASH ON align the white dot towards the lid press down and turn towards the lighting logo the flash should pop up 2 FLASH OFF turn the Flash On white dot towards the lid turn the button to wards the no lighting logo Make sure that the Flash is turn off before opening the lid 3 FOCUS press to activate confirm ...

Page 3: ...tegrity Each housing is individually inspected and hydrostatically tested in the factory The design of the main piston O ring seal is among the most reliable in the industry and the watertight integrity is excellent This special O ring design provides a perfect seal even if there is any movement between the body and lid due to change of ambient pressure However please note that responsibility for ...

Page 4: ... the outside of the housing is thoroughly toweled dry before opening up After removing the lid and servicing the camera replace the lid straight away rather than leaving it lying around Before replacing the lid check the o rings and make sure that no contamination such as dust hair salt sand etc has fallen onto the O ring or O ring recess as a precaution we recommend to inspect the O ring every ti...

Page 5: ...he Key hole Lock is simple and easy to use and adding security To open the housing make sure that the flash on the camera has been turned off before opening the lid Turn the levers of the lock perpendicular to the wall of the housing until the lock is released on both sides Pull out the lid by holding on the grip near the lock To close the housing place the lid over the housing and align the key h...

Page 6: ...the side wall of the housing Lock the lid by press down the lever and turn until the lever is parallel to the side wall of the housing After replacing and locking the lid make a final visual inspection of the main O ring for contamination Note If the O ring is in good contact a thin black line about 0 5 to 1mm in width should be visible where the O ring is in contact with the lid Follow this line ...

Page 7: ...ad if no sync cord is connected 5 Use Care of Housing 5 1 Pre Dive Function Check Just before entering the water make a habit of reviewing the proper steps to close the housing and connect the bulkhead Make a visual check of the O ring seal It is also useful to switch on the camera and check that controls e g on off zoom shutter functions operate normally Check housing is closed Check O ring is in...

Page 8: ...sand After a series of 10 or more dives e g after a dive holiday it is recommended to immerse the housing for 2 3 hours in warm water to dissolve any salt deposits that may have built up No chemical cleaners should be used Important For long term storage please remove the main closure o rings from body 5 4 Transportation Please protect the housing during transportation It is recommended to remove ...

Page 9: ... the information below and return a copy to 10Bar Underwater Housing at the address below to validate the warranty Copy to be retained by user Housing Type Date of Purchase Serial Number Labeled inside housing Dealer Owner s Name e mail Owner s Address Tel Fax Office Showroom Unit C 2 F Wing Hin Factory Building 31 33 Ng Fong St San Po Kong Hong Kong Tel 852 2573 3228 Fax 852 2811 9180 Email servi...

Reviews: