background image

Chapter 3 Demo Server Setup

STB-1003 User’s Guide

40

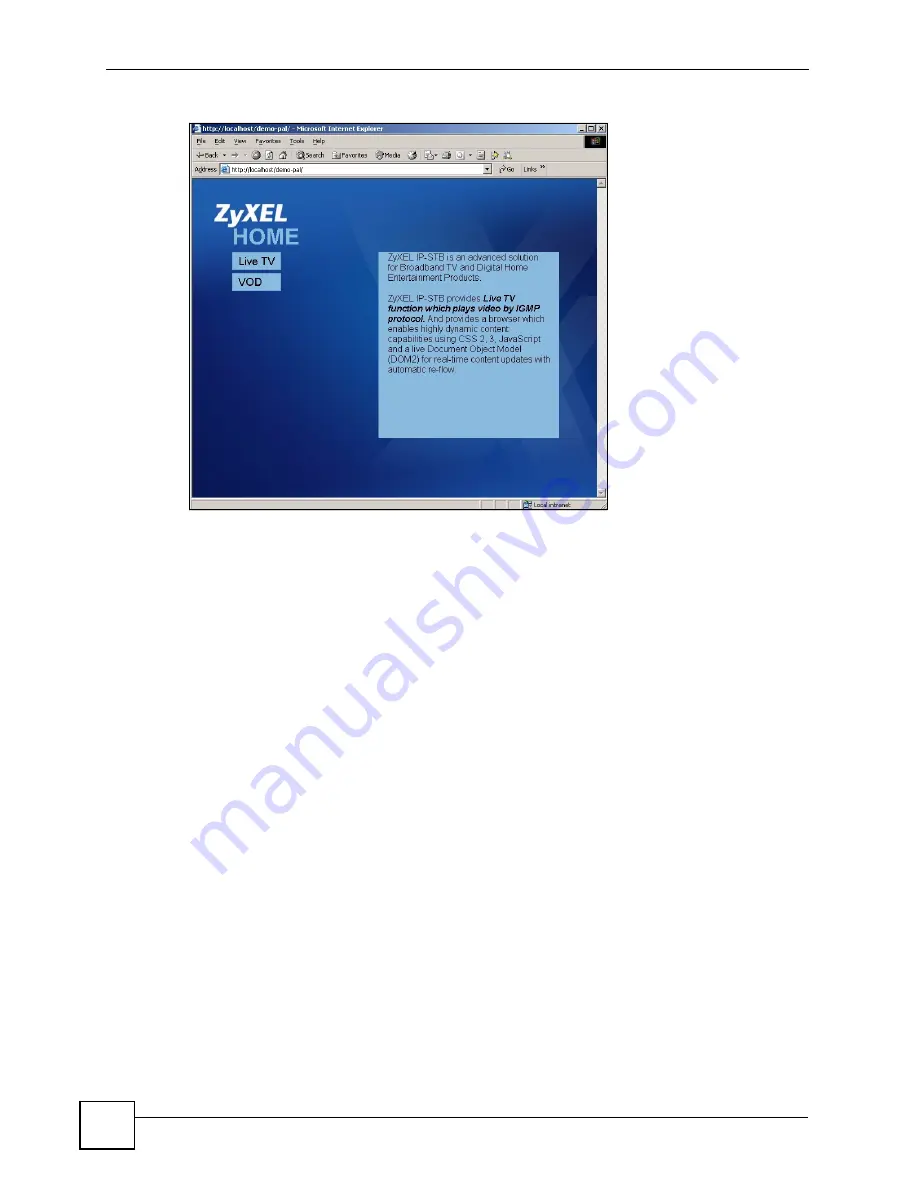
Figure 20   

Interface Installed

3.5  Set up the LIVE555 Media Server and Demo Content

Take the following steps to install the LIVE555 Media Server and the demonstration video 
content on your computer.

1

Locate the 

LIVE555

 zip file on the CD that came with your STB.

2

Using a file compression/decompression tool such as WinZip or PKZIP, unzip the 
LIVE555 file to your computer’s 

D:\Content

 folder. If this folder does not already exist, 

create it.

3.6  Set up the STB

Next, you need to configure the STB to use your computer as its media server.

1

Ensure that the STB is set up and working correctly, as shown in the Quick Start Guide.

2

Press the blue key on the remote control three times. 

3

Enter the STB’s password in the screen that appears. The default is 

123456

. Select 

OK

.

Содержание STB-1003

Страница 1: ...www zyxel com STB 1003 IP Set Top Box User s Guide Version 1 0 01 2008 Edition 1 DEFAULT LOGIN Password 123456 ...

Страница 2: ......

Страница 3: ... contains information on setting up your network and configuring for Internet access Supporting Disk Refer to the included CD for support documents ZyXEL Web Site Please refer to www zyxel com for additional support documentation and product certifications User Guide Feedback Help us help you Send all User Guide related comments questions or suggestions for improvement to the following address or ...

Страница 4: ...roke is denoted by square brackets and uppercase text for example ENTER means the enter or return key on your keyboard Enter means for you to type one or more characters and then press the ENTER key Select or choose means for you to use one of the predefined choices A right angle bracket within a screen name denotes a mouse click For example Maintenance Log Log Setting means you first click Mainte...

Страница 5: ...ser s Guide 5 Icons Used in Figures Figures in this User s Guide may use the following generic icons The STB icon is not an exact representation of your STB STB Computer Notebook computer Server DSLAM Firewall Telephone Switch Router ...

Страница 6: ...ecting cables carefully so that no one will step on them or stumble over them Always disconnect all cables from this device before servicing or disassembling Use ONLY an appropriate power adaptor or cord for your device Connect it to the right supply voltage for example 110V AC in North America or 230V AC in Europe Do NOT allow anything to rest on the power adaptor or cord and do NOT place the pro...

Страница 7: ...Safety Warnings STB 1003 User s Guide 7 ...

Страница 8: ...Safety Warnings STB 1003 User s Guide 8 ...

Страница 9: ...tents Overview STB 1003 User s Guide 9 Contents Overview Using the STB 17 Introducing the STB 19 The Menu System 23 Demo Server Setup 33 Troubleshooting 43 Product Specifications 47 Appendices and Index 51 ...

Страница 10: ...Contents Overview STB 1003 User s Guide 10 ...

Страница 11: ... 3 Resetting the STB 21 Chapter 2 The Menu System 23 2 1 Navigating the Menus 23 2 2 The Basic Setup Menus 23 2 2 1 Accessing and Exiting the Basic Setup Menus 23 2 2 2 Video Setup Menu 24 2 2 3 Audio Output Menu 25 2 2 4 System Setup Menu 26 2 2 5 Language Setup Menu 27 2 3 The Advanced Setup Menus 27 2 3 1 Accessing and Exiting the Menus 28 2 3 2 The Advanced Setup Information Menu 28 2 3 3 The ...

Страница 12: ...rver and Demo Content 40 3 6 Set up the STB 40 3 7 Play Live TV 41 3 8 Play VOD 42 Chapter 4 Troubleshooting 43 4 1 Power Hardware Connections and LEDs 43 4 2 STB Access and Login 44 4 3 Internet Access 45 Chapter 5 Product Specifications 47 5 1 General STB Specifications 47 5 2 Power Adaptor Specifications 50 Part II Appendices and Index 51 Appendix A Setting up Your Computer s IP Address 53 Appe...

Страница 13: ...erface Installed 40 Figure 21 Enter Password 41 Figure 22 Left hand Menu Network 41 Figure 23 Enter IP Address 41 Figure 24 WIndows 95 98 Me Network Configuration 54 Figure 25 Windows 95 98 Me TCP IP Properties IP Address 55 Figure 26 Windows 95 98 Me TCP IP Properties DNS Configuration 56 Figure 27 Windows XP Start Menu 57 Figure 28 Windows XP Control Panel 57 Figure 29 Windows XP Control Panel N...

Страница 14: ...Ethernet Device General 70 Figure 49 Red Hat 9 0 KDE Network Configuration DNS 71 Figure 50 Red Hat 9 0 KDE Network Configuration Activate 71 Figure 51 Red Hat 9 0 Dynamic IP Address Setting in ifconfig eth0 72 Figure 52 Red Hat 9 0 Static IP Address Setting in ifconfig eth0 72 Figure 53 Red Hat 9 0 DNS Settings in resolv conf 72 Figure 54 Red Hat 9 0 Restart Ethernet Card 72 Figure 55 Red Hat 9 0...

Страница 15: ...PPPoE Menu 31 Table 10 Hardware Specifications 47 Table 11 Firmware Specifications 49 Table 12 Standards Supported 49 Table 13 Power Adaptor Specifications 50 Table 14 IP Address Network Number and Host ID Example 76 Table 15 Subnet Masks 77 Table 16 Maximum Host Numbers 77 Table 17 Alternative Subnet Mask Notation 77 Table 18 Subnet 1 79 Table 19 Subnet 2 80 Table 20 Subnet 3 80 Table 21 Subnet 4...

Страница 16: ...List of Tables STB 1003 User s Guide 16 ...

Страница 17: ...17 PART I Using the STB Introducing the STB 19 The Menu System 23 Demo Server Setup 33 Troubleshooting 43 Product Specifications 47 ...

Страница 18: ...18 ...

Страница 19: ...ernet Television IPTV and Video on Demand VOD on your television Connect the STB to your regular Internet access device a broadband modem or router for example Operate the STB using the supplied remote control The following figure shows your STB A connected to your Internet access device B supplying content from the service provider on the Internet to your TV C operated by the remote control D Fig...

Страница 20: ...up or is in standby mode Green The STB is on and ready to use Off The STB is not receiving power or has malfunctioned LAN On Green The STB has an Ethernet connection to the network on the LAN port Blinking Green The STB has an Ethernet connection to the network on the LAN port and is transmitting or receiving data Off The STB has no network connection on the LAN port CARD SLOT USB LEDS RESET ON ST...

Страница 21: ... to connect your STB to a High Definition Multimedia Interface HDMI television S PDIF Optical Use this port to connect the STB to a S PDIF Sony Philips Digital Interface Format audio device using an optical connector S Video Use this to connect the STB to your TV s S Video connector The S Video connector does not carry audio You must also connect your TV to one of the STB s audio connectors Compos...

Страница 22: ...n release it The configuration remains unchanged To return the STB to its factory default configuration use the System Setup menu see Section 2 2 4 on page 26 If you do this all configuration changes will be lost You can also reset the STB to its factory defaults by pressing the Help key on the remote control three times If you do this all configuration changes will be lost ...

Страница 23: ...the and navigator keys on the remote control to highlight the menu or setting you want The currently highlighted item is colored orange Use the OK key on the remote control to select the highlighted object When you go to a new menu the top item in the right hand column is automatically highlighted To move to the left hand column press the key Highlight and select the Save button in each menu to st...

Страница 24: ...n North American televisions and PAL is supported in European televisions If you need to reset your STB to its factory defaults see Section 1 3 on page 21 The following table describes the labels in this menu Table 3 The Video Setup Menu LABEL DESCRIPTION Device COMPOSITE Highlight and select this to edit the STB s composite video settings Use this when you connect your TV to the STB via the VIDEO...

Страница 25: ... number 1080 in 1080i refers to the number of vertical lines displayed The letter P or I refers to the screen mode P means progressive and I means interlaced Select the display mode supported by your television Mode of HDMI This appears only when you select HDMI in the Device section The number in these fields for example the number 1080 in 1080i refers to the number of vertical lines displayed Th...

Страница 26: ... settings change the time zone and activate or deactivate Daylight Saving Time Figure 6 The System Setup Menu Table 4 The Audio Output Menu LABEL DESCRIPTION PCM Select this to use PCM Pulse Code Modulation audio compression Select this only if your TV supports PCM AC3 Select this to use AC 3 Dolby Digital audio compression Select this only if your TV supports AC 3 Save Select this to store your c...

Страница 27: ...in this section could render your STB unusable If in doubt contact the service provider Table 5 The System Setup Menu LABEL DESCRIPTION Date This is the current date This comes from an external time server Time This is the current time This comes from an external time server Time Zone Select your time zone from the list In the list 0 is GMT Greenwich Mean Time so for example 8 is GMT plus eight ho...

Страница 28: ...e navigator key to highlight the login button Press the OK key The Advanced Setup Information menu displays when you are successfully logged in 2 3 2 The Advanced Setup Information Menu Use this menu to see information about the STB s current network and configuration settings Select Information from the column on the left of the screen The following menu displays Figure 9 The Information Menu The...

Страница 29: ...e 10 The Network DHCP Menu Flash This shows the quantity of available flash non volatile memory Memory This shows the quantity of available run time memory MAC Address This shows the hardware Media Access Control address of the STB IP Address This shows the IP address currently assigned to the STB You can change this in the Advanced Setup Network menu STB Version This shows the firmware version ru...

Страница 30: ...s of the homepage the STB uses as the Home menu the screen that displays when you press the HOME key on the remote control ACS Server This field is for remote management Change the information in this field only if you were specifically told to do so Enter the address of the auto configuration server from which the STB gets its operating settings NTP Server Enter the address of the Network Time Pr...

Страница 31: ...the Advanced Setup Network Setup menu s ACS Server field see Section 2 3 3 on page 29 Select Firmware Upgrade from the column on the left of the screen The following menu displays Primary DNS Enter the IP address of the primary Domain Name Server DNS allows your STB to resolve domain names such as zyxel com into IP addresses Secondary DNS Enter the IP address of the secondary backup Domain Name Se...

Страница 32: ...o configuration server click Upgrade Now The STB contacts the autoconfiguration server and downloads the firmware If the following screen displays the STB cannot reach the autoconfiguration server Check the settings in the Advanced Setup Network Setup menu see Section 2 3 3 on page 29 and try again Figure 14 Firmware Upgrade Error ...

Страница 33: ...p your computer or a computer on your network to act as a media server Data such as video from the media server can be supplied to the STB as shown in the following figure The media server and the STB must have IP addresses in the same subnet see Appendix B on page 75 For instance in this example the media server s IP address is 192 168 1 33 and the STB s IP address is 192 168 1 34 You have assign...

Страница 34: ...eo on Demand transmitting media only when requested by a client The LIVE555 servers uses RTSP the Real Time Streaming Protocol to deliver media 3 Transfer the content files from the CD to your computer The content files are demonstration videos 4 Copy the interface files to the server s working directory These are HTML files that provide the menu system that appears on the TV connected to the STB ...

Страница 35: ...uter 3 4 1 Download Apache You must first locate and download the latest Apache HTTP Server setup files from the web 1 Open your web browser and go to the Apache Software Foundation website at www apache org 2 Click the HTTP Server link The Apache HTTP Server main page appears You may also obtain release notes documentation and other materials from this page 3 Click the from a Mirror link in the D...

Страница 36: ...your computer s hard disk 3 4 2 Install Apache Once you have downloaded Apache take the following steps to set up the web server on your computer 1 Open the Apache file you previously downloaded 2 A screen similar to the following appears Figure 16 The Apache Wizard Follow the directions in the wizard to install Apache When installation is complete a screen similar to the following displays Click ...

Страница 37: ...ly installed a screen similar to the following appears Figure 18 Apache Default Screen 3 4 3 Set Up the Demo Interface When you have successfully installed the Apache HTTP Server on your computer take the following steps 1 First locate the demo files These files provide an interface for the media server that allows you to select and watch videos on your TV using the STB s remote control The demo f...

Страница 38: ... files contact your vendor 2 There are two demo files one is for NTSC televisions and one is for PAL televisions If you have an NTSC television copy the demo ntsc zip file and if you have a PAL television copy the demo pal zip file 3 Open the Apache folder Figure 19 The Apache Folder ...

Страница 39: ... htdocs folder If your operating system does not support this use a file compression decompression tool such as WinZip or PKZIP 7 Open a browser window and enter http localhost demo pal if you are using the PAL version or http localhost demo ntsc if you are using the NTSC version in the URL bar If the demo interface is successfully installed a screen similar to the following displays ...

Страница 40: ...our STB 2 Using a file compression decompression tool such as WinZip or PKZIP unzip the LIVE555 file to your computer s D Content folder If this folder does not already exist create it 3 6 Set up the STB Next you need to configure the STB to use your computer as its media server 1 Ensure that the STB is set up and working correctly as shown in the Quick Start Guide 2 Press the blue key on the remo...

Страница 41: ...displays this example uses the Static version of the screen Enter the location of your index file in the Home URL field For example if your IP address is 10 0 0 1 and the name of your index file is abc index html enter http 10 0 0 1 abc index html Figure 23 Enter IP Address 6 Select Save The STB now uses your computer as its media server 3 7 Play Live TV Take the following steps to test the live T...

Страница 42: ...g the streaming video s status 2 Using the STB s remote control select the relevant Live TV channel The demo video displays on the television 3 8 Play VOD Take the following steps to test Video on Demand 1 In the D Content folder click on Vod 1 bat to make the demonstration Video on Demand file available to the STB 2 Using the STB s remote control select VOD Movie 1 The demo video displays on the ...

Страница 43: ... 3 Make sure the power adaptor or cord is connected to the STB and plugged in to an appropriate power source Make sure the power source is turned on 4 Turn the STB off and on 5 If the problem continues contact the vendor V The POWER LED stays red and does not turn green 1 The STB may be in standby mode Try using the remote control s button to turn it on 2 Wait for a short while The STB may take a ...

Страница 44: ... Check they are properly inserted or try replacing them 3 Move closer to the STB and try again 4 If the problem persists contact your vendor 4 2 STB Access and Login V I forgot the IP address for the STB The default IP address is 192 168 1 1 Use the System Setup menu to check the current IP address see Section 2 2 4 on page 26 V I forgot the password for the Advanced menus 1 The default password i...

Страница 45: ...me URL IP address in the Network menu 3 Disconnect all the cables from your STB and follow the directions in the Quick Start Guide again 4 If the problem continues contact your ISP or IPTV provider V The Internet connection is slow or intermittent There might be a lot of traffic on the network If you have computers or other devices using your Internet connection try turning them off or disconnecti...

Страница 46: ...Chapter 4 Troubleshooting STB 1003 User s Guide 46 ...

Страница 47: ...alf duplex or full duplex mode Auto crossover Use either crossover or straight through Ethernet cables SPDIF Ports 1 x Sony Philips Digital Interface Format IEC 958 type II audio connector RCA type 1 x Optical Sony Philips Digital Interface Format IEC 958 type II audio connector TOSLINK type Supported audio standards PCM AC3 USB Ports 2 x Universal Serial Bus 2 0 connector HDMI Port 1 x High Defin...

Страница 48: ...ating Environment Temperature 0º C 40º C Humidity 0 95 RH Storage Environment Temperature 40º C 55º C Humidity 0 95 RH Security Content Protection Smart Card Macrovision CA HDCP 1 1 Supplied Browser ANT Galio Video Encoding Decoding MPEG 1 MPEG 2 MP HL Smooth trick modes for MPEG 2 HD MPEG 4 AVC Level 10 H 264 MPEG 4 HP L4 1 Audio Encoding Decoding MPEG 1 layer I II MP3 AC3 Dolby Digital AAC AAC L...

Страница 49: ...HCP Default Subnet Mask Obtained via DHCP Default Password 123456 Device Management Use the remote control and the on screen menu system to configure the STB Time and Date Get the current time and date from an external server when you turn on your STB PPPoE PPPoE mimics a dial up Internet access connection Table 12 Standards Supported STANDARD DESCRIPTION RFC 867 Daytime Protocol RFC 868 Time Prot...

Страница 50: ...otocol Encapsulation over ATM Adaptation Layer 5 IEEE 802 11d Standard for Local and Metropolitan Area Networks Media Access Control MAC Bridges TR 069 TR 069 DSL Forum Standard for CPE Wan Management 1 363 5 Compliant AAL5 SAR Segmentation And Re assembly Table 12 Standards Supported continued STANDARD DESCRIPTION Table 13 Power Adaptor Specifications AC Power Adaptor Model MU24 1120200 A1 Input ...

Страница 51: ...ices and Index The appendices provide general information Some details may not apply to your STB Setting up Your Computer s IP Address 53 IP Addresses and Subnetting 75 Legal Information 85 Customer Support 89 Index 95 ...

Страница 52: ...52 ...

Страница 53: ...se of a third party TCP IP application package TCP IP should already be installed on computers using Windows NT 2000 XP Macintosh OS 7 and later operating systems After the appropriate TCP IP components are installed configure the TCP IP settings in order to communicate with your network If you manually assign IP information instead of using dynamic assignment make sure that your computers have IP...

Страница 54: ...n click Add 3 Select the manufacturer and model of your network adapter and then click OK If you need TCP IP 1 In the Network window click Add 2 Select Protocol and then click Add 3 Select Microsoft from the list of manufacturers 4 Select TCP IP from the list of network protocols and then click OK If you need Client for Microsoft Networks 1 Click Add 2 Select Client and then click Add 3 Select Mic...

Страница 55: ...elect Obtain an IP address automatically If you have a static IP address select Specify an IP address and type your information into the IP Address and Subnet Mask fields Figure 25 Windows 95 98 Me TCP IP Properties IP Address 3 Click the DNS Configuration tab If you do not know your DNS information select Disable DNS If you know your DNS information select Enable DNS and type the information in t...

Страница 56: ...ose the TCP IP Properties window 6 Click OK to close the Network window Insert the Windows CD if prompted 7 Turn on your STB and restart your computer when prompted Verifying Settings 1 Click Start and then Run 2 In the Run window type winipcfg and then click OK to open the IP Configuration window 3 Select your network adapter You should see your computer s IP address subnet mask and default gatew...

Страница 57: ...003 User s Guide 57 Figure 27 Windows XP Start Menu 2 In the Control Panel double click Network Connections Network and Dial up Connections in Windows 2000 NT Figure 28 Windows XP Control Panel 3 Right click Local Area Connection and then click Properties ...

Страница 58: ... in Win XP and then click Properties Figure 30 Windows XP Local Area Connection Properties 5 The Internet Protocol TCP IP Properties window opens the General tab in Windows XP If you have a dynamic IP address click Obtain an IP address automatically If you have a static IP address click Use the following IP Address and fill in the IP address Subnet mask and Default gateway fields Click Advanced ...

Страница 59: ... In TCP IP Address type an IP address in IP address and a subnet mask in Subnet mask and then click Add Repeat the above two steps for each IP address you want to add Configure additional default gateways in the IP Settings tab by clicking Add in Default gateways In TCP IP Gateway Address type the IP address of the default gateway in Gateway To manually configure a default metric the number of tra...

Страница 60: ... General tab in Windows XP Click Obtain DNS server address automatically if you do not know your DNS server IP address es If you know your DNS server IP address es click Use the following DNS server addresses and type them in the Preferred DNS server and Alternate DNS server fields If you have previously configured DNS servers click Advanced and then the DNS tab to order them ...

Страница 61: ...Connections window Network and Dial up Connections in Windows 2000 NT 11 Turn on your STB and restart your computer if prompted Verifying Settings 1 Click Start All Programs Accessories and then Command Prompt 2 In the Command Prompt window type ipconfig and then press ENTER You can also open Network Connections right click a network connection click Status and then click the Support tab Windows V...

Страница 62: ...Windows Vista Start Menu 2 In the Control Panel double click Network and Internet Figure 35 Windows Vista Control Panel 3 Click Network and Sharing Center Figure 36 Windows Vista Network And Internet 4 Click Manage network connections Figure 37 Windows Vista Network and Sharing Center ...

Страница 63: ...hen click Properties During this procedure click Continue whenever Windows displays a screen saying that it needs your permission to continue Figure 38 Windows Vista Network and Sharing Center 6 Select Internet Protocol Version 4 TCP IPv4 and click Properties Figure 39 Windows Vista Local Area Connection Properties ...

Страница 64: ...e IP Settings tab and click OK Do one or more of the following if you want to configure additional IP addresses In the IP Settings tab in IP addresses click Add In TCP IP Address type an IP address in IP address and a subnet mask in Subnet mask and then click Add Repeat the above two steps for each IP address you want to add Configure additional default gateways in the IP Settings tab by clicking ...

Страница 65: ...ties window the General tab Click Obtain DNS server address automatically if you do not know your DNS server IP address es If you know your DNS server IP address es click Use the following DNS server addresses and type them in the Preferred DNS server and Alternate DNS server fields If you have previously configured DNS servers click Advanced and then the DNS tab to order them ...

Страница 66: ...ties window 12 Close the Network Connections window 13 Turn on your STB and restart your computer if prompted Verifying Settings 1 Click Start All Programs Accessories and then Command Prompt 2 In the Command Prompt window type ipconfig and then press ENTER You can also open Network Connections right click a network connection click Status and then click the Support tab Macintosh OS 8 9 1 Click th...

Страница 67: ...cintosh OS 8 9 Apple Menu 2 Select Ethernet built in from the Connect via list Figure 44 Macintosh OS 8 9 TCP IP 3 For dynamically assigned settings select Using DHCP Server from the Configure list 4 For statically assigned settings do the following From the Configure box select Manually ...

Страница 68: ...figuration 7 Turn on your STB and restart your computer if prompted Verifying Settings Check your TCP IP properties in the TCP IP Control Panel window Macintosh OS X 1 Click the Apple menu and click System Preferences to open the System Preferences window Figure 45 Macintosh OS X Apple Menu 2 Click Network in the icon bar Select Automatic from the Location list Select Built in Ethernet from the Sh...

Страница 69: ...net mask in the Subnet mask box Type the IP address of your STB in the Router address box 5 Click Apply Now and close the window 6 Turn on your STB and restart your computer if prompted Verifying Settings Check your TCP IP properties in the Network window Linux This section shows you how to configure your computer s TCP IP settings in Red Hat Linux 9 0 Procedure screens and file location may vary ...

Страница 70: ...ow to configure your computer IP address using the KDE 1 Click the Red Hat button located on the bottom left corner select System Setting and click Network Figure 47 Red Hat 9 0 KDE Network Configuration Devices 2 Double click on the profile of the network card you wish to configure The Ethernet Device General screen displays as shown Figure 48 Red Hat 9 0 KDE Ethernet Device General ...

Страница 71: ... KDE Network Configuration DNS 5 Click the Devices tab 6 Click the Activate button to apply the changes The following screen displays Click Yes to save the changes in all screens Figure 50 Red Hat 9 0 KDE Network Configuration Activate 7 After the network card restart process is complete make sure the Status is Active in the Network Configuration screen Using Configuration Files Follow the steps b...

Страница 72: ...he etc directory The following figure shows an example where two DNS server IP addresses are specified Figure 53 Red Hat 9 0 DNS Settings in resolv conf 3 After you edit and save the configuration files you must restart the network card Enter network restart in the etc rc d init d directory The following figure shows an example Figure 54 Red Hat 9 0 Restart Ethernet Card DEVICE eth0 ONBOOT yes BOO...

Страница 73: ...oot localhost ifconfig eth0 Link encap Ethernet HWaddr 00 50 BA 72 5B 44 inet addr 172 23 19 129 Bcast 172 23 19 255 Mask 255 255 255 0 UP BROADCAST RUNNING MULTICAST MTU 1500 Metric 1 RX packets 717 errors 0 dropped 0 overruns 0 frame 0 TX packets 13 errors 0 dropped 0 overruns 0 carrier 0 collisions 0 txqueuelen 100 RX bytes 730412 713 2 Kb TX bytes 1570 1 5 Kb Interrupt 10 Base address 0x1000 r...

Страница 74: ...Appendix A Setting up Your Computer s IP Address STB 1003 User s Guide 74 ...

Страница 75: ...are a common street name the hosts on a network share a common network number Similarly as each house has its own house number each host on the network has its own unique identifying number the host ID Routers use the network number to send packets to the correct network while the host ID determines to which host on the network the packets are delivered Structure An IP address is made up of four p...

Страница 76: ... part of the host ID The following example shows a subnet mask identifying the network number in bold text and host ID of an IP address 192 168 1 2 in decimal By convention subnet masks always consist of a continuous sequence of ones beginning from the leftmost bit of the mask followed by a continuous sequence of zeros for a total number of 32 bits Subnet masks can be referred to by the size of th...

Страница 77: ...d by a continuous number of zeros for the remainder of the 32 bit mask you can simply specify the number of ones instead of writing the value of each octet This is usually specified by writing a followed by the number of bits in the mask after the address For example 192 1 1 0 25 is equivalent to saying 192 1 1 0 with subnet mask 255 255 255 128 The following table shows some possible subnet masks...

Страница 78: ...ows the company network before subnetting Figure 57 Subnetting Example Before Subnetting You can borrow one of the host ID bits to divide the network 192 168 1 0 into two separate sub networks The subnet mask is now 25 bits 255 255 255 128 or 25 The borrowed host ID bit can have a value of either 0 or 1 allowing two subnets 192 168 1 0 25 and 192 168 1 128 25 The following figure shows the company...

Страница 79: ... 1 254 Example Four Subnets The previous example illustrated using a 25 bit subnet mask to divide a 24 bit address into two subnets Similarly to divide a 24 bit address into four subnets you need to borrow two host ID bits to give four possible combinations 00 01 10 and 11 The subnet mask is 26 bits 11111111 11111111 11111111 11000000 or 255 255 255 192 Each subnet contains 6 host ID bits giving 2...

Страница 80: ...net 3 IP SUBNET MASK NETWORK NUMBER LAST OCTET BIT VALUE IP Address 192 168 1 128 IP Address Binary 11000000 10101000 00000001 10000000 Subnet Mask Binary 11111111 11111111 11111111 11000000 Subnet Address 192 168 1 128 Lowest Host ID 192 168 1 129 Broadcast Address 192 168 1 191 Highest Host ID 192 168 1 190 Table 21 Subnet 4 IP SUBNET MASK NETWORK NUMBER LAST OCTET BIT VALUE IP Address 192 168 1...

Страница 81: ...BITS SUBNET MASK NO SUBNETS NO HOSTS PER SUBNET 1 255 255 255 128 25 2 126 2 255 255 255 192 26 4 62 3 255 255 255 224 27 8 30 4 255 255 255 240 28 16 14 5 255 255 255 248 29 32 6 6 255 255 255 252 30 64 2 7 255 255 255 254 31 128 1 Table 24 16 bit Network Number Subnet Planning NO BORROWED HOST BITS SUBNET MASK NO SUBNETS NO HOSTS PER SUBNET 1 255 255 128 0 17 2 32766 2 255 255 192 0 18 4 16382 3...

Страница 82: ...ou don t need to change the subnet mask computed by the STB unless you are instructed to do otherwise Private IP Addresses Every machine on the Internet must have a unique address If your networks are isolated from the Internet running only between two branch offices for example you can assign any IP addresses to the hosts without problems However the Internet Assigned Numbers Authority IANA has r...

Страница 83: ... computer B which is a DHCP client Neither can access the Internet This problem can be solved by assigning a different static IP address to computer A or setting computer A to obtain an IP address automatically Figure 59 Conflicting Computer IP Addresses Example Conflicting Router IP Addresses Example Since a router connects different networks it must have interfaces using different network number...

Страница 84: ...an not use the same IP address In the following example the computer and the router s LAN port both use 192 168 1 1 as the IP address The computer cannot access the Internet This problem can be solved by assigning a different IP address to the computer or the router s LAN port Figure 61 Conflicting Computer and Router IP Addresses Example ...

Страница 85: ...e Trademarks ZyNOS ZyXEL Network Operating System is a registered trademark of ZyXEL Communications Inc Other trademarks mentioned in this publication are used for identification purposes only and may be properties of their respective owners Certifications Federal Communications Commission FCC Interference Statement The device complies with Part 15 of FCC rules Operation is subject to the followin...

Страница 86: ...is product in revenue generating broadcast systems terrestrial satellite cable and or other distribution channels streaming applications via Internet intranets and or other networks other content distribution systems pay audio or audio on demand applications and the like or on physical media compact discs digital versatile discs semiconductor chips hard drives memory cards and the like An independ...

Страница 87: ...ization number RMA Products must be returned Postage Prepaid It is recommended that the unit be insured when shipped Any returned products without proof of purchase or those with an out dated warranty will be repaired or replaced at the discretion of ZyXEL and the customer will be billed for parts and labor All repaired or replaced products will be shipped by ZyXEL to the corresponding return addr...

Страница 88: ...Appendix C Legal Information STB 1003 User s Guide 88 ...

Страница 89: ...ail support zyxel com tw Sales E mail sales zyxel com tw Telephone 886 3 578 3942 Fax 886 3 578 2439 Web www zyxel com www europe zyxel com FTP ftp zyxel com ftp europe zyxel com Regular Mail ZyXEL Communications Corp 6 Innovation Road II Science Park Hsinchu 300 Taiwan Costa Rica Support E mail soporte zyxel co cr Sales E mail sales zyxel co cr Telephone 506 2017878 Fax 506 2015098 Web www zyxel ...

Страница 90: ...448 Web www zyxel fi Regular Mail ZyXEL Communications Oy Malminkaari 10 00700 Helsinki Finland France E mail info zyxel fr Telephone 33 4 72 52 97 97 Fax 33 4 72 52 19 20 Web www zyxel fr Regular Mail ZyXEL France 1 rue des Vergers Bat 1 C 69760 Limonest France Germany Support E mail support zyxel de Sales E mail sales zyxel de Telephone 49 2405 6909 69 Fax 49 2405 6909 99 Web www zyxel de Regula...

Страница 91: ...gawa ku Tokyo 141 0022 Japan Kazakhstan Support http zyxel kz support Sales E mail sales zyxel kz Telephone 7 3272 590 698 Fax 7 3272 590 689 Web www zyxel kz Regular Mail ZyXEL Kazakhstan 43 Dostyk Ave Office 414 Dostyk Business Centre 050010 Almaty Republic of Kazakhstan Malaysia Support E mail support zyxel com my Sales E mail sales zyxel com my Telephone 603 8076 9933 Fax 603 8076 9833 Web htt...

Страница 92: ...rzei 1A 03 715 Warszawa Poland Russia Support http zyxel ru support Sales E mail sales zyxel ru Telephone 7 095 542 89 29 Fax 7 095 542 89 25 Web www zyxel ru Regular Mail ZyXEL Russia Ostrovityanova 37a Str Moscow 117279 Russia Singapore Support E mail support zyxel com sg Sales E mail sales zyxel com sg Telephone 65 6899 6678 Fax 65 6899 8887 Web http www zyxel com sg Regular Mail ZyXEL Singapor...

Страница 93: ...l ZyXEL Thailand Co Ltd 1 1 Moo 2 Ratchaphruk Road Bangrak Noi Muang Nonthaburi 11000 Thailand Ukraine Support E mail support ua zyxel com Sales E mail sales ua zyxel com Telephone 380 44 247 69 78 Fax 380 44 494 49 32 Web www ua zyxel com Regular Mail ZyXEL Ukraine 13 Pimonenko Str Kiev 04050 Ukraine United Kingdom Support E mail support zyxel co uk Sales E mail sales zyxel co uk Telephone 44 134...

Страница 94: ...Appendix D Customer Support STB 1003 User s Guide 94 ...

Страница 95: ...columns 23 compatibility 34 connectors 20 contact information 89 content files 34 controls 20 copyright 85 CPU 28 customer support 89 D D drive 34 date 26 27 28 daylight saving time 23 26 27 default password 28 defaults 22 27 demo interface setup 37 demonstration setup 33 demonstration videos 34 DHCP 29 34 dimensions 47 disclaimer 85 disconnected network 28 display mode 23 display type 24 DNS 30 d...

Страница 96: ...34 live TV test 41 LIVE555 34 LIVE555 setup 40 login menu 40 M MAC address 28 management 19 mask 30 media server 29 33 34 memory 28 menu navigation 23 menus 23 misconfiguration 27 modem 19 N NAT 82 navigation 23 network 23 network disconnected 28 40 Network menu 29 network settings 27 NTP server 30 NTSC 38 O open source software 34 overview 33 P PAL 38 password 28 31 44 Point to Point over Etherne...

Страница 97: ...s 50 power adaptor 50 standby mode 43 startup 43 static IP 29 static IP address 30 34 STB version 28 streaming 34 streaming video 42 subnet 30 75 subnet mask 76 subnetting 78 syntax conventions 4 System Setup menu 26 27 T temperature 48 testing IPTV 41 testing VOD 42 TFTP 30 third party software 34 time 26 27 30 time zone 26 27 trademarks 85 TV menus 23 TV screen 23 U URL 30 username 31 V video mo...

Страница 98: ...Index STB 1003 User s Guide 98 ...

Отзывы: