background image

 Appendix A Wall Mounting

PM7510-R0 User’s Guide

39

3

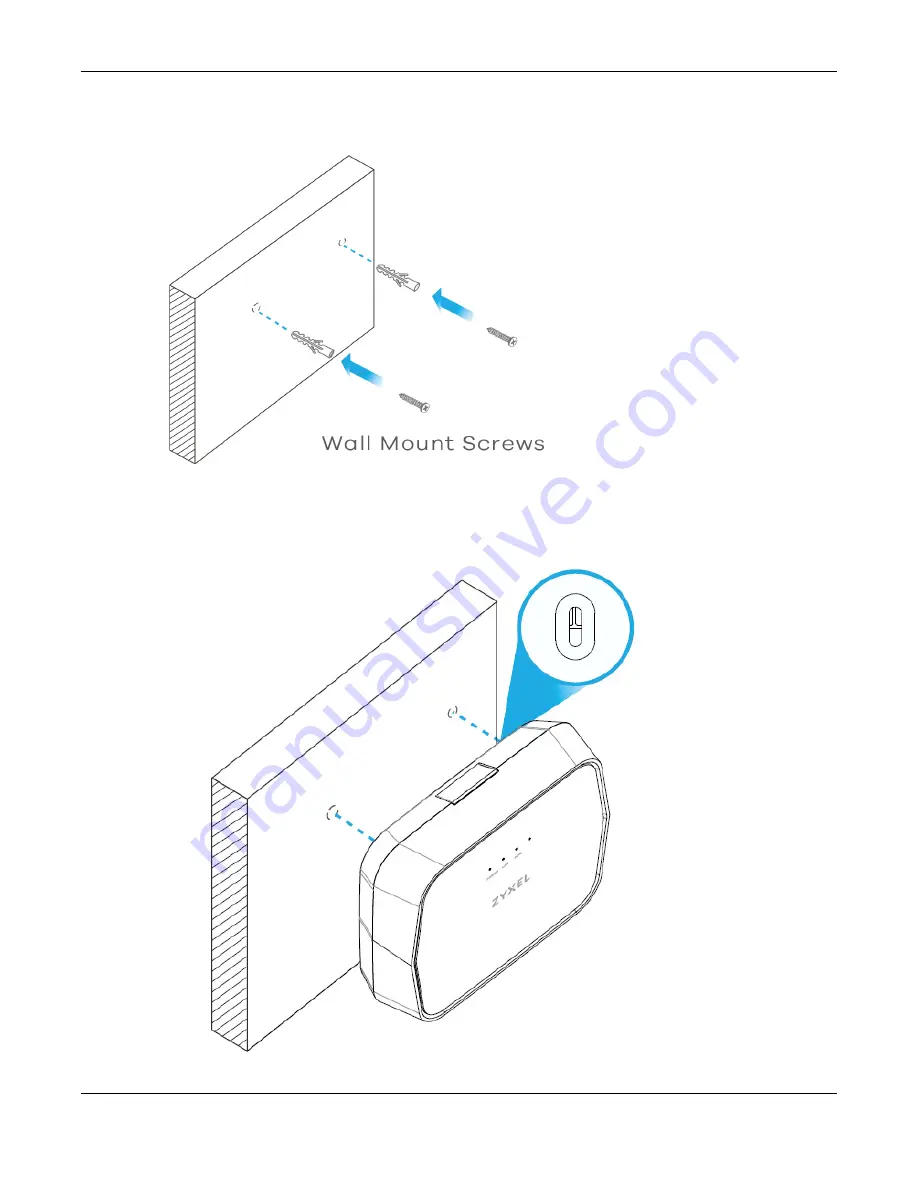
Insert screw anchors and screws (not provided) into the holes.

Figure 24   

Insert Screw Anchors and Screws

4

Place the Zyxel Device so the wall mount holes line up with the screws. Slide the Zyxel Device down 
gently to fix it into place.

Figure 25   

Placing the Zyxel Device

Содержание PM7510-R0 Series

Страница 1: ...User s Guide PM7510 R0 XGS PON Bridge ONT with 10G LAN Copyright 2022 Zyxel and or its affiliates All Rights Reserved IP Address https 192 168 0 1 User Name admin Password See the device label Version...

Страница 2: ...n this book may differ slightly from your product due to differences in your product firmware or your computer operating system Every effort has been made to ensure that the information in this manual...

Страница 3: ...ns Syntax Conventions PM7510 R0 may be referred to as PM in this guide Product labels screen names field labels and field choices are all in bold font A right angle bracket within a screen name denote...

Страница 4: ...Managing the Zyxel Device 9 1 3 Good Habits for Managing the Zyxel Device 9 1 4 Hardware 9 1 4 1 Front Panel LEDs 9 1 4 2 Rear Panel 10 1 4 3 UPS Port 11 1 4 4 Reset Button 11 Chapter 2 The Web Confi...

Страница 5: ...atus 23 6 3 LAN Status 24 Chapter 7 User Account 26 7 1 Overview 26 7 2 User Account 26 Chapter 8 Time Setting 27 8 1 Time Setting 27 Chapter 9 Log Setting 29 9 1 Overview 29 9 2 Log Setting 29 Chapte...

Страница 6: ...Table of Contents PM7510 R0 User s Guide 6 Part III Appendices 36 Appendix A Wall Mounting 37 Appendix B Legal Information 40 Appendix C Safety Warnings 41...

Страница 7: ...7 PART I User s Guide...

Страница 8: ...ided by the Internet Service Provider ISP to the PON port It supports OMCI ONU Management and Control Interface for provisioning and management by the ISP s OLT Optical Line Terminal 1 1 3 Multi Gigab...

Страница 9: ...nd that consists of different types of characters such as numbers and letters Write down the password and put it in a safe place 1 4 Hardware 1 4 1 Front Panel LEDs The following figure shows the fron...

Страница 10: ...down Blinking The received optical signal is too weak Table 1 Front Panel LEDs continued LED COLOR STATUS DESCRIPTION Table 2 Rear Panel LABEL DESCRIPTION POWER Connect the power cable to start the Zy...

Страница 11: ...the RESET button on the rear panel of the device to reload the factory system configuration This means that you will lose all configurations that you had previously and the password will be reset to t...

Страница 12: ...Make sure your Zyxel Device hardware is properly connected refer to the Quick Start Guide 2 Manually configure your computer s IP address to 192 168 0 X X represents any number from 2 to 254 For examp...

Страница 13: ...figurator Layout Figure 8 Screen Layout As illustrated above the main screen is divided into these parts A Title bar this shows the Zyxel logo and device model name Click the logout icon to log out of...

Страница 14: ...nformation Network Setting LAN Use this screen to set the Local Area Network IP address and subnet mask of your Zyxel Device System Monitor Log System Log Use this screen to view the status of events...

Страница 15: ...er s Guide 15 Firmware Upgrade Firmware Upgrade Use this screen to upload firmware to your Zyxel Device Reboot Reboot Use this screen to reboot the Zyxel Device without turning the power off Table 5 S...

Страница 16: ...16 PART II Technical Reference...

Страница 17: ...Device Information Model Name This shows the model number of your Zyxel Device Serial Number This field displays the serial number of the Zyxel Device GPON SN This field displays the serial number th...

Страница 18: ...uld not increase much If memory usage does get close to 100 the Zyxel Device is probably becoming unstable and you should restart the device or turn off the device unplug the power for a few seconds P...

Страница 19: ...Table 7 Network Setting LAN LABEL DESCRIPTION LAN IP Setup IP Address Enter the LAN IPv4 address you want to assign to your Zyxel Device in dotted decimal notation for example 192 168 0 1 factory def...

Страница 20: ...IGMP snooping to forward group multicast traffic only to ports that are members of that group Otherwise select Disabled Apply Click Apply to save your changes Cancel Click Cancel to restore your prev...

Страница 21: ...es A syslog enabled device can generate a syslog message and send it to a syslog server Syslog is defined in RFC 3164 The RFC defines the packet format content and system log related information of sy...

Страница 22: ...el Select a severity level from the drop down list box This filters search results according to the severity level you have selected When you select a severity the Zyxel Device searches through all lo...

Страница 23: ...ffic Status to open the WAN screen Figure 13 System Monitor Traffic Status WAN The following table describes the fields on this screen Table 10 System Monitor Traffic Status WAN LABEL DESCRIPTION Refr...

Страница 24: ...is interface Table 10 System Monitor Traffic Status WAN continued LABEL DESCRIPTION Table 11 System Monitor Traffic Status LAN LABEL DESCRIPTION Refresh Interval Enter how often you want the Zyxel Dev...

Страница 25: ...er of outgoing packets dropped on this interface Received Packet Data This indicates the number of received packets on this interface Error This indicates the number of frames with errors received on...

Страница 26: ...ield displays the name of the account used to log into the Zyxel Device Web Configurator Old Password Type the default password or the existing password used to access the Zyxel Device Web Configurato...

Страница 27: ...Zyxel Device s time based on your local time zone Figure 16 Maintenance Time Setting The following table describes the fields on this screen Table 13 Maintenance Time Setting LABEL DESCRIPTION Current...

Страница 28: ...ylight Saving Time at 2 A M local time So in the United States set the day to Second Sunday the month to March and the time to 2 in the Hour field Daylight Saving Time starts in the European Union on...

Страница 29: ...DESCRIPTION Syslog Settings Syslog Logging Select Active to enable syslog logging Mode Select the syslog destination from the drop down list box If you select Local File the log s will be saved in a...

Страница 30: ...to two minutes After a successful upload the system will reboot Do NOT turn off the Zyxel Device while firmware upload is in progress Figure 18 Maintenance Firmware Upgrade The following table describ...

Страница 31: ...into the Zyxel Device again The Zyxel Device automatically restarts in this time causing a temporary network disconnect In some operating systems you may see the following icon on your desktop Figure...

Страница 32: ...to reboot the Zyxel Device remotely without turning the power off You may need to do this if the Zyxel Device hangs for example Click Maintenance Reboot Click Reboot to have the Zyxel Device reboot T...

Страница 33: ...are using the power adaptor or cord included with the Zyxel Device 3 Make sure the power adaptor or cord is connected to the Zyxel Device and plugged in to an appropriate power source Make sure the p...

Страница 34: ...255 255 255 0 If you changed the IP address Section 4 2 on page 19 use the new IP address If you changed the IP address and have forgotten it see the troubleshooting suggestions for I forgot the IP ad...

Страница 35: ...cted or is broken or damaged enough to break the PON connection See Section 1 4 1 on page 9 for details about the other LEDs 2 Disconnect the power and the LAN cable from your device and reconnect the...

Страница 36: ...36 PART III Appendices Appendices contain general information Some information may not apply to your device...

Страница 37: ...the steps below to mount your Zyxel Device on a wall 1 Use screws and anchors of the size as shown below Figure 21 Screws and Anchors Size 2 Drill two holes in the wall with their centers either 85 5...

Страница 38: ...Appendix A Wall Mounting PM7510 R0 User s Guide 38 Figure 23 Drill Holes 60 0 mm Apart...

Страница 39: ...screw anchors and screws not provided into the holes Figure 24 Insert Screw Anchors and Screws 4 Place the Zyxel Device so the wall mount holes line up with the screws Slide the Zyxel Device down gen...

Страница 40: ...nce and 2 This device must accept any interference received including interference that may cause undesired operation This product has been tested and complies with the specifications for a Class B di...

Страница 41: ...ce potential safety issues only the power adapter or battery backup provided with the product a replacement power adapter or battery backup provided by Zyxel or agency or a power adapter or battery ba...

Отзывы: