Chapter 8 VLAN
MGS-3712/MGS-3012F User’s Guide
96
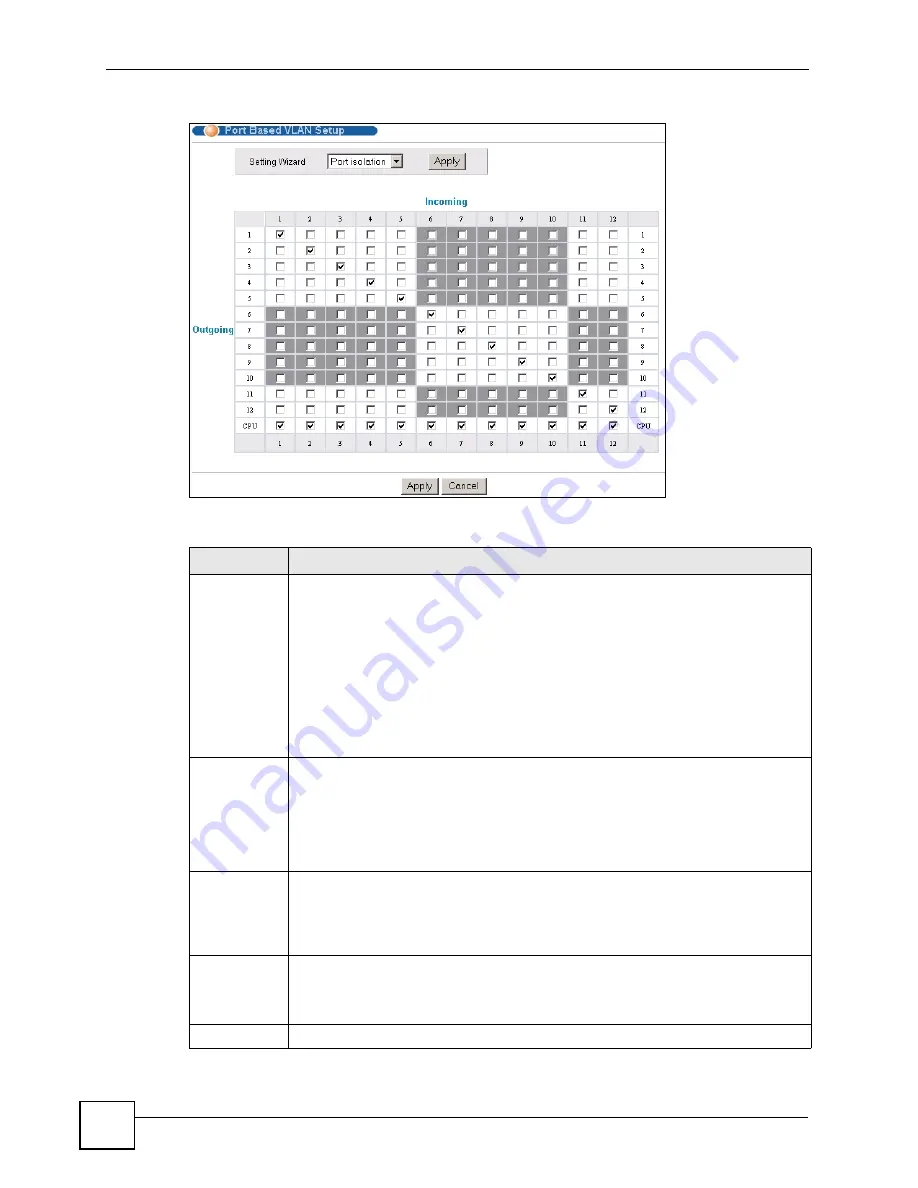
Figure 48
Port Based VLAN Setup (Port Isolation)
The following table describes the labels in this screen.
Table 19
Port Based VLAN Setup
label
Description
Setting Wizard Choose
All connected
or
Port isolation
.
All connected
means all ports can communicate with each other, that is, there are no
virtual LANs. All incoming and outgoing ports are selected. This option is the most
flexible but also the least secure.
Port isolation
means that each port can only communicate with the CPU
management port and cannot communicate with each other. All incoming ports are
selected while only the CPU outgoing port is selected. This option is the most limiting
but also the most secure.
After you make your selection, click
Apply
(top right of screen) to display the screens
as mentioned above. You can still customize these settings by adding/deleting
incoming or outgoing ports, but you must also click
Apply
at the bottom of the screen.
Incoming
These are the ingress ports; an ingress port is an incoming port, that is, a port through
which a data packet enters. If you wish to allow two subscriber ports to talk to each
other, you must define the ingress port for both ports. The numbers in the top row
denote the incoming port for the corresponding port listed on the left (its outgoing
port).
CPU
refers to the Switch management port. By default it forms a VLAN with all
Ethernet ports. If it does not form a VLAN with a particular port then the Switch cannot
be managed from that port.
Outgoing
These are the egress ports; an egress port is an outgoing port, that is, a port through
which a data packet leaves. If you wish to allow two subscriber ports to talk to each
other, you must define the egress port for both ports.
CPU
refers to the Switch
management port. By default it forms a VLAN with all Ethernet ports. If it does not
form a VLAN with a particular port then the Switch cannot be managed from that port.
Apply
Click
Apply
to save your changes to the Switch’s run-time memory. The Switch loses
these changes if it is turned off or loses power, so use the
Save
link on the top
navigation panel to save your changes to the non-volatile memory when you are done
configuring.
Cancel Click
Cancel
to begin configuring this screen afresh.
Содержание MGS-3712
Страница 2: ......
Страница 7: ...Safety Warnings MGS 3712 MGS 3012F User s Guide 7 ...
Страница 8: ...Safety Warnings MGS 3712 MGS 3012F User s Guide 8 ...
Страница 20: ...Table of Contents MGS 3712 MGS 3012F User s Guide 20 ...
Страница 28: ...List of Tables MGS 3712 MGS 3012F User s Guide 28 ...
Страница 30: ...30 ...
Страница 38: ...Chapter 2 Hardware Installation and Connection MGS 3712 MGS 3012F User s Guide 38 ...
Страница 50: ...50 ...
Страница 70: ...Chapter 6 System Status and Port Statistics MGS 3712 MGS 3012F User s Guide 70 ...
Страница 82: ...Chapter 7 Basic Setting MGS 3712 MGS 3012F User s Guide 82 ...
Страница 84: ...84 ...
Страница 132: ...Chapter 15 Link Aggregation MGS 3712 MGS 3012F User s Guide 132 ...
Страница 142: ...Chapter 17 Port Security MGS 3712 MGS 3012F User s Guide 142 ...
Страница 148: ...Chapter 18 Classifier MGS 3712 MGS 3012F User s Guide 148 Figure 80 Classifier Example ...
Страница 153: ...Chapter 19 Policy Rule MGS 3712 MGS 3012F User s Guide 153 Figure 83 Policy Example ...
Страница 154: ...Chapter 19 Policy Rule MGS 3712 MGS 3012F User s Guide 154 ...
Страница 169: ...Chapter 21 Multicast MGS 3712 MGS 3012F User s Guide 169 Figure 96 MVR Group Configuration Example ...
Страница 170: ...Chapter 21 Multicast MGS 3712 MGS 3012F User s Guide 170 ...
Страница 184: ...Chapter 22 Authentication Accounting MGS 3712 MGS 3012F User s Guide 184 ...
Страница 214: ...Chapter 25 Two Rate Three Color Marker MGS 3712 MGS 3012F User s Guide 214 ...
Страница 215: ...215 PART IV IP Application Static Route 217 DHCP 221 ...
Страница 216: ...216 ...
Страница 220: ...Chapter 26 Static Route MGS 3712 MGS 3012F User s Guide 220 ...
Страница 227: ...Chapter 27 DHCP MGS 3712 MGS 3012F User s Guide 227 Figure 134 DHCP Relay for Two VLANs Configuration Example ...
Страница 228: ...Chapter 27 DHCP MGS 3712 MGS 3012F User s Guide 228 ...
Страница 230: ...230 ...
Страница 256: ...Chapter 30 Diagnostic MGS 3712 MGS 3012F User s Guide 256 ...
Страница 260: ...Chapter 31 Syslog MGS 3712 MGS 3012F User s Guide 260 ...
Страница 273: ...273 PART VI Troubleshooting Product Specifications Troubleshooting 275 Product Specifications 279 ...
Страница 274: ...274 ...
Страница 278: ...Chapter 36 Troubleshooting MGS 3712 MGS 3012F User s Guide 278 ...
Страница 285: ...285 PART VII Appendices and Index Common Services 287 Legal Information 291 Customer Support 295 Index 301 ...
Страница 286: ...286 ...
Страница 290: ...Appendix A Common Services MGS 3712 MGS 3012F User s Guide 290 ...
Страница 294: ...Appendix B Legal Information MGS 3712 MGS 3012F User s Guide 294 ...
Страница 308: ...Index MGS 3712 MGS 3012F User s Guide 308 ...


