


LCT-1631A Manual V1.0
18
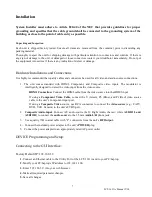
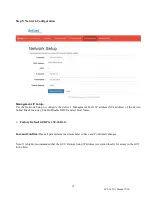
Network Setup
Default Management IP:
192.168.1.9
◈
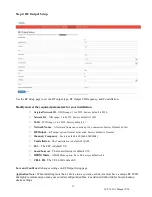
Host Name
– Use the Scroll Up/Down button to select Host Name. Press the OK button to enter
the Host Name menu. Use the Scroll Up/Down button to select the first character for the desired
Host Name then press the OK button to set. Repeat the process for each character in the desired
Network Name. A Host Name can consist up to 15 characters. Press OK to Reboot.
◈
IP Setup
–
Use the Scroll Up/Down button to select IP Setup. Press the OK button to enter the IP
Setup menu. Use the Scroll Up/Down button to Enable/Disable DHCP. Press the OK button to
set. When selecting Enable and press OK, OK to Reboot will show and press OK to reboot for
DHCP. When selecting Disable, IP Address, Subnet Mask, and Default Gateway need to be set as
follows.
Note: If DHCP is enabled and the LCT-1631A is connected to a DHCP server/network, the LCT-
1631A will receive an IP address from the DHCP server. If DHCP is enabled, you will not be
able to set an IP address. Select DHCP disabled if Static IP Address required.
◈
IP Address
–
Use the Scroll Up/Down enter the desired IP Address then press the OK button to
set. Repeat the process until the IP Address is completed. Press the OK button to set.
◈
Subnet Mask
–
Use the Scroll Up/Down button to enter the Subnet Mask. Use the Scroll
Up/Down menu to select the first number of the desired Subnet Mask then press the OK button to
set. Repeat the process until the Subnet Mask is completed. Press the OK button to set.
◈
Default Gateway
–
Press the OK button to enter the Default Gateway. Use the Scroll Up/Down
menu to select the first number of the desired Gateway Address then press the OK button to set.
Repeat the process until the Gateway Address is completed. Press the OK button to Reboot.
◈
EXIT
– Select EXIT to escape the Network Setup Menu.
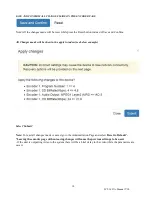
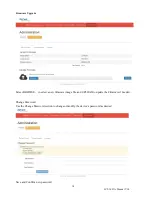
Change Password
◈
Change Password
–
Press the OK button to enter the Change Password menu. Use the Scroll
Up/Down menu to select and modify the 4-digit Password then press the OK button to set.
Default Password: 0000.
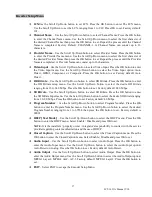
Reset to Default
◈
Reset to Default
–
Press the OK button reset all settings to factory default settings. Select
Country, Australia or New Zealand, then press OK button to reboot.
Caution- Once you enter this function there is no way to exit.
All parameters will be reset to factory defaults.
Note: GUI Administration functions are not available via the LCD menu.
Use the GUI to utilize all the Admin functions available.
Содержание LCT-1631A
Страница 19: ...LCT 1631A Manual V1 0 19 Distributed by ...


