background image

6

Made in Germa

ny

5

4

3

2

1

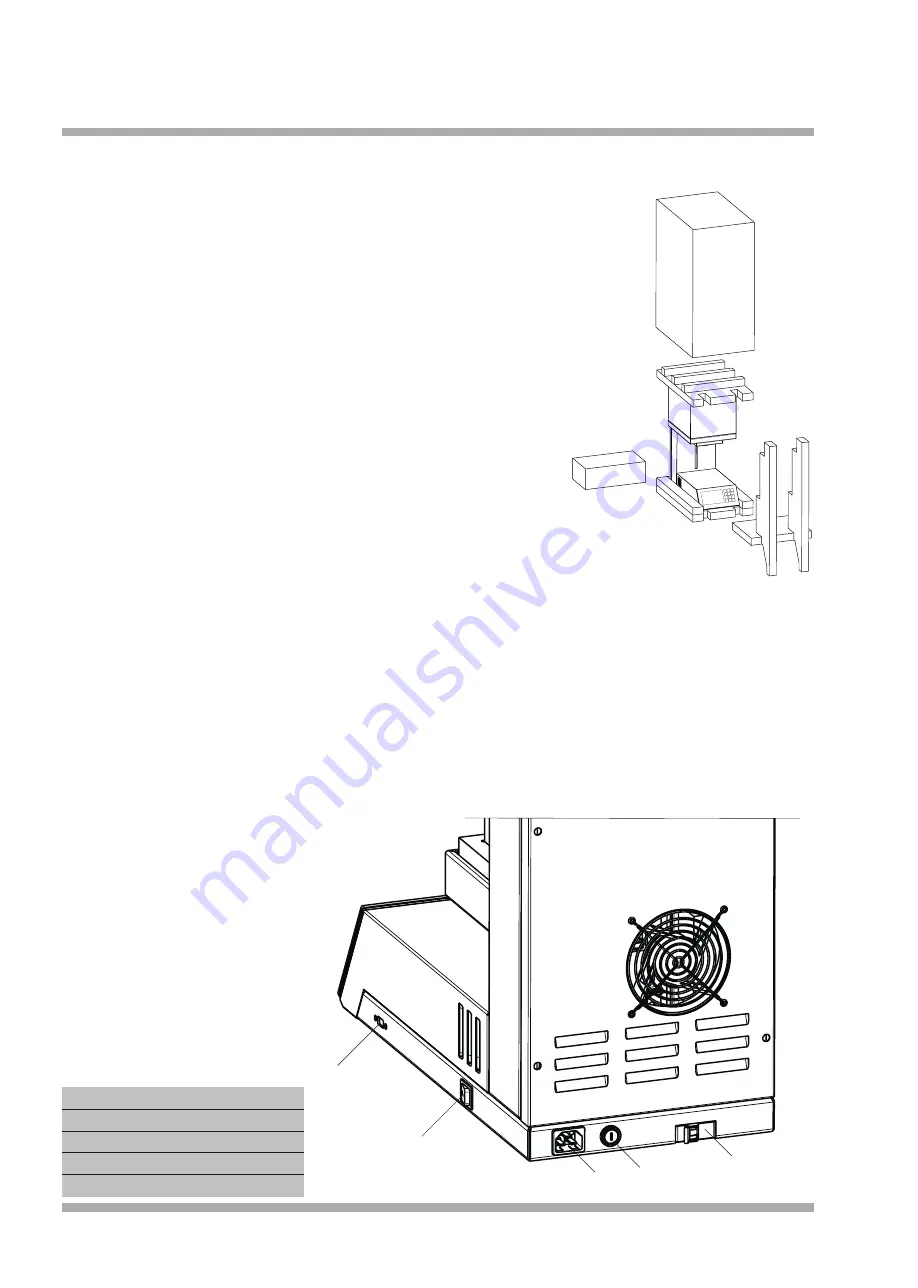
1. Installation 

1

Main switch

2

USB port

3

Power cord connection

4

Main fuse

5

Sicherungsautomat

1.1 Setting up the device 


Q

Place the oven on a stable and level 
work station


Q

Keep the original box and packaging 
material for warranty claims and 
service


Q

Have the firing or pressing insulation 
base ready for the further procedure.


Q

Power connection:


Q

The ceramic oven requires 
230V/50Hz or 115V/60Hz.


Q

Do not use extension cords


Q

Connect oven to a dedicated 
electrical outlet.


Q

The main switch should be in the "0" 
position.


Q

Connect the oven to the power 
supply using the supplied power 
cord.


Q

Switch on the furnace at the main 
switch.

1.2 Initial installation


Q

After switching on for the first time, 
instructions for the first steps are 
shown on the display. After that, the  
initial installation cycle runs auto-
matically. The oven is only ready for 
operation after a complete set-up 
(2.5.10).

Remove any remaining packaging

Initial installation steps


Q

Setting the language


Q

Base and centering socket (incl. 
centering ring) in the lift cage


Q

Brightness


Q

Volume


Q

Check circuit breaker


Q

Set date and time


Q

Setting the unit (°C / °F)


Q

Loading programs via USB


Q

Start burn-in program

Содержание VARIO S 430

Страница 1: ...Made in Germany VARIO S 430 EN09 2022 ...

Страница 2: ...2 ...

Страница 3: ...n 2 1 6 Program ended 2 1 7 Explanation of terms 2 2 Edit folder programs 2 3 Settings 2 3 1 Data transfer 2 3 2 Firmware update Firmware version 2 3 3 Custom calibration 2 3 4 Last error message 2 3 5 Muffle operating hours 2 3 6 Regeneration program 2 3 7 Basic settings 2 3 8 Initial oven setup 2 3 9 lift 2 3 10 Service menu 2 3 11 Factory reset 2 3 12 Upgrade oven 3 Data 26 3 1 Technical data 3...

Страница 4: ...ut changes to the software or additions to the processing options We are sure that you will have much success with the ceramic furnace and congratula te you on the choice you have made 0 Introduction 0 2 General Q The VARIO series ovens are used exclusively for the firing and pressing of dental ceramics and is only intended for these applications Q The user is liable for damage resulting from othe...

Страница 5: ...uch as when opening the heating chamber high temperatures may radiate outside the oven chamber Q Do not touch the surface parts the heating elements or the inner surface of the oven The hot surfaces can cause serious burns Q Immediately after the firing process do not leave the firing chamber unattended close it as soon as possible Q If the furnace is left under vacuum for a long time when it is s...

Страница 6: ...utlet Q The main switch should be in the 0 position Q Connect the oven to the power supply using the supplied power cord Q Switch on the furnace at the main switch 1 2 Initial installation Q After switching on for the first time instructions for the first steps are shown on the display After that the initial installation cycle runs auto matically The oven is only ready for operation after a comple...

Страница 7: ...display of the VARIO furnaces is a full touch display including an additional number block The number block is only active when numerical values can be entered The UP and DOWN arrows are active when they can be used In the top posi tion only the down arrow is active in the lower plate position only the up arrow is active In this way the proper functioning of the lift and the end positions can be c...

Страница 8: ...ire Folder Buttons are dark grey while program buttons are light grey Example All DC 9 2 Programs will be in the DC 9 2 Folder The red Main menu button takes you back to the main menu Q Once a folder has been opened the Program buttons in that folder are displayed This menu will be recogniz able by the prompt at the top of the page in yellow Select Program Press the desired program button The pres...

Страница 9: ... to OK Please confirm your input by activating this field The original parameter is restored by pressing the Abort function field Q If a value is entered that follows the correction of subsequent parameters these are high lighted in yellow image 09 3 Rampen 5 Heat rate 4 5 C min Heat rate 1 10 C min Heat rate 3 8 C min Final temp 1 900 C Final temp 3 820 C Hold time 1 030 min Hold time 3 120 min H...

Страница 10: ...r is highlighted in a darker shade of grey If a subsequent parameter is controlled the parameter bar scrolls accordingly Subsequent parameters can be checked by dragging the process bar to the appropriate positions with a swiping motion Display Status A running firing program Abort View parameters Hold time 2 000 min Final temp 2 1100 C Heat rate 2 3 C min Monolitic Start Select program Display St...

Страница 11: ...Abort 2 1 3 Parameter overview Q The preview window can be called up again during a program run using the Parameter overview button In this way all parameters can be checked at a glance Changes to parameters can no longer be made here Edit program Image 11 1 Image 11 2 Delete Rampen 5 Heat rate 4 5 C min Heat rate 1 10 C min Heat rate 3 8 C min Final temp 1 900 C Final temp 3 1500 C Hold time 1 03...

Страница 12: ...isually by a text window The name of the completed program the time and the date at the end of the process are given in the text window image 12 2 Q A code is generated image 12 3 for documentation or quality assurance This consists of the serial number of the furnace the date YYMMDD time 24 hour system The complete program data can be called up under Settings Data transfer Export protocol files i...

Страница 13: ...ividual program sections Adjustable Temperature range 250 C 1650 C Holding time 1 5 Duration of the respective program section at the end temperature Maximum holding time that can be set for a single ramp 300 minutes Maximum holding times to be set across all ramps 420 minutes Cooling rate Cooling in C min F min to reach the opening temperature Adjustable Cooling range 1 50 C min Opening temperatu...

Страница 14: ...ction field If a folder function field that has already been described is selected the field and its content can be copied moved edited or even deleted Corresponding function fields are activated as soon as the function is available Q If a described folder function field was selected a green Programs and a red Main menu function field become active among other things By pressing the Programs field...

Страница 15: ...t is selected The oven now hides all other function fields except for Paste The target storage location must now be selected in the case of programs this can also be in a different folder By clicking on the Paste field the program or the folder and its contents are moved to the desired position 3 Copy Here the folder program is copied to the clipboard The folder remains unchanged in the same posit...

Страница 16: ...ollowing parameters e g the opening temperature when the final temperature is lowered these parameters are adjusted accordingly after the OK field has been clicked and highlighted in yellow These values are accepted and saved with Save and the initial values are called up again with Abort 7 Next Previous With the forwards and backwards keys you can switch to the next page with further groups or pr...

Страница 17: ...ered Two lines of text each with a maxi mum of 12 characters or letters are available for this purpose image 18 1 When programs are created the second step is to select the program type To do this as shown in the diagram on the right activate the arrow in the program type A list with all available program types opens After the desired program type has been selected the oven offers the parameters r...

Страница 18: ... image 20 3 2 3 1 Data transfer Included with your Zubler ceramic furnace a USB data stick flash drive is enclosed With the help of this USB stick you can transfer program datas from the oven to USB or from USB to oven or log datas for quality assurance to save When the oven detects the USB stick all active function fields are highlighted image 20 2 When using a third party data medium problems ma...

Страница 19: ... selected the green function field Export is activated Please activate this field to save the folder and its contents Q The furnace Image 21 3 creates a folder file which it names with the folder name to be saved serial number of the furnace date and time Display Status Settings Data transfer Export one folder DC 9 2 Sarah is choosen Display Status Settings Data transfer Import one folder Display ...

Страница 20: ...with the oldest in subsequent work pro cesses Log data that is exported is deleted from the oven memory in the process Here too the furnace generates a file name composed of the word proto col serial number of the furnace date and time of the storage time image 22 2 Delete all protocol files All protocol datas in the oven memo ry can be deleted here Display Status Settings Data transfer Protocol f...

Страница 21: ...O Board number of series 123456789 1234 1 Firmwareupdate Firmwareversion Update firmware Import Firmware Date 2022 03 18 15 10 Firmware I O Board 00 00 27 Firmware Date 2022 03 18 15 10 2 3 2 Firmware update Firmware version 1 Firmware version and Firmware update The firmware versions of the relative components are displayed here A firmware update can be installed on the furnace from the USB memor...

Страница 22: ...n the elements or by a progressive matting becomes noticea ble these defects are regenerable Both please Sinter bowls empty no zirconia no sinter granules or sinter beads place the lift table and the regeneration pro gram start Furthermore this program serves as a Relaxation burn after replacement of heating elements Muffle hours Firing programs Settings Display Status Settings Customize calibrati...

Страница 23: ...the area without making any changes with the red Abort button 1 Select language Selection of the menu language To do this select the desired national language by activating the red Back button you ll get back to the Basic settings image 26 2 2 3 7 Basic settings In this area specific display settings can be made These are Settings Back Display Status Settings Basic settings Display Status Settings...

Страница 24: ...section can be checked by pressing the loudspeaker field With the red Back function field you ll return to the Basic settings level image 27 2 Display Status Settings Basic settings Set volume Display Status Settings Basic settings Set brightness Back Set volume Button Program done Error Abort Boot Set brightness Back 2 3 8 Initial setup You will be guided through all the para meters that have to ...

Страница 25: ...nd the oven then switches to the desired device version The activation code can only be used for one day at a time 2 3 10 Service menu Password protected service area for customer support 500 C Top limit switch Off On Lower limit switch 0 Back Display Status Settings Vacuum lift Lift test Lift test Lift position Image 29 1 2 3 9 lift test The function of the lift system can be checked during the l...

Страница 26: ...1 Width 330mm Height 830mm Depth 570mm Weight 52kg Voltage 115V AC 230V AC 5 50 60Hz Power consumption 1900VA Temperature 250 C 1650 C Colour display 152 x 92mm Touch 230 x 92mm Programs 972 Heat rate 1 C min 100 C min Number of heating cooling stages 5 1 ...

Страница 27: ...t Guide 3 3 Spare parts accessories Power cable VS430 012 00309 Sinter bowl tongs VS430 898 4138 Tweezers long 898 106 Sinter bowl set 2 bowls 1 lid 896 0418 Sinter bowl set 1 bowl with lid 896 0419 Sinter bowl individually 896 0420 Sintered lid 896 0421 Base socket 896 0407 Centering socke 896 0408 Centering ring 896 0406 Sintered beads 40g 896 0409 Sintered beads 200g 896 0410 Sintered granulate...

Страница 28: ...inaus schalten Sie den Ofen aus und kontaktieren Sie Ihren Servicepartner L 01 Abort Fan error one or more fans are failed Check which fan is inoperative there are two fans above the combustion chamber and a fan on the back wall of the oven and contact your service partner Oven will not turn on main switch on the stove does not light up the oven probably doesn t have one power supply check the roo...

Страница 29: ...29 5 Warranty 5 1 Cleaning the heating chamber see point 2 5 7 ...

Страница 30: ...ials burning and press base All materials must be disposed of in accordance with country specific regulations 7 2 Disposal of the device The device must be disposed of by a specialist company The specialist company must be informed of any hazardous residues in the device 7 2 1 Disposal instructions for EU countries In order to preserve and protect the environment prevent environmental pollution an...

Страница 31: ...31 ...

Страница 32: ...32 Zubler Gerätebau GmbH Buchbrunnenweg 26 89081 Ulm Jungingen Germany technical changes without notice 36 2022 en ...

Отзывы: