background image


  ZTE MF60 User Manual


30 Confidential and Proprietary Information of ZTE CORPORATION


IP Address

: Set IP address for the virtual server. 


Port Range

: Set port numbers for the virtual server. 


Protocol

: Set protocol for the virtual server. 


Comment

: Type comment for the virtual server settings. 

Select 

Enable

, and input the detail information in the 

Virtual Server Settings 

area, then click 

Apply 

to 

add a new rule. 

Click 

Delete Selected

 to delete the rule which you selected. 

Click 

Reset

 to clear what you select or input. 

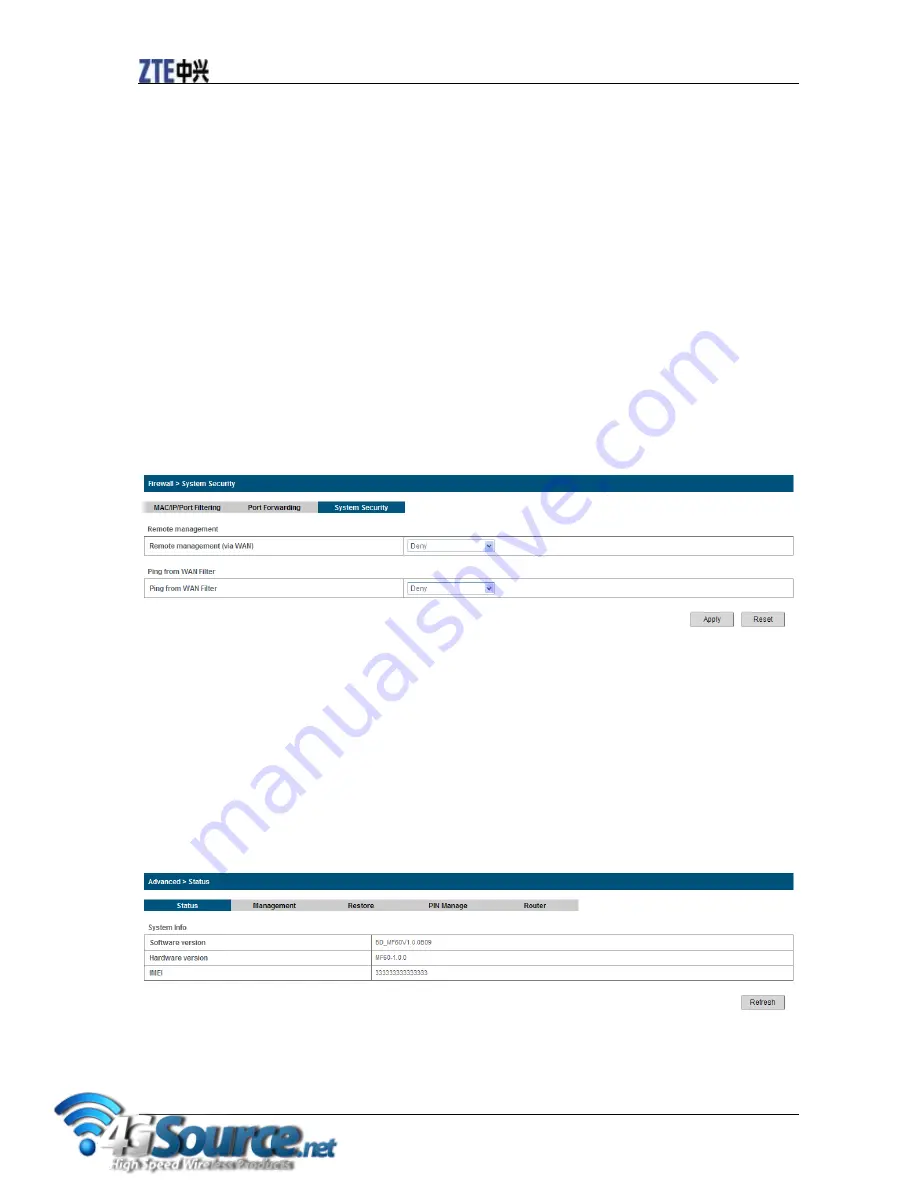
System Security 

You can configure system firewall to protect the device from being attacked. Select 

Settings > Firewall > 

System Security

, the system security setting is shown in the following figure: 


Allow

 or 

Deny

 the remote management function and ping from WAN filter function on requirement, and 

then click 

Apply

Click 

Reset

 to restore the default value. 

Advanced 

Status   

Select 

Settings > Advanced > Status

, the system information is shown in the following figure: 


Management 

Select 

Settings  >  Advanced  >  Management

,  the  administrator  settings  information  is  shown  in  the 

Содержание MF60

Страница 1: ...ary Information of ZTE CORPORATION 1 ZTE MF60 3G Global Mobile Hotspot User Manual ZTE CORPORATION NO 55 Hi tech Road South ShenZhen P R China Postcode 518057 Tel 86 755 26779999 URL http www zte com cn E mail mobile zte com cn ...

Страница 2: ...erpted reproduced translated or utilized in any form or by any means electronic or mechanical including photocopying and microfilm without the prior written permission of ZTE Corporation The manual is published by ZTE Corporation We reserve the right to make modifications on print errors or update specifications without prior notice Version No R Edition Time Manual No ...

Страница 3: ...ff Your Device 8 Charging Your Device 8 microSD Card 9 About SIM Card 9 Working Mode 10 USB Mode 10 Wi Fi Mode 13 Mixed Mode 14 Operation and Function 15 Preparation 15 Establish a connection between your device and the client 15 Access the Internet 16 Access the WebGUI Configuration Page 16 Login 17 Quick Setup 19 Settings 21 3G Settings 21 Wi Fi Settings 24 Firewall 27 Advanced 30 Phonebook 33 A...

Страница 4: ...tion in native 35 Operation in SIM Card 36 WAN Connection 36 Usage of WPS 37 Logout 37 Disconnecting from the Internet 37 Sleep Mode 37 Warning and Notice 39 To the Owner 39 Using Your Device 39 Using Battery 40 Limited Warranty 40 Limitation of Liability 41 FCC Compliance 41 Radio Frequency RF Energy 41 Troubleshooting 43 Technical Parameters 45 Glossary 47 ...

Страница 5: ...actual device may be different Right Side Front Left Side Bottom 1 Power Hold the Power button to switch on off the device 2 Memory card slot microSD card It is where you insert the memory card microSD card 3 WPS This button is used to start Wi Fi Protected Setup authentication process and enable disable the Wi Fi function Hold it for three seconds to activate the WPS process Press it to enable di...

Страница 6: ... device is powered on the following icons will appear on the LED screen with the corresponding indications listed in the table below Icon Indication Network signal strength Network type 2G or 3G icon will appear on the LED screen according to the network being connected Roaming network indication Connect to the Internet automatically Connect to the Internet manually Wi Fi status and number of the ...

Страница 7: ...ce and remove the external power adapter before removing or inserting the SIM card if not the device or SIM card may be damaged 3 Insert the battery as shown with the contacts located against the gold springs 4 Line the battery cover up correctly and press gently to close the case Inserting microSD Card 1 Pull the microSD cover out of the card slot ...

Страница 8: ...button to switch on off the device Notes Please install battery before power on The device is powered on when the signal strength indication lights up Charging Your Device Notes Charge at least 4 hours to ensure a full initial charge Charging is only possible within a temperature range of 0 to 45 You can charge your device by using USB cable or adapter 1 Insert the charger lead carefully with the ...

Страница 9: ... 1 Left click the icon in the Windows system tray bar Then a menu will popup and indicate the USB devices list as below 2 Select Safely remove the USB disk which is relevant to the device 3 Remove the device directly About SIM Card Avoid handling the SIM card unnecessarily Hold the card by the edges to prevent static damage Keep the SIM card away from electrical and magnetic appliances If you cann...

Страница 10: ...e then power on your device And the following picture is one application example Installing Software When you connect your device to PC or laptop for the first time the system will automatically detect and recognize the new hardware and display the new icon in the desktop status bar indicating that the PC or laptop and the USB device have been connected properly After a few seconds there will show...

Страница 11: ...Proprietary Information of ZTE CORPORATION 11 Strongly recommend you to exit Windows programs and click Next Select the folder that you want to install the software and you can select a different path by pressing Change and then click Next ...

Страница 12: ...ZTE MF60 User Manual 12 Confidential and Proprietary Information of ZTE CORPORATION Click Install Click Finish to complete the installation ...

Страница 13: ...e desktop Uninstalling Software Select Start Programs ZTE USB Drivers for MF60 Uninstall ZTE USB Drivers for MF60 menu on the laptop or desktop PC Click Yes to confirm uninstall the software Then the system begins to uninstall programs and this interface will indicate the progress of uninstall Click OK to complete the application software uninstall Wi Fi Mode Power on directly and then connect the...

Страница 14: ... MF60 User Manual 14 Confidential and Proprietary Information of ZTE CORPORATION Mixed Mode Use the both connection methods to connect your PC or laptop And the following picture is one application example ...

Страница 15: ...tallation the connection between your device and the client will be established successfully a moment later Via Wi Fi 1 Power on your device directly It will take 1 2 minutes to initialize and then Wi Fi LED icon will be indicated on the LED screen of your device 2 Use your normal Wi Fi application on the client to search the available wireless network Notes You need to check your Wireless Network...

Страница 16: ... your device and the client 3 After successfully establishing the connection access the Internet in the Always On or Manual mode The default mode is Manual Notes You can browse the WebGUI Configuration page and click WAN Connection to set the WAN connection mode Access the WebGUI Configuration Page 1 Make sure the connection between your device and the client is correct 2 Launch the internet brows...

Страница 17: ...TE MF60 User Manual Confidential and Proprietary Information of ZTE CORPORATION 17 Login In the WebGUI Configuration page select the desired language and input the password the default Password is admin ...

Страница 18: ... ZTE CORPORATION Click Login to log in the device Notes If you check Save after type in password the device will save it Next time when you want to login the device with the same password what you need to do is click Login When you login the following interface appears ...

Страница 19: ...ice Content area Show the detail configuration System Information Area Show the system status and different kinds of tip Battery indicator Shows the battery level 4 stages from none to high Signal strength Shows the network signal intensity 5 stages from none to strong Internet Status Connect Internet Disconnect Internet Wi Fi Strength Wi Fi status and number of the connected users And the maximum...

Страница 20: ... the APN string 4 Set PPP Authentication in the following figure 5 Set SSID Configuration in the following figure Service Set Identifier SSID is used to uniquely identify your WLAN If you enable SSID Broadcast the gateway will broadcast the SSID and other devices can detect and connect to it 5 Set Security Configuration in the following figure ...

Страница 21: ...lgorithm for it 6 Show the Configuration in the following figure Make sure that all the parameters shown in the figure are correct and then click Apply Settings Do not modify any settings unless instructed by your service provider Please disconnect the device from the network before change the settings 3G Settings Wireless Info Select Settings 3G Settings Wireless Info the 3G wireless information ...

Страница 22: ...the Band Selection Mode is shown in the following figure Manual Search the available network manually Automatic Device searches for available network WCDMA Only Device searches for WCDMA network only GSM Only Device searches for GSM network only Click Apply to confirm your configuration APN Setting Select Settings 3G Settings APN Setting the APN parameters are shown in the following figure ...

Страница 23: ... Enter the related parameters detailed please see following table and then click Save to add one new profile Parameter Function Profile Selection Choose one profile from the list Profile Name Type the profile name APN Type the APN string DNS Set DNS mode Authentication Password Authentication Protocol PAP provides a simple method without encryption for the peer to establish its identity using a 2 ...

Страница 24: ...on is established Wi Fi Settings Station list Select Settings Wi Fi Settings Station List the wireless network stations are shown in the following figure Basic Select Settings Wi Fi Settings Basic the wireless network basic parameters are shown in the following figure Network Mode If all of the wireless devices connect with this device in the same transmission mode performance will be improved by ...

Страница 25: ...ce and coverage of your wireless network Rate Choose the speed rate MAX Station Number Choose the maximum number of the stations which connect the AP simultaneously Click Apply to confirm your configuration Security Select Settings Wi Fi Settings Security the Security parameters are shown in the following figure Unless one of these encryption modes is selected wireless transmissions to and from yo...

Страница 26: ...n WEP Keys At most four keys can be set in the blank Choose the primary key index The primary key is the only key in use at a given time Whatever keys you enter for an access point you must also enter the same keys for the client adapter in the same order In other words WEP key 1 on the AP must match WEP key 1 on the client adapter WEP key 2 on the AP must match WEP key 2 on the client adapter etc...

Страница 27: ...tion is shown in the following figure WPS Disable this function WPS mode Choose the desired mode Client PIN Enter the client PIN Click Apply to confirm your configuration Firewall You may setup firewall rules to protect your network from virus worm and malicious activity on the Internet Notes You can set the maximum 10 filtering items for MAC IP Port Filtering and Port Forwarding MAC IP Port Filte...

Страница 28: ...packet if none of the rules matches MAC address Set the MAC address that will be filtered Dest IP Address Set the destination IP address that will be filtered Source IP Address Set the source IP address that will be filtered Protocol Set which protocol will be used for filtering Dest Port Range Set the destination port numbers that will be filtered Source Port Range Set the source port numbers tha...

Страница 29: ...ete the rule which you selected Click Reset to clear what you select or input To add a new rule 1 Select Enable in the Basic Settings area 2 Click Apply 3 Input the detail information in the Mac IP Port Filtering area 4 Click Apply in the Mac IP Port Filtering area Port Forwarding You can setup virtual servers to provide services on the Internet Select Settings Firewall Port Forwarding the virtual...

Страница 30: ...e the rule which you selected Click Reset to clear what you select or input System Security You can configure system firewall to protect the device from being attacked Select Settings Firewall System Security the system security setting is shown in the following figure Allow or Deny the remote management function and ping from WAN filter function on requirement and then click Apply Click Reset to ...

Страница 31: ...t automatically PIN Manage Select Settings Advanced PIN Manage the PIN manage is shown in the following figure PIN Status Show the current PIN status Action Choose one option and then click Apply to active corresponding function PIN Type the PIN code PIN Save Check the box then click Apply to enable PIN save function After you enable this function the device will save your PIN code and you do not ...

Страница 32: ...g PIN code entries will block the SIM card After you changed the PIN code you still need input PIN code again even though you enable PIN save function Router Select Settings Advanced Router the router information is shown in the following figure IP Address IP address for LAN interface Subnet Mask Subnet mask for the IP address MAC Address MAC address for the LAN interface DHCP Server Enable or dis...

Страница 33: ...honebook This function allows you store contacts Adding new contact 1 Select Phonebook Add New to access the following figure 2 Set the related parameters Parameters Description Location Select the device or SIM card to save your contacts Name Enter the contact s name Mobile number Enter the contact s phone number 3 Click Save to confirm your configuration Operation in native Select Phonebook Nati...

Страница 34: ...n your SIM card will be displayed here detailed operation please refer to chapter Operation in native SMS This function allows you to send or receive short messages Configing SMS 1 Select SMS SMS Settings to access the following figure 2 Set the related parameters Parameters Description Validity Configure the validity period of outgoing messages Center Number Enter the short message center number ...

Страница 35: ...1 Select SMS New Message to access the following figure 2 Enter the recipient s phone number 3 Enter a message 4 Click Send to send the message Operation in native You can check the messages saved in your device Inbox Select SMS Native Inbox to access the following figure All the received messages saved in your device will be displayed here Click View to view the selected message Click Reply to re...

Страница 36: ...ll the drafts and unsuccessfully sent messages saved in your device will be displayed here Click View to access the selected message edited interface then click Send to send it Operation in SIM Card You can check the messages saved in your SIM card Select SMS SIM Card Inbox Outbox Drafts to access the corresponding figure detailed operation please refer to the chapter Operation in native WAN Conne...

Страница 37: ...PS function of the client Notes For the detailed operations about the client please refer to the client s instruction Logout Select Logout a pop up window will appear as the following figure shown Click OK to logout the web page Disconnecting from the Internet 1 Select Disconnect Internet from WAN Connection page 2 Click Apply to disconnect from the Internet Notes Turn off the device can also term...

Страница 38: ...CORPORATION be also disabled Press Power or WPS button to wake up the device and all LEDs will be turned on Notes With USB connection if no Wi Fi user connects to the device within 10 minutes only the Wi Fi function will be disabled Press WPS button to enable this function ...

Страница 39: ...s Please observe and obey all warning signs and switch off your device in these conditions Do not touch the inner antenna area if not necessary Otherwise it will affect your device s performance Store the device out of the reach of little children The device may cause injury if used as a toy Do not touch the metallic parts of the device so as to avoid a burn when the device is working Using Your D...

Страница 40: ...ken keep away from content If it taints your skin wash your skin with abundant fresh water and ask doctor help if necessary Limited Warranty This warranty does not apply to defects or errors in the Product caused by i Reasonable abrasion ii End User s failure to follow ZTE s installation operation or maintenance instructions or procedures iii End User s mishandling misuse negligence or improper in...

Страница 41: ...that may cause undesired operation Caution Changes or modifications not expressly approved by the manufacturer could void the user s authority to operate the equipment NOTE This equipment has been tested and found to comply with the limits for a Class B digital device pursuant to part 15 of the FCC Rules These limits are designed to provide reasonable protection against harmful interference in a r...

Страница 42: ...m value This is because the device is designed to operate at multiple power levels so as to use only the poser required to reach the network In general the closer you are to a wireless base station antenna the lower the power output The highest SAR value for the model device as reported to the FCC when worn on the body as described in this user guide is 1 080 W kg Body worn measurements differ amo...

Страница 43: ...IP address to make sure your client to obtain an IP address automatically in the Internet protocol TCP IP properties 4 Type the correct network key when you connect to the device The client connected to the device can not access the Internet 1 Make sure your SIM card is available 2 Change the location to find a place with good signal 3 Check WAN Connection mode setting 4 Contact with your service ...

Страница 44: ...ZTE MF60 User Manual 44 Confidential and Proprietary Information of ZTE CORPORATION Sending E mail to mobile zte com cn Visiting http www zte com cn Calling Service Hotline 86 755 26779999 ...

Страница 45: ...2 0 HIGH SPEED USB Interface Type Micro USB Weight 77g Dimensions W H D 99 7mm 53 7mm 13 9mm microSD card Support up to 32GB microSD card Power Adapter 5V 700mA Battery 1500mAh Li ion battery Standby time 100hours Working time 4hours Charge time 4hours Operate system Windows 7 Windows Vista Windows XP SP2 or later Mac OS 10 4 or later Linux Web Browser IE 6 0 or later Firefox 1 0 or later Opera 6 ...

Страница 46: ...E MF60 User Manual 46 Confidential and Proprietary Information of ZTE CORPORATION Charging temperature 0 40 Humidity 5 95 Notes The device s standby and working time are based on ideal working environment ...

Страница 47: ...etworks LANs GSM Global System for Mobile Communications GPRS General Packet Radio Service HSDPA High Speed Downlink Packet Access HSUPA High Speed Uplink Packet Access IP Internet Protocol LAN Local Area Network LED Light Emitting Diode MHz Megahertz PDP Packet Data Protocol PIN Personal Identification Number PPP Point to Point Protocol PUK PIN Unlocking Key UPNP Universal Plug and Play SIM UMTS ...

Страница 48: ...ZTE MF60 User Manual 48 Confidential and Proprietary Information of ZTE CORPORATION WLAN Wireless LAN WPA PSK Wi Fi Protected Access PreShared Key ...

Отзывы: