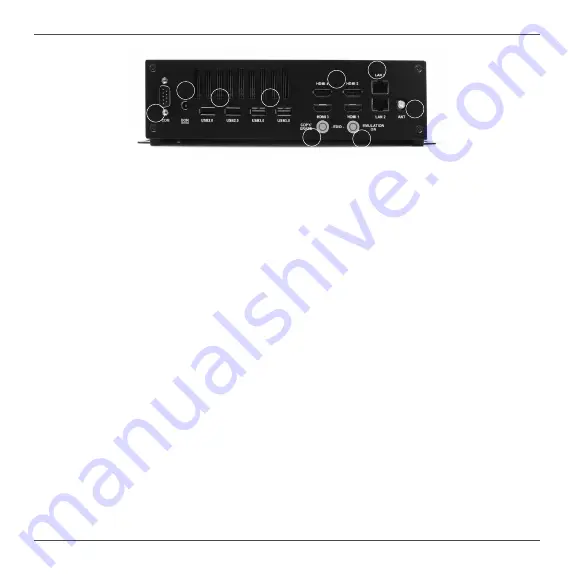
Zotac ZBOX PRO ZP-QK7P3000 Скачать руководство пользователя страница 9

8


Rear view

1. COM port

Use the COM port to connect serial devices such as mouse or fax/modem.

2. Power input (DC19.5V)

The supplied power adapter converts AC power to DC power for use with this power port. To 

prevent damage to the mini-PC, always use the supplied power adapter.

3. USB 2.0 ports


The USB (Universal Serial Bus) port is compatible with USB devices such as keyboards, mice, 

    cameras and hard disk drives.

4. USB 3.0 ports 

The USB 3.0 port supports the SuperSpeed USB 3.0 devices. Use this port for USB 3.0 

devices for maximum performance with USB 3.0 compatible devices.

5. HDMI ports

The HDMI (High Definition Multimedia Interface) port supports a UHD device such as an LCD 

TV or monitor to allow viewing on a larger external display. 

6. COPY/ERASE

Press the COPY/ERASE button once to read, copy and proofread, press it for five seconds to 

clear the EDID EEPROM.

7. EMULATION ON

Press the EMULATION ON button once to toggle between “Emulation On” or “Pass Through” 

Mode.

8. Ethernet ports

The eight-pin RJ-45 LAN port supports standard Ethernet cable for connections to  local area 

networks (LAN) with speeds of 10/100/1000Mbps.

9. WiFi antenna connector

The WiFi antenna connector supports the included WiFi antenna.


The power adapter may become warm to hot when in use. Do not cover the adapter and keep it away from your body.

1

2

3

4

5

6

7

8

9

Содержание ZBOX PRO ZP-QK7P3000

Страница 1: ......

Страница 2: ...tered trademarks or copyrights of their respective companies and are used for identification purposes only All trademarks are the property of their respective owners Every effort has been made to ensu...

Страница 3: ...SSD module 10 Installing a memory module 12 Installing a hard disk drive 13 Installing the L shaped mountings 16 Installing your ZP QK7P3000 to a monitor 17 Setting up your ZP QK7P3000 18 Installing d...

Страница 4: ...Up to 32 GB of memory USB Ports 2x USB3 1 2x USB3 0 2x USB2 0 Onboard Serial ATA SATA 6 0 Gb s transfer rates Support one 2 5 inch SATA III HDD SSD bay support the device with max 9 5mm height Expans...

Страница 5: ...4...

Страница 6: ...t objects of any kind into the ventilation openings Use this product in environments with ambient temperature on below conditions Main unit 20 C 40 C AC adapter 0 C 40 C Do not walk on the power cord...

Страница 7: ...illustration displays the package contents of your new ZP QK7P3000 If any of the below items is damaged or missed contact your retailer 1 x ZP QK7P3000 1 x L shaped mounting kit 1 x AC Adapter 1 x Pow...

Страница 8: ...is compatible with SD SDHC SDXC cards used in devices like digital cameras MP3 players mobile phones and PDAs 6 USB 3 1 port The USB 3 1 port supports the SuperSpeed USB 3 1 device Use this port for...

Страница 9: ...evices 5 HDMI ports The HDMI High Definition Multimedia Interface port supports a UHD device such as an LCD TV or monitor to allow viewing on a larger external display 6 COPY ERASE Press the COPY ERAS...

Страница 10: ...P QK7P3000 Before installing hardware please follow the instructions below to remove the cover of your ZP QK7P3000 1 Remove the four thumb screws of bottom cover 6 Hold the bottom cover with two hands...

Страница 11: ...10 2 Insert an M 2 SSD module into the slot Installing an M 2 SSD module 1 Locate the M 2 SSD slot and remove the screw on the blot as shown below The M 2 SSD slot only support SATA SSD module...

Страница 12: ...11 3 Gently press down on the M 2 SSD module and install the screw...

Страница 13: ...12 Installing a memory module 1 Insert the memory module into the socket 2 Gently press down on the memory module until it is locked by the arms of the socket...

Страница 14: ...13 Installing a hard disk drive 1 Unscrew and remove the hard disk drive bracket as shown below 2 Locate the 2 5 inch SATA hard disk drive and the hard disk drive bracket...

Страница 15: ...14 4 Insert the hard disk drive SSD into the socket and gently slide into the connector 3 Install the hard disk drive SSD to the hard disk drive bracket...

Страница 16: ...15 5 Reinstall the screw for the hard disk drive bracket 5 Reinstall the bottom cover...

Страница 17: ...Installing the L shaped mountings 1 Locate the bottom cover upwards and take out the L shaped mounting kit and screws from accessory box 2 Install the L shaped mountings to the bottom cover with scre...

Страница 18: ...Secure four screws M4XH15 0MM to your monitor VESA100 standard 2 Place your ZP QK7P3000 to the monitor noting the correct alignment Mechanical Loading Stability Mounting of the equipment on the backs...

Страница 19: ...ng a COM device Connect serial devices such as mouse of fax modems 2 Connecting to USB 2 0 devices Connect USB 2 0 devices such as keyboards mice cameras and hard disk drives 3 Connecting to USB 3 0 d...

Страница 20: ...d the other end to a network router hub or switch 6 Connecting the WiFi antenna Connect the WiFi antenna to the WiFi antenna connector 7 Connecting the power adapter and turning on the ZP QK7P3000 Con...

Страница 21: ...n directions to install the operating system 5 Install system drivers to gain full functionality of the ZP QK7P3000 hardware and features Installing system drivers Before you can use the full features...

Страница 22: ...should launch 4 Follow the onscreen instructions to install the drivers 5 Restart the system Using your ZP QK7P3000 Configuring a wireless connection Please follow the instructions below to connect to...

Страница 23: ...QK7P3000 to a TV or receiver via HDMI adapter 1 Access the Sound settings via the system Control Panel 2 Under Playback devices click the display device that corresponds with your audio compatible di...

Страница 24: ...hen the reading and writing is successful the green LED will keep bright a If the reading is not successful the LED turns red and keeps flashing It indicates that HDMI1 may not be connected in place b...

Страница 25: ...EPROM it will automatically set EMULATION ON to BYPASS mode and the red light will flash Emulation on A When the EDID MCU module finishes the EDID COPY operation press EMULATION ON the EDID MCU module...

Отзывы: