Zotac ZBOX PRO ZP-QK7P3000 Скачать руководство пользователя страница 24


23    

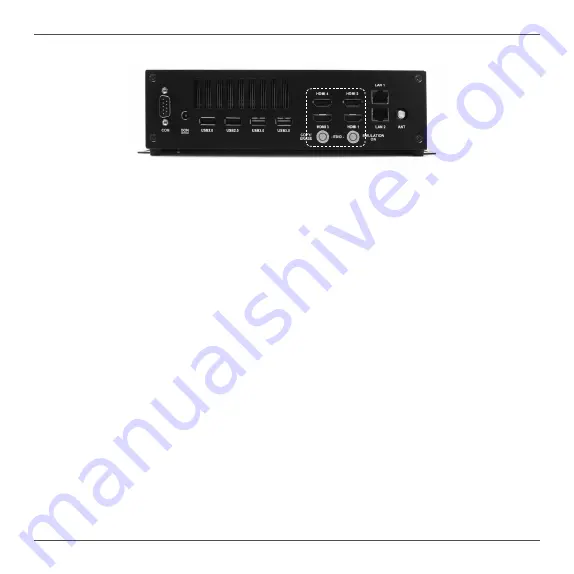
1. Ports and function

HDMI3: supports HDMI 2.0 and is backwards compatible with HDMI 1.4/1.2 devices. The 

built-in EDID MCU module will read the EDID message through HDMI3. 

HDMI1/2/4: The EDID MCU module does not support reading EDID through HDMI1/2/4.

Note: EDID Emulation does not support the automatic recovery of EDID simulation during OS 

restart or warmboot. You need to press Emulation On/Off when the EEPROM has EDID data, 

or press the Power button.

2. Copy/Erase

Copy

:

A. Press COPY/ERASE, the green LED flashes once. The EDID MCU module starts reading 

     EDID from HDMI3 and overwriting to HDMI1-4. When the reading and writing is successful, 

     the green LED will keep bright.

a. If the reading is not successful, the LED turns red and keeps flashing. It indicates that  

     HDMI1 may not be connected in place.

b. If the writing is not successful, the LED turns red and keeps bright. 

B. Situation a: Check the connection of HDMI3, and repeat the step A.

C. If the EDID message is written completely and correctly, the EDID MCU module will exit 

     the EDID programming mode and automatically enable the EDID EMULATION function. 

     The green LED of COPY/ERASE lights indicating that the EEPROM has data. The OS will 

     change the settings according to the update of the EDID information, but it will not change 

     according to the actual EDID message on the monitor connected to HDMI or due to the 

     disconnection. 

EDID configuration

Содержание ZBOX PRO ZP-QK7P3000

Страница 1: ......

Страница 2: ...tered trademarks or copyrights of their respective companies and are used for identification purposes only All trademarks are the property of their respective owners Every effort has been made to ensu...

Страница 3: ...SSD module 10 Installing a memory module 12 Installing a hard disk drive 13 Installing the L shaped mountings 16 Installing your ZP QK7P3000 to a monitor 17 Setting up your ZP QK7P3000 18 Installing d...

Страница 4: ...Up to 32 GB of memory USB Ports 2x USB3 1 2x USB3 0 2x USB2 0 Onboard Serial ATA SATA 6 0 Gb s transfer rates Support one 2 5 inch SATA III HDD SSD bay support the device with max 9 5mm height Expans...

Страница 5: ...4...

Страница 6: ...t objects of any kind into the ventilation openings Use this product in environments with ambient temperature on below conditions Main unit 20 C 40 C AC adapter 0 C 40 C Do not walk on the power cord...

Страница 7: ...illustration displays the package contents of your new ZP QK7P3000 If any of the below items is damaged or missed contact your retailer 1 x ZP QK7P3000 1 x L shaped mounting kit 1 x AC Adapter 1 x Pow...

Страница 8: ...is compatible with SD SDHC SDXC cards used in devices like digital cameras MP3 players mobile phones and PDAs 6 USB 3 1 port The USB 3 1 port supports the SuperSpeed USB 3 1 device Use this port for...

Страница 9: ...evices 5 HDMI ports The HDMI High Definition Multimedia Interface port supports a UHD device such as an LCD TV or monitor to allow viewing on a larger external display 6 COPY ERASE Press the COPY ERAS...

Страница 10: ...P QK7P3000 Before installing hardware please follow the instructions below to remove the cover of your ZP QK7P3000 1 Remove the four thumb screws of bottom cover 6 Hold the bottom cover with two hands...

Страница 11: ...10 2 Insert an M 2 SSD module into the slot Installing an M 2 SSD module 1 Locate the M 2 SSD slot and remove the screw on the blot as shown below The M 2 SSD slot only support SATA SSD module...

Страница 12: ...11 3 Gently press down on the M 2 SSD module and install the screw...

Страница 13: ...12 Installing a memory module 1 Insert the memory module into the socket 2 Gently press down on the memory module until it is locked by the arms of the socket...

Страница 14: ...13 Installing a hard disk drive 1 Unscrew and remove the hard disk drive bracket as shown below 2 Locate the 2 5 inch SATA hard disk drive and the hard disk drive bracket...

Страница 15: ...14 4 Insert the hard disk drive SSD into the socket and gently slide into the connector 3 Install the hard disk drive SSD to the hard disk drive bracket...

Страница 16: ...15 5 Reinstall the screw for the hard disk drive bracket 5 Reinstall the bottom cover...

Страница 17: ...Installing the L shaped mountings 1 Locate the bottom cover upwards and take out the L shaped mounting kit and screws from accessory box 2 Install the L shaped mountings to the bottom cover with scre...

Страница 18: ...Secure four screws M4XH15 0MM to your monitor VESA100 standard 2 Place your ZP QK7P3000 to the monitor noting the correct alignment Mechanical Loading Stability Mounting of the equipment on the backs...

Страница 19: ...ng a COM device Connect serial devices such as mouse of fax modems 2 Connecting to USB 2 0 devices Connect USB 2 0 devices such as keyboards mice cameras and hard disk drives 3 Connecting to USB 3 0 d...

Страница 20: ...d the other end to a network router hub or switch 6 Connecting the WiFi antenna Connect the WiFi antenna to the WiFi antenna connector 7 Connecting the power adapter and turning on the ZP QK7P3000 Con...

Страница 21: ...n directions to install the operating system 5 Install system drivers to gain full functionality of the ZP QK7P3000 hardware and features Installing system drivers Before you can use the full features...

Страница 22: ...should launch 4 Follow the onscreen instructions to install the drivers 5 Restart the system Using your ZP QK7P3000 Configuring a wireless connection Please follow the instructions below to connect to...

Страница 23: ...QK7P3000 to a TV or receiver via HDMI adapter 1 Access the Sound settings via the system Control Panel 2 Under Playback devices click the display device that corresponds with your audio compatible di...

Страница 24: ...hen the reading and writing is successful the green LED will keep bright a If the reading is not successful the LED turns red and keeps flashing It indicates that HDMI1 may not be connected in place b...

Страница 25: ...EPROM it will automatically set EMULATION ON to BYPASS mode and the red light will flash Emulation on A When the EDID MCU module finishes the EDID COPY operation press EMULATION ON the EDID MCU module...

Отзывы: