Status Information
To turn
OFF
Wireless networking if the We3G is in:
Setting up your Provider
Depending on your provider you may be unable to access the Internet until you set up the We3G to
recognize your SIM card. To set up your provider:
1
In the Configuration Manager, click on the
Advanced Settings
icon.
2
Click on
Internet
Æ
Connection settings
.
3
Select your provider from the APN Profile List and click
Set Default
then
Save
in the next two
windows.
If your provider is not listed, then select
New
. Create a Profile name and then enter the settings
provided by your broadband service provider and click in the
Set Default
box. Click
Save
in the next
two windows.
Try connecting to a webpage. If you can connect successfully, continue with
Admin Setup
.
If you cannot connect, verify that you entered the information correctly in the previous section and then
continue with
Admin Setup
.
Admin Setup
You should use this page to change the default password to prevent unauthorized users, or to set up
wireless security.
To configure these settings, click on the
Admin Setup
icon from the Configuration Manager and then follow
the steps below:
1
Create an administrator password
: This password is used to log in to the home page, where
you can view and customize your device settings.
2
Name your WiFi
®
-compatible wireless network (SSID)
: This name is visible to other WiFi
®
-
compatible devices and is used to identify your wireless network.
3
Setup wireless security
:
Select a security type and create a password for it. (For information
about the different security types, please refer to the User Manual by clicking on the
User Guide
icon from any page in the user interface.)
4
WPS
: If all of your devices support WPS (WiFi
®
Protected Setup) security, it is recommended that
you use this option. Enable WPS on this page. Continue with the section
Setting up WPS
security
.
Click
Submit
.
•
Setting up WPS security (Software option)
If you prefer to set WPS security through the Configuration Manager instead of using the WPS
button on the We3G, from the
Advanced Settings
tab in the Configuration Manager, go to
Wireless LAN
Æ
WPS
. If you select the
PIN
option, input the client’s PIN in the
Client PIN
textbox. If you select the
PBC
option, press the
WPS
button on each wireless device within 120
seconds of pressing the
Wi-Fi / WPS
button on your device or clicking
Save
,
to establish the
WPS connection.
•
Setting up WPS security (WPS button option)
Please refer to the User Manual by clicking on the
User Guide
icon from any page in the user
interface.
Congratulations!
You are done with the setup. The We3G is ready to use!
If you want to use one of the We3G’s advanced features such as Mac or IP filtering, please refer to the User
Manual for instructions. The We3G offers wireless security options including WPS and WPA/WPA2 Mixed.
For complete instructions on how to setup wireless security, please see the User Manual by clicking on the
User Guide
icon from any page in the user interface.
Features
Sleep Mode
If you select
Auto
in “Power-Saving mode setting”
(Advanced Settings
Æ
System
Æ
Basic settings)
when there is no data transmission (Internet, wireless, LAN) Sleep Mode will go on automatically after 5
minutes of inactivity. To exit Sleep Mode, press any button or use the web interface. When the device is
in Sleep Mode, the 3G modem and wireless radios are off, and the Power button is yellow and flashing.
This works only when the battery is working.
Restart
The device will restart and go back to the home page automatically after some settings modifications
such as after
Admin Setup
. Then all you need to do is re-login with your Admin Login password.
Turning Wireless Networking OFF
If you are using a USB connection, we recommend that you turn wireless networking OFF. This will save
your battery and prevent other people from accessing your connection. The Wireless Networking LED
should be OFF. To turn
OFF
Wireless networking if the We3G is in:
Full Power Working Mode:
Short press the
WiFi
®
/WPS
button for 1 second.
Low Power Working Mode:
Press and hold the
Power/Connect
button for 2 seconds to switch to
Full Power Working Mode
and then short press the
WiFi
®
/WPS
button for 1 second.
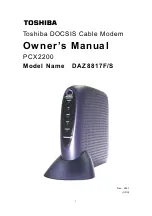
The device has four LED status indicators on the front panel of the device which indicate the information
described in the table that follows.
Note:
Once the We3G is working (and in Low Power Working Mode), all LEDs are unlit except the Power
LED which is blue and flashing.
Indicator
Status
Description
Steady Red
SIM Card error, PIN verification failed or no signal
Steady Yellow
Weak signal
Steady Green
Good signal
Steady Blue
Roaming and good signal
Blue and flashing
slowly
Roaming but poor signal
Signal
Unlit
Power off, Low Power Working Mode or sleep mode
Steady Red
No network
Green and flashing
fast
Dialing
Green and flashing
slowly
Registering to 2G network
Steady Green
Connected to 2G network
Blue and flashing
slowly
Registering to 3G network
Steady Blue
Connected to 3G network
Yellow and flashing
fast
Dial failed
Network
Unlit
Power off, Low Power Working Mode or sleep mode
Steady Green
Normal battery power
Steady Yellow
Low battery power
Steady Red
Very low battery power and will power off automatically
Green and flashing
slowly
Charging
Blue and flashing
Low Power Working Mode
Yellow and flashing
Sleep mode
Power / Connect
Unlit Power
off
Blue and flashing
slowly
Wireless Networking on and transmitting data
Green and flashing
fast
Creating WPS connection
Steady Green for 5
Seconds
WPS connection created
Steady Red for 5
Seconds
WPS connection failed
Wireless / WPS
(( w ))
Unlit
Power off, Low Power Working Mode or sleep mode
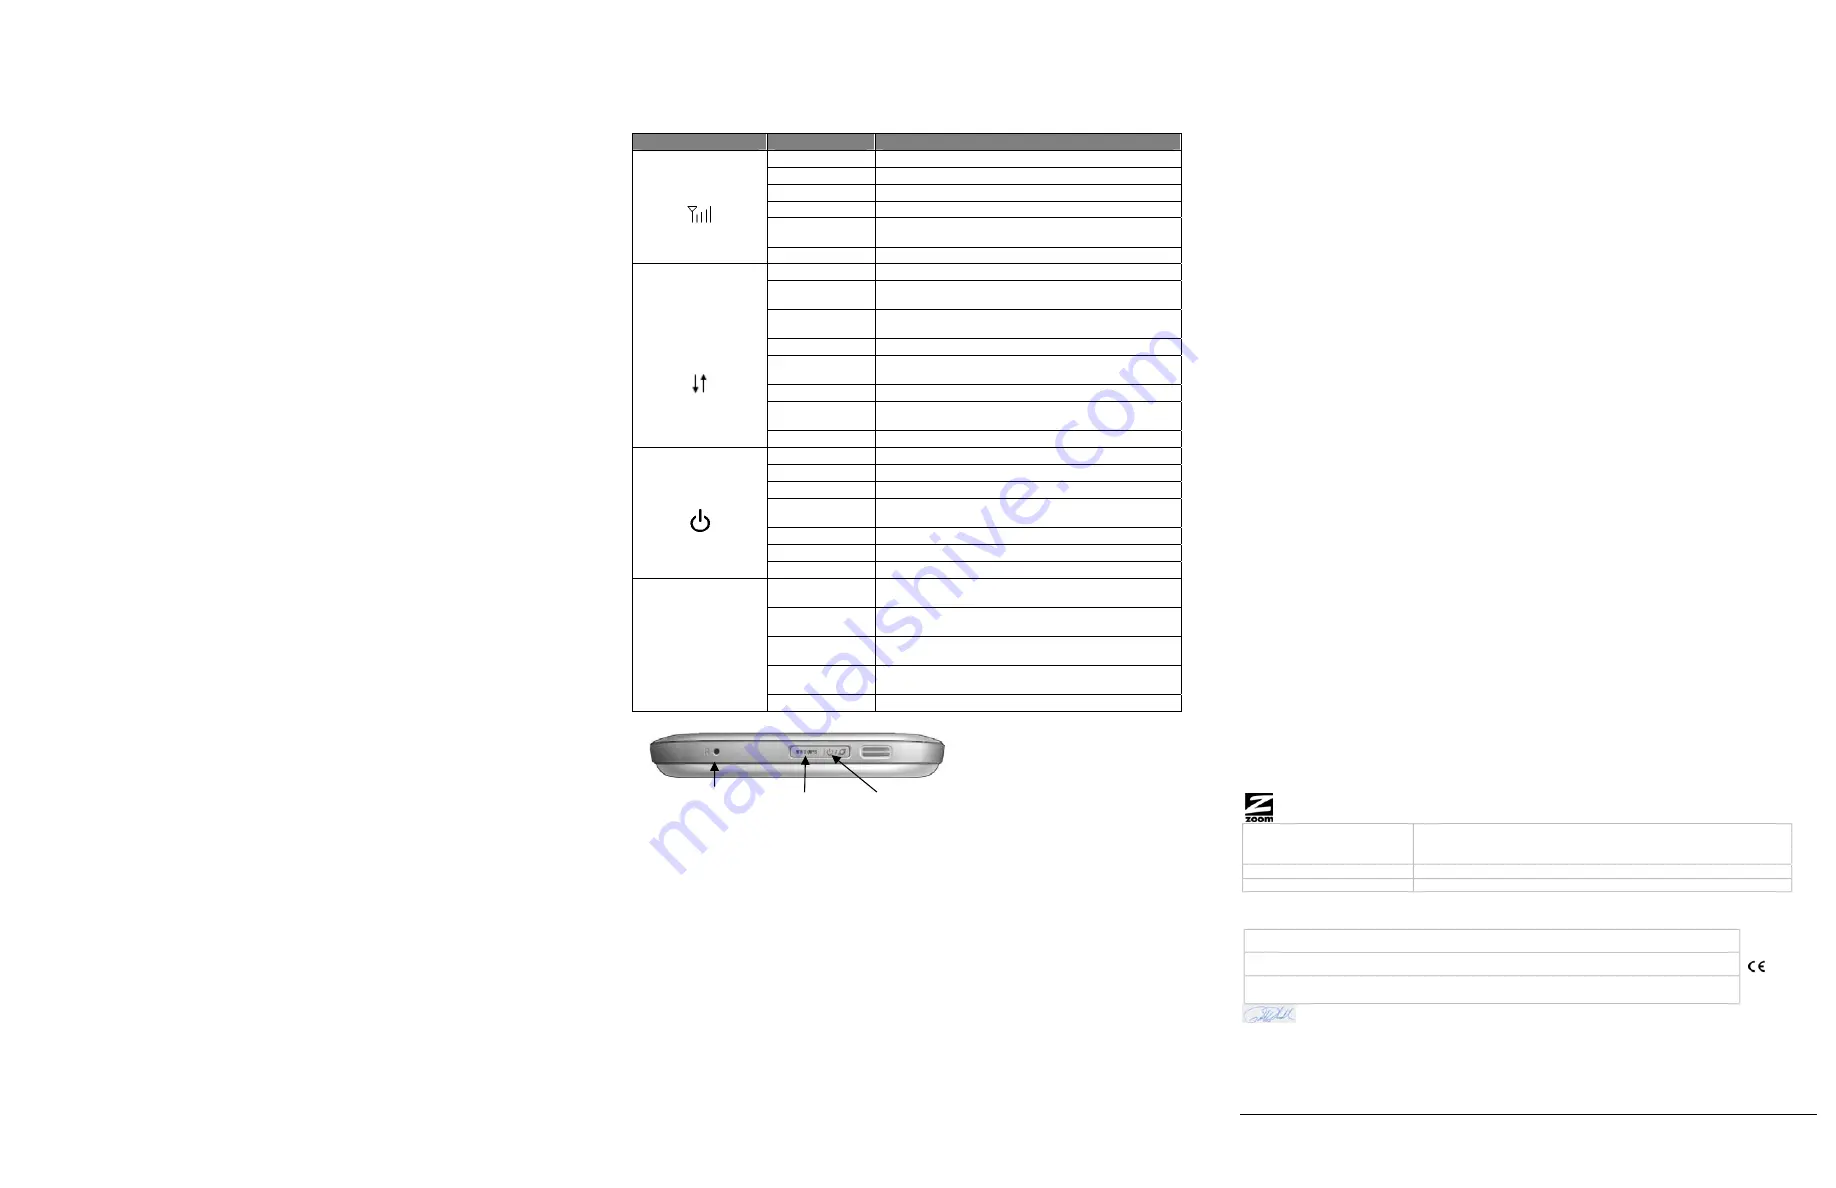
Buttons
Reset WiFi
®
/ WPS Power / Connect
Power/Connect Button
ON:
To power ON the We3G, press and hold the
Power/Connect
button for 4 seconds. The Power LED
indicates the current battery power (see
Status Information
for LED status indicator descriptions) and after
several seconds goes into
Full Power Working Mode
(
all LED indicators light up
). It will be in
Full Power
Working Mode
for 30 seconds and then automatically switch to
Low Power Working Mode
.
OFF:
To power OFF the We3G if it is in:
Full Power Working Mode:
Press and hold the
Power/Connect
button for 3 seconds.
Low Power Working Mode:
Press and hold the
Power/Connect
button for 2 seconds to switch
to
Full Power Working Mode
and then press and hold the
Power/Connect
button for 3 seconds
to power OFF the We3G.
WiFi
®
/WPS Button
Wireless
To turn
ON
Wireless networking if the We3G is in:
Full Power Working Mode:
Wireless is automatically ON when you power ON the We3G. If you
have turned OFF wireless and want to turn it ON again, short press the
WiFi
®
/WPS
button for 1
second. The Wireless LED will be blue and blinking.
Low Power Working Mode:
Press and hold the
Power/Connect
button for 2 seconds to switch
to
Full Power Working Mode
and then short press the
WiFi
®
/WPS
button for 1 second. The
Wireless LED will be blue and blinking.
Full Power Working Mode:
Short press the
WiFi
®
/WPS
button for 1 second.
Low Power Working Mode:
Press and hold the
Power/Connect
button for 2 seconds to switch
to
Full Power Working Mode
and then short press the
WiFi
®
/WPS
button for 1 second.
WPS
For information on how to enable
WPS
, see
Admin Setup
.
Reset Button
Reset:
To reset the We3G to factory default settings if it is in:
Full Power Working Mode:
Use a paper clip to press and hold the
Reset
button for 6 seconds.
Wait for 30 seconds for the We3G to automatically turn ON again.
Low Power Working Mode:
Press and hold the
Power/Connect
button for 2 seconds to switch
to
Full Power Working Mode
and then use a paper clip to press and hold the
Reset
button for 6
seconds. Wait for 30 seconds for the We3G to automatically turn ON again.
Reboot:
To reboot the We3G if it is in:
Full Power Working Mode:
Use a paper clip to short press the
Reset
button (for 1 second).
Low Power Working Mode:
Press and hold the
Power/Connect
button for 2 seconds to switch
to
Full Power Working Mode
and then use a paper clip to short press the
Reset
button (for 1
second). Wait for 30 seconds for the We3G to automatically turn ON again.
If You Need Help
We can support you best if you register your product at
www.zoomtel.com/register
We have many ways to assist you, and you can see them at
Tech Support Numbers:
US:
(617) 753-0965
UK (London):
+44 2033180660
UK (Manchester):
+44 1618840074
FCC Regulations
•
This device complies with part 15 of the FCC Rules. Operation is subject to the following two conditions: (1) This device may not cause harmful
interference, and (2) this device must accept any interference received, including interference that may cause undesired operation.
•
This device has been tested and found to comply with the limits for a Class B digital device, pursuant to Part 15 of the FCC Rules. These limits are
designed to provide reasonable protection against harmful interference in a residential installation. This equipment generates, uses and can radiated radio
frequency energy and, if not installed and used in accordance with the instructions, may cause harmful interference to radio communications. However,
there is no guarantee that interference will not occur in a particular installation If this equipment does cause harmful interference to radio or television
reception, which can be determined by turning the equipment off and on, the user is encouraged to try to correct the interference by one or more of the
following measures:
-Reorient or relocate the receiving antenna.
-Increase the separation between the equipment and receiver.
-Connect the equipment into an outlet on a circuit different from that to which the receiver is connected.
-Consult the dealer or an experienced radio/TV technician for help.
Changes or modifications not expressly approved by the party responsible for compliance could void the user‘s authority to operate the
equipment.
•
The antenna(s) used for this transmitter must not be co-located or operating in conjunction with any other antenna or transmitter.
•
RF Exposure Information (SAR)
This device meets the government’s requirements for exposure to radio waves.
This device is designed and manufactured not to exceed the emission limits for exposure to radio frequency (RF) energy set by the Federal
Communications Commission of the U.S. Government.
The exposure standard for wireless devices employs a unit of measurement known as the Specific Absorption Rate, or SAR. The SAR limit set by the
FCC is 1.6W/kg. *Tests for SAR are conducted using standard operating positions accepted by the FCC with the device transmitting at its highest certified
power level in all tested frequency bands. Although the SAR is determined at the highest certified power level, the actual SAR level of the device while
operating can be well below the maximum value. This is because the device is designed to operate at multiple power levels so as to use only the poser
required to reach the network. In general, the closer you are to a wireless base station antenna, the lower the power output.
The highest SAR value for the device as reported to the FCC when tested for worn on the body, as described in this user guide, is 1.18 W/kg for PCS
Body SAR and 0.066 W/kg for WLAN Body SAR.
While there may be differences between the SAR levels of various devices and at various positions, they all meet the government requirement.
The FCC has granted an Equipment Authorization for this device with all reported SAR levels evaluated as in compliance with the FCC RF exposure
guidelines. SAR information on this device is on file with the FCC and can be found under the Display Grant section of www.fcc.gov/oet/ea/fccid after
searching on FCC ID: BDN3GM1086
For body worn operation, this device has been tested and meets the FCC RF exposure guidelines for use with an accessory that contains no metal and
the positions the handset a minimum of 1 cm from the body. Use of other accessories may not ensure compliance with FCC RF exposure guidelines.
This USB dongle transmitter is approved for use in typical laptop computers. To comply with FCC RF exposure requirements, this USB dongle should not
be used in other devices or certain laptop and tablet computer configurations where the USB connectors on the host computer are unable to provide or
ensure the necessary operating configurations intended for the device and its users or bystanders to satisfy RF exposure compliance requirements.
Declaration of Conformity / Declaración de conformidad
Zoom Telephonics, Inc.
207 South Street
Boston, MA 02111 USA / 617-423-1072
www.zoomtel.com
Manufacturer/Fabricante
We3G Modem/Router
Brand/Marca
Model 4520, Series 1086
Type/Tipo
The manufacturer declares under sole responsibility that this equipment is compliant to Directive 1999/5/EC (R&TTE) via the following. This product is CE
marked.
El fabricante declara bajo su exclusiva responsabilidad que este equipo satisface la Directiva 1999/5/EC (R&TTE) por medio de lo siguiente. Este producto
tiene marca CE.
EN 301 511 V9.0.2
EN 301 908-1/ -2 V3.2.1
EN 300328 V1.7.1
ETSI EN 301 489-1 V1.6.1/ -7 V1.3.1/-17 V1.3.2/ -24 V1.4.1
EN 60950-1:2006+A11:2009
EN 62311:2008/ IEC62209-2: 2010
Paul Prohodski
4 November, 2010
1086/TF, Boston, MA, USA
Director, Hardware Engineering/Director, Ingeniería de apoyo
3080-A
27653
©2010