

Zoom We3G Modem Quick Start
This Quick Start describes how to use the Zoom We3G Modem with any Windows 7, Vista, or XP (SP2 and
above) computer and with a Macintosh computer with OS X 10.4.9 or above.
Before You Begin
Before you can connect to the Internet with your new modem, you must:
1
Sign up for a mobile broadband service plan.
2
Slide the service provider’s SIM card into your modem.
3
Charge and Power ON the We3G
4
When using the We3G, connect to it either through a wired USB connection or through WiFi
®
-
compatible wireless networking (wireless n, g, or b).
Step 1: Sign Up for a Mobile Broadband Service Plan
Most countries have one or more GSM service providers who offer mobile broadband service. When you
sign up for service, you will get a SIM card to slide into your modem. As you travel, you may save money
and get better coverage by using different service providers for different countries or regions. Wherever you
are, just make sure that you slide in the SIM for the service provider you want to use. You should select a
GSM service provider who uses at least one of this modem’s GSM frequencies, ideally 850, 1900, or 2100
MHz for high-speed Internet.
If you would like to use AT&T service
To use AT&T, you need to get a SIM card and sign up for service, typically for a small one-time fee.
When you go into the store, make sure to bring the IMEI number of the modem with you.
(To
find the IMEI number, press the white button in on the back of the modem and remove the cover.
Remove the battery. You will see a label with the IMEI number on it. Write down the IMEI number and
bring it with you.)
Although the modem has not been certified by AT&T, their position regarding this and other non-
certified devices is:
“Consistent with AT&T’s public statements, a customer can bring a non-AT&T certified device to one of
our retail stores or work with their account manager to get set up for service, provided the device has
FCC approval.” The We3G has FCC approval.
You can easily sign up for AT&T mobile broadband service for your Zoom We3G modem at AT&T or
at any retailer that offers AT&T service plans. AT&T typically calls their mobile broadband service plan
a Data Connect plan. You do NOT need to make a long-term commitment. You can simply arrange for
a monthly plan with no long-term commitment or even a prepaid plan.
If a salesperson says that you need to commit to a long-term plan, tell the salesperson that you know
this is not necessary. Explain that you are supplying your own USB modem, the kind that plugs into a
laptop computer, and say that you know that you can get a no-commitment service plan for that.
If you have a SIM card, you can sign up for an AT&T prepaid Data Connect plan and get details about
the plan at this Web site:
https://buyasession.att.com/sbd/unauth/InitiateSBD.action
You can also sign up for a monthly or long-term plan.
If you are signing up as an individual, you typically show your ID and arrange payment by way of a
credit card or monthly billing. Even if you're visiting the US from a foreign country, you can sign up as
an individual. If you are signing up as a company on the other hand, you will probably be asked to
provide your company address and taxpayer ID. When you sign up, check your Service Summary to
make sure that you get the plan you want. Check the cost and term of service, and make sure that
they are correct.
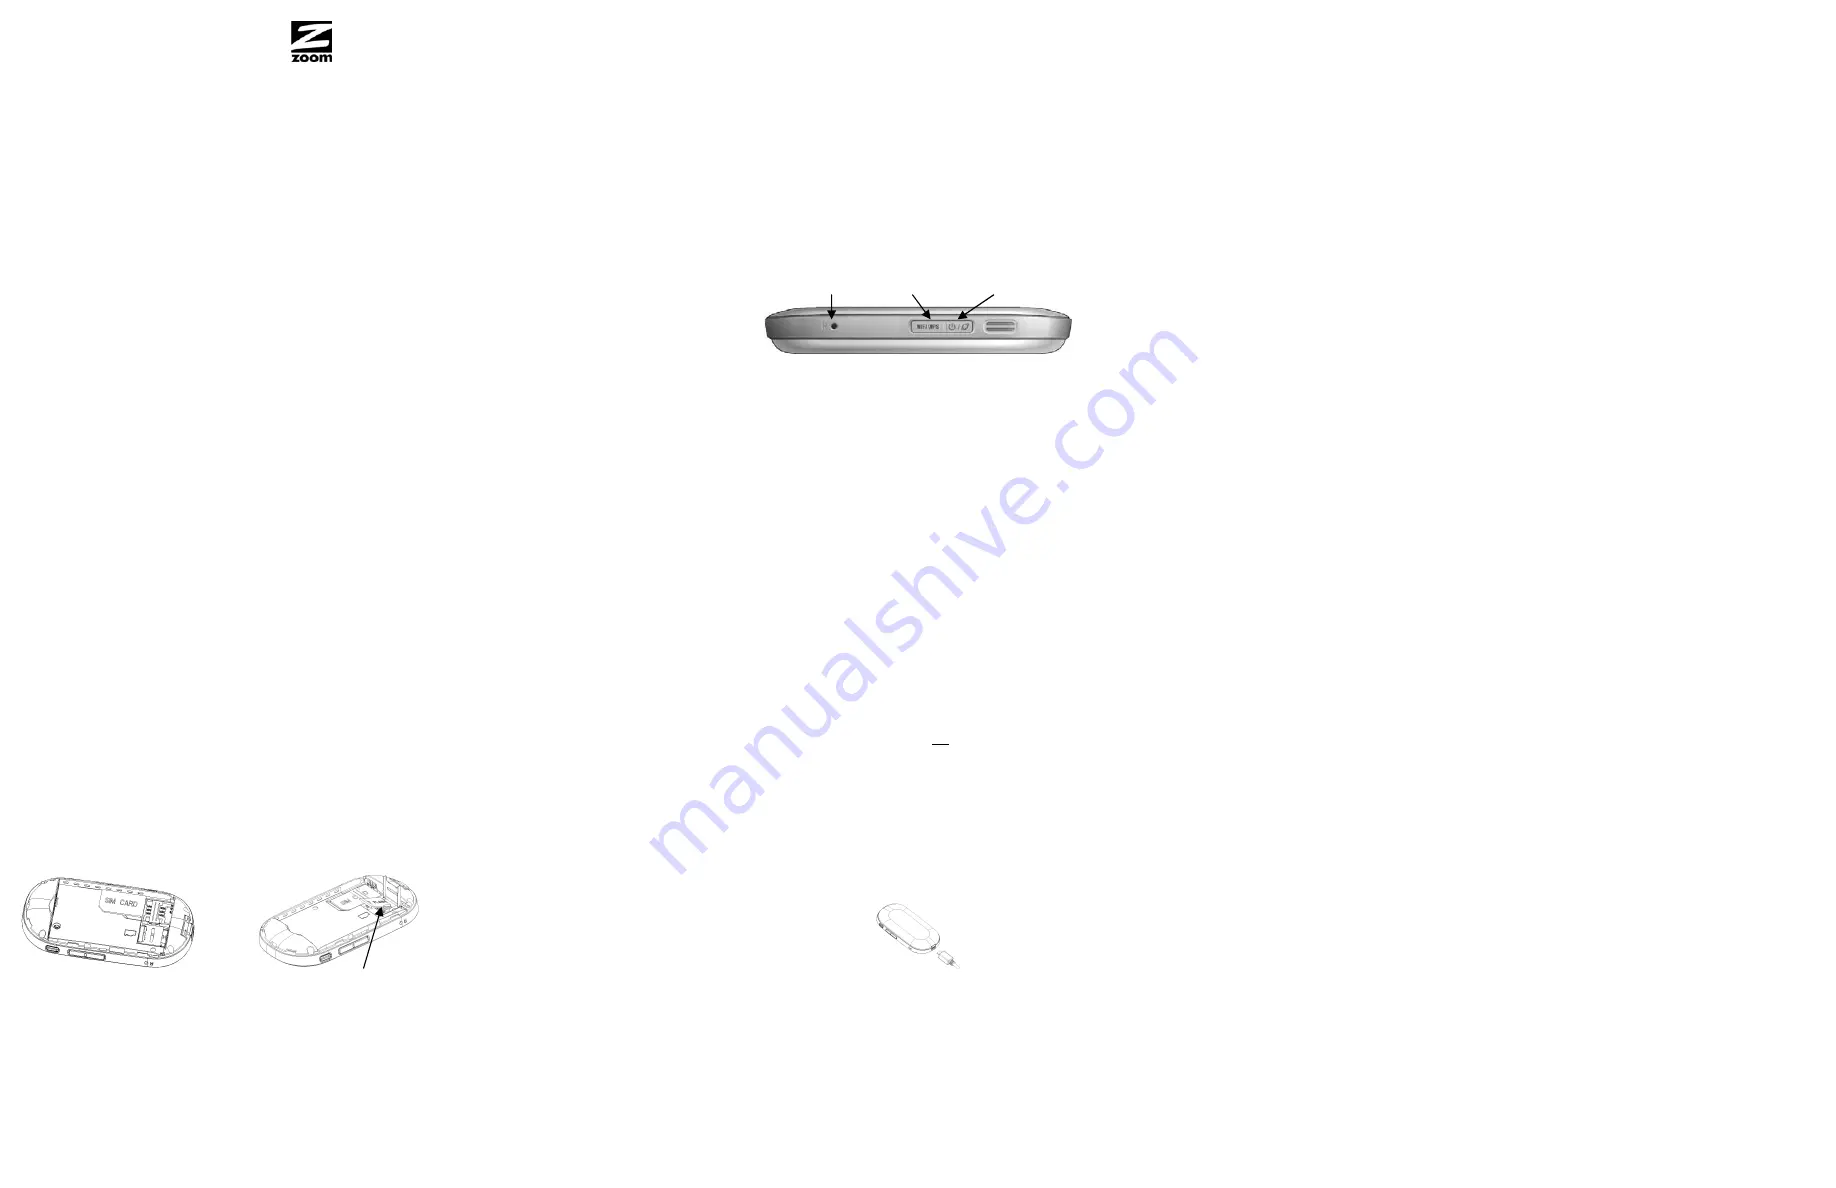
Step 2: Slide the Service Provider's SIM Card into Your We3G
To slide the SIM card into the We3G, please follow these steps:
1
Press the white button in on the back of the modem to open the back cover.
2
Remove the battery. The micro-SD memory and SIM card slots are now exposed.
3
Insert the SIM card, orienting the card as shown by the diagram in the unit.
MicroSD card
4
Insert the MicroSD Card if you want the We3G to provide portable memory. You do not need a
MicroSD Card to use the We3G as a mobile broadband Hotspot.
5
Insert the battery.
6
Close the cover.
Step 3: Charge and Power ON the We3G
When the We3G is first powered ON, the Power LED indicates the current battery power (see
Status
Information
on the back of this Quick Start for LED status indicator descriptions) and after several seconds
goes into
Full Power Working Mode
(
all LED indicators light up
). In approximately 30 seconds, the
We3G automatically switches into
Low Power Working Mode
(the
Power LED is blue and blinking
) to
save battery; however the We3G is still functioning in this mode and transmits data. In order to perform
certain functions such as powering OFF the We3G, setting WPS security using the WPS button, performing
a hard reset, and turning OFF or ON the Wireless option, the We3G needs to be in
Full Power Working
Mode
. (Press and hold the
Power/Connect
button for 2 seconds to switch to
Full Power Working Mode
from
Low Power Working Mode
.)
2
Once the We3G is in Full Power Working Mode (all LED indicators light up), connect one end of the
USB cable into the We3G and the other end into your computer. The
Drivers
screen pops up.
3
Double-click the
Start We3G
icon.
4
Click
Continue
. Then click
Install
.
5
Type the user password for your Mac.
Power ON the We3G
To power ON the We3G, press and hold the
Power/Connect
button for 4 seconds.
6
Click
Continue Installation
.
7
Power OFF the We3G and then click
Restart
.
Power OFF the We3G
To power OFF the We3G if it is in:
8
Once the computer restarts and you see the computer desktop, power ON the We3G.
Full Power Working Mode:
Press and hold the
Power/Connect
button for 3 seconds.
9
If you see a dialog box, double-click the
Start We3G
icon. Close the window.
Low Power Working Mode:
Press and hold the
Power/Connect
button for 2 seconds to switch
to
Full Power Working Mode
and then press and hold the
Power/Connect
button for 3 seconds
to power OFF the We3G.
10
Open up your browser and go to a website.
11
Continue with the section
Once you have established the USB connection
.
Note:
It is recommended that you turn off the We3G when it is not in use to preserve the battery.
Once you have established the USB connection
Reset WiFi
®
/ WPS Power / Connect
If you can browse the Internet, you should continue with
Step 5:
Logging into the Configuration Manager
to setup security for the We3G. Some broadband service plans have limited bandwidth and may charge for
overuse; so please consider protecting your network from overuse from unauthorized users by setting up a
secure network.
How to Charge the We3G
If you are unable to access the Internet (the Signal LED is red or OFF), you may need to set up the We3G
to recognize your SIM card. Go to
Step 5:
Logging into the Configuration Manager
. Here you will set up
the We3G to work with your provider.
When the We3G is charged, its Power LED goes from a steady green to blue and blinking (Low Power
Working Mode) when you power it ON. If the We3G’s battery power is low (the Power LED is a steady
yellow or red or the Power LED is not lit at all), it must be charged before using. You charge the We3G by
using its power cube or by connecting the We3G to a computer using its USB cable.
WiFi
®
-compatible wireless networking
You must first establish a WiFi
®
-compatible connection with the We3G. Follow the instructions below if you
are using Windows. If you are using a non-Windows device or your Windows adapter uses its own software,
please refer to that device’s documentation.
Step 4: Select either the USB or wireless networking option
When you use the We3G, you can use a USB cable to connect the We3G to your computer or you can use
wireless-G to connect to up to 5 WiFi
®
-compatible devices. You can also connect the We3G to your
computer via USB and up to 5 WiFi
Connecting a Windows computer with Built-in Wireless Capabilities
®
-compatible devices wirelessly. Either way, connection to the Internet
is through the We3G’s built-in mobile broadband modem.
Below are general instructions for a Windows computer. The exact steps may vary depending on your
operating system.
USB is a good choice if you don’t have wireless networking enabled on your device, don’t want to use
wireless networking, or if you want to access a MicroSD card you’ve plugged into the We3G. If you are
connecting via USB, you should turn off the We3G’s wireless capability to save battery life if the
Wireless/WPS LED is blue and flashing, indicating it is ON.
1
From the taskbar, click on the wireless symbol.
2
In the wireless network options box, highlight
ZoomWe3G_xxx
where xxx is the last 3 digits of the
MAC address which can be found below the battery of the unit or on the label. Click
Connect
.
3
Open up your browser and go to a website.
(To turn
OFF
Wireless networking if the We3G is in:
Full Power Working Mode
(
all LED indicators light up
)
:
Short press the
WiFi
®
/WPS
button for 1 second.
4
Continue with the section
Once you have established the wireless network connection
.
Low Power Working Mode
(the
Power LED is blue and blinking
)
:
Press and hold the
Power/Connect
button for 2 seconds to switch to
Full Power Working Mode
and then
short press the
WiFi
To disconnect from the current network
Right-click the wireless network icon in the notification area of the Windows taskbar.
®
/WPS
button for 1 second.)
Right-click
ZoomWe3G_xxx
where xxx is the last 3 digits of the MAC address which can be found below
the battery of the unit or on the label. Select
Disconnect
.
When you connect your device via USB for the first time, the USB driver will be installed automatically. For
more information about connecting via USB, please go to the
USB
section below.
Connecting wirelessly on Mac OS X 10.4.9 or higher
There are several advantages to connecting via wireless networking, including truly wireless operation and
the ability to have up to 5 WiFi
1
Click on the “Airport” icon on your menu bar.
®
-compatible computers, phones, and/or other devices networked together
and sharing your mobile broadband connection. You will
2
From the Mac wireless connection list, highlight
ZoomWe3G_xxx
where xxx is the last 3 digits of the
MAC address which can be found below the battery of the unit or on the label.
not need to install any drivers if you connect to the
We3G using wireless networking. For more information about connecting to the We3G using wireless
networking, please go to the
WiFi
®
-compatible wireless networking
section below.
Note:
If a window pops up requesting a password, enter the security password and click
OK
.
3
Open up your browser and go to a website.
USB
4
Continue with the section
Once you have established the wireless network connection
.
Connecting via USB for Windows users
Note
:
When you connect your device via USB for the first time, the driver will be installed automatically.
Once you have established the wireless network connection
1
Power ON the We3G by pressing and holding the
Power / Connect
button for 4 seconds if the We3G
is not already powered ON.
If you can browse the Internet, you should continue with
Step 5:
Logging into the Configuration Manager
to setup security for the We3G. Some broadband service plans have limited bandwidth and may charge for
overuse; so please consider protecting your network from overuse from unauthorized users by setting up a
secure network.
2
Once the We3G is in Full Power Working Mode (all LED indicators light up), connect one end of the
USB cable into the We3G and the other end into your computer.
If you are unable to access the Internet, you may need to set up the We3G to recognize your SIM card. Go
to
Logging into the Configuration Manager
. Here you will login to the configuration manager and set up
the We3G to work with your provider (the Signal LED should be red or OFF).
Step 5: Logging into the Configuration Manager
3
Follow the prompts to automatically install the driver. Before you click
Finish
to reboot your computer,
power OFF the We3G, then click
Finish
. Once the computer restarts and you see the computer
desktop, power ON the We3G.
From the Configuration Manager you will be able to set up your provider, set up wireless security, and
access the We3G advanced settings. To log in:
1
Open your browser and then input the address:
4
If you see an autoplay dialog box, click
Run autorun.exe
. Click
Yes
.
2
In the Admin Login textbox, type the default password:
admin
5
Open up your browser and go to a website.
3
Click
OK
or press Enter.
6
Go to the section
Once you have established the USB connection
.
If you are able to browse the Internet, go to
Admin Setup
.
Connecting via USB on Mac OS X 10.4.9 and higher
If you are unable to browse the Internet, you may need to set up the We3G to recognize your SIM card. Go
to
Setting up your Provider
.
1
Power ON the We3G by pressing and holding the
Power / Connect
button for 4 seconds if the We3G
is not already powered ON.


