pg. 4 - D1201 Installation -
8.
Lower the front axle and remove the coil springs. Check for slack in ABS wires,
brake lines, and differential breather hose. Keep the coils separated, do not mix
sides.
9.
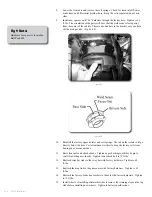
Install new spacers with 7/16” hardware through the factory hole. Tighten to 35
ft-lbs. The orientation of the parts will be so that the weld seam is facing away
from the center of the vehicle. There is an extra hole in the bracket, only one hole
will be used per side. (Fig 6a, 6b)
Figure 6A
Figure 6B
10.
Reinstall the factory upper isolator and coil springs. The tab on the isolator will go
directly below the bolt. Coil orientation is critical to keep the factory coils from
bowing an excessive amount.
11.
Raise front axle and attach shocks. Tighten upper bushings until they begin to
swell if installing new shocks. Tighten lower shock bolt to 70 ft-lbs.
12.
Reattach sway bar links to the sway bar with factory hardware. Tighten to 40
ft-lbs.
13.
Reattach the drag link to the pitman arm with factory hardware. Tighten to 65
ft-lbs.
14.
Reattach the factory brake line brackets to the axle with factory hardware. Tighten
to 12 ft-lbs.
15.
Install wheels, if installing aftermarket wheels remove the retaining clips on the lug
studs before installing new wheels. Tighten to factory specifications.
Fig 9 Note:
Hardware for spacer is located in
Bolt Pack 605


