ZOLL Base PowerCharger
4x4
Operator’s Manual
16
2. Insert a battery into any compartment. Make sure the
battery is fully seated (a click can be heard.)
3. Press the
TEST
button for the appropriate
compartment. The
TESTING
indicator light will
illuminate for the duration of the test cycle.
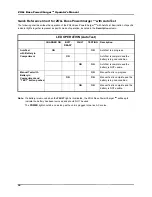
4. If the battery passes the test, the
BATT. READY
light
will illuminate while the
TESTING
light remains lit,
indicating that the battery is fully charged, ready for
use, and has adequate capacity to power an
M Series equipped with Pace/Defibrillation and Pulse
Oximetry (SpO
2
) for approximately 1.5 hours in
Monitor mode.
5. If a battery fails the test, the
FAULT
light will
illuminate while the
TESTING
light remains lit. The
unit will beep when a battery that has failed capacity
test is removed.
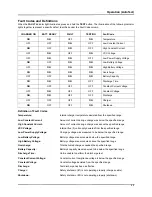
To identify the defect, press and hold the
TEST
button while the battery is still in the compartment.
Illumination of certain indicator lights together
represent a specific defect; see “Fault Codes and
Definitions” on page 17 and take corrective action.
Repeat test.
Before disposing of the battery, test the battery
compartment for possible defective operation (see
“Battery Compartment Testing Procedure” on
page 16).
6. Record the date and results of the test on the battery
label.
1RWH
Interrupting a test cycle in progress by removing
the battery will cause an audible warning of
five (5) consecutive beeps to indicate that the
battery is not fully charged and should not be
used. All four indicator lights will illuminate for
four (4) seconds and then go off.
%DWWHU\&RPSDUWPHQW7HVWLQJ
3URFHGXUH
The ZOLL Base PowerCharger
4x4
has four battery
compartments that are able to test and charge batteries
simultaneously and independently of each other. In
addition, the ZOLL Base PowerCharger
4x4
can test each
battery compartment for defective operation through the
simple press of a button.
To test a battery compartment:
1. Check to see that the unit is connected to live AC
mains. The
POWER
light should be lit.
2. Remove battery from compartment to be tested.
3. Press
TEST
button under battery compartment.
4. All four indicator lights will illuminate for
approximately 4-5 seconds.
5. If the
TESTING
light and
BATT. READY
light remain
lit for three (3) seconds while the other lights go off,
the compartment is fully operational without any
defects.
6. If the
FAULT
light is lit, the compartment is defective
in some way.
To identify the defect, press and hold the
TEST
button. Illumination of certain indicator lights together
represent a specific defect. Refer to “Fault Codes
and Definitions” on page 17 to identify the fault and
take corrective action.
1RWH
Battery compartments operate independently of
each other and one faulty compartment may not
affect any others. However, there are common
failures that can affect all compartments.
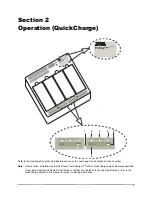
TEST
TESTING
FAULT
BATT. READY
CHARGER ON

