Pattern selection interface
Template machine - Touch screen E2
17
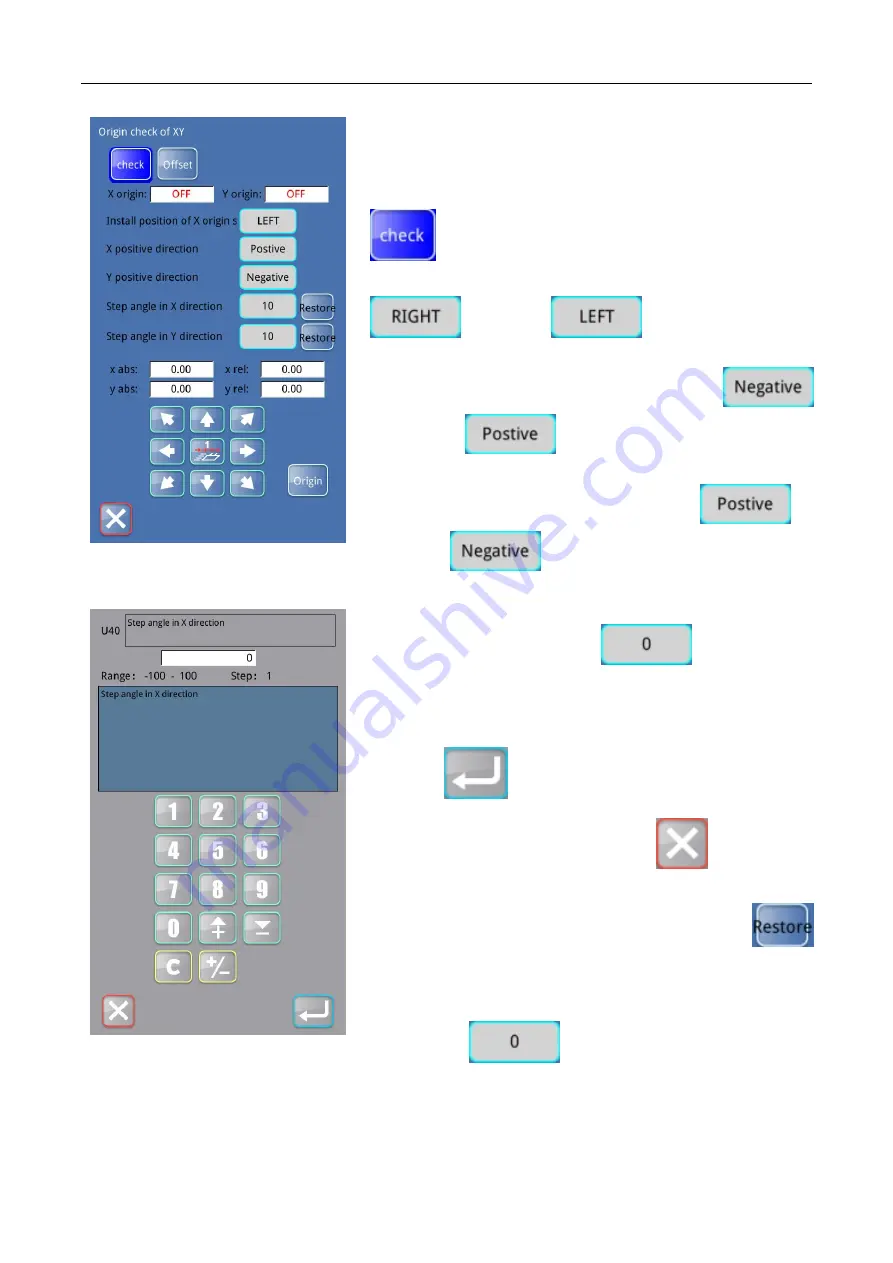
Under the "XY origin detection" interface, the "detection" and
"deviation" interfaces can be selected.
The default interface of the system is the [detection] interface,
and the "detection" icon in the interface is shown in blue
, with the following contents:
⑨ Installation position of X origin sensor: click "right"
or "left"
to switch installation
position of X origin sensor.
⑩ X positive direction: click the right "negative"
or "positive"
to switch the direction of X positive
direction.
⑪ Y positive direction: click the right "positive"
or
"negative"
to switch the direction of Y positive
direction.
⑫ X step Angle fine-tuning: display the current X step Angle
fine-tuning value. Click the value
on the right side
to enter the parameter setting interface of U40 X step Angle
fine-tuning:
Enter the value through the number key below the interface, click
"confirm"
to confirm the value, and return to the "XY
origin detection" interface, click "back"
to cancel the
operation, and return to the "XY origin detection" interface.
In the interface of "XY origin detection", click "restore"
on the right side of X step Angle fine-tuning to restore the value.
⑬ Y step away from the Angle of fine-tuning: show the current
step Y values from the Angle of fine-tuning, but by clicking the
right number
, enter the interval Angle fine-tuning
U41 Y parameter Settings interface, parameter setting method
and interval Angle of fine-tuning
【
⑫ X step Angle fine-tuning.
】
Содержание ZJ-M3-S500-SF-LK2-V2
Страница 1: ...模板机 触摸屏 E2 Template machine Touch screen E2 2019 01 ...
Страница 4: ......
Страница 15: ...模板机 触摸屏 E2 概要说明 3 1 3 主界面 开机后将直接进入 花样选择 界面 单击 可进入 花样缝制 界面 花样选择界面 花样缝制界面 ...
Страница 17: ...模板机 触摸屏 E2 概要说明 5 1 5 快速缝制入门 开机将直接进入 花样选择 界面 单击 花样选择 界面的 花样管理 键 进入 读 取花样 界面 在 读取花样 界面 可选择想要缝制的花样 ...
Страница 18: ...概要说明 模板机 触摸屏 E2 6 在 读取花样 界面单击想要缝制的花样 选中该花样 单击 回车 确认花样并自动返回到 花样选择 界 面 在 花样选择 界面 单击 可进入 花样缝制 界面 ...
Страница 21: ...模板机 触摸屏 E2 花样选择界面 9 O 移框 可移动压框 P 检测 可进入检测模式 检测输入输出和其他信号 Q 切换 花样缝制界面和花样选择界面互相切换 R 中压脚 提升或者下降中压脚 ...
Страница 22: ...花样选择界面 模板机 触摸屏 E2 10 2 1 花样预览 在 花样选择 或 花样缝制 界面 单击花样预览区 可进入 花样预览 界面 显示如下信息 花样名称 花样号 X 尺寸 Y 尺寸 针数 中压脚高度 花样坐标 ...
Страница 37: ...模板机 触摸屏 E2 花样选择界面 25 旋转切刀电机 旋转切刀复位 提升气缸 压料气缸 切刀启动 切刀提升汽缸原点信号 直线切刀 21 直线切刀动作模拟 22 直线切刀原点传感器状态 ...
Страница 46: ...花样缝制界面 模板机 触摸屏 E2 34 单击 退出 后 返回花样缝制界面 ...
Страница 51: ...模板机 触摸屏 E2 花样管理 39 在 读取花样 界面 选中花样后 单击 修改 可 进入 花样修改 界面 修改花样 ...
Страница 52: ...设置 模板机 触摸屏 E2 40 5 设置 在 花样选择 界面或 花样缝制 界面 按下 设置 键 进入 设置 界面 ...
Страница 72: ...绕线 模板机 触摸屏 E2 60 6 绕线 在 花样缝制 或 花样选择 界面 单击 绕线 可进入 绕线 界面 ...
Страница 76: ...信息 模板机 触摸屏 E2 64 6 输入分期密码 按下 密码 1 键 进入第一期密码设置界面 要求输入第 一个有效日期 选择合适的日期后 按 确认 ...
Страница 77: ...模板机 触摸屏 E2 信息 65 然后进入密码设置界面 输入密码 日期不能小于系统日期 密码输入要求确认 两次密码必须一致 ...
Страница 81: ...模板机 触摸屏 E2 信息 69 7 2 穿线示意 在 信息 界面下 单击 穿线示意 进入 穿线示意 界面 穿线时 请参阅 ...
Страница 93: ...模板机 触摸屏 E2 附录 2 81 9 附录 2 9 1 电控箱连接示意图 图 1 电控箱连接示意图 ...
Страница 94: ...附录 2 模板机 触摸屏 E2 82 9 2 操作箱示意图 图 2 操作箱示意图 ...
Страница 95: ...模板机 触摸屏 E2 附录 2 83 9 3 系统框图 MHSC4056 2E2 B MBJ 三丝杠模板机 ...
Страница 96: ......
Страница 190: ...Template machine Touch screen E2 Appendix 2 94 9 3 Control System Diagram MHSC4056 2E2 B MBJ ...


