background image

H0430700.A - EN - 2014-05

9

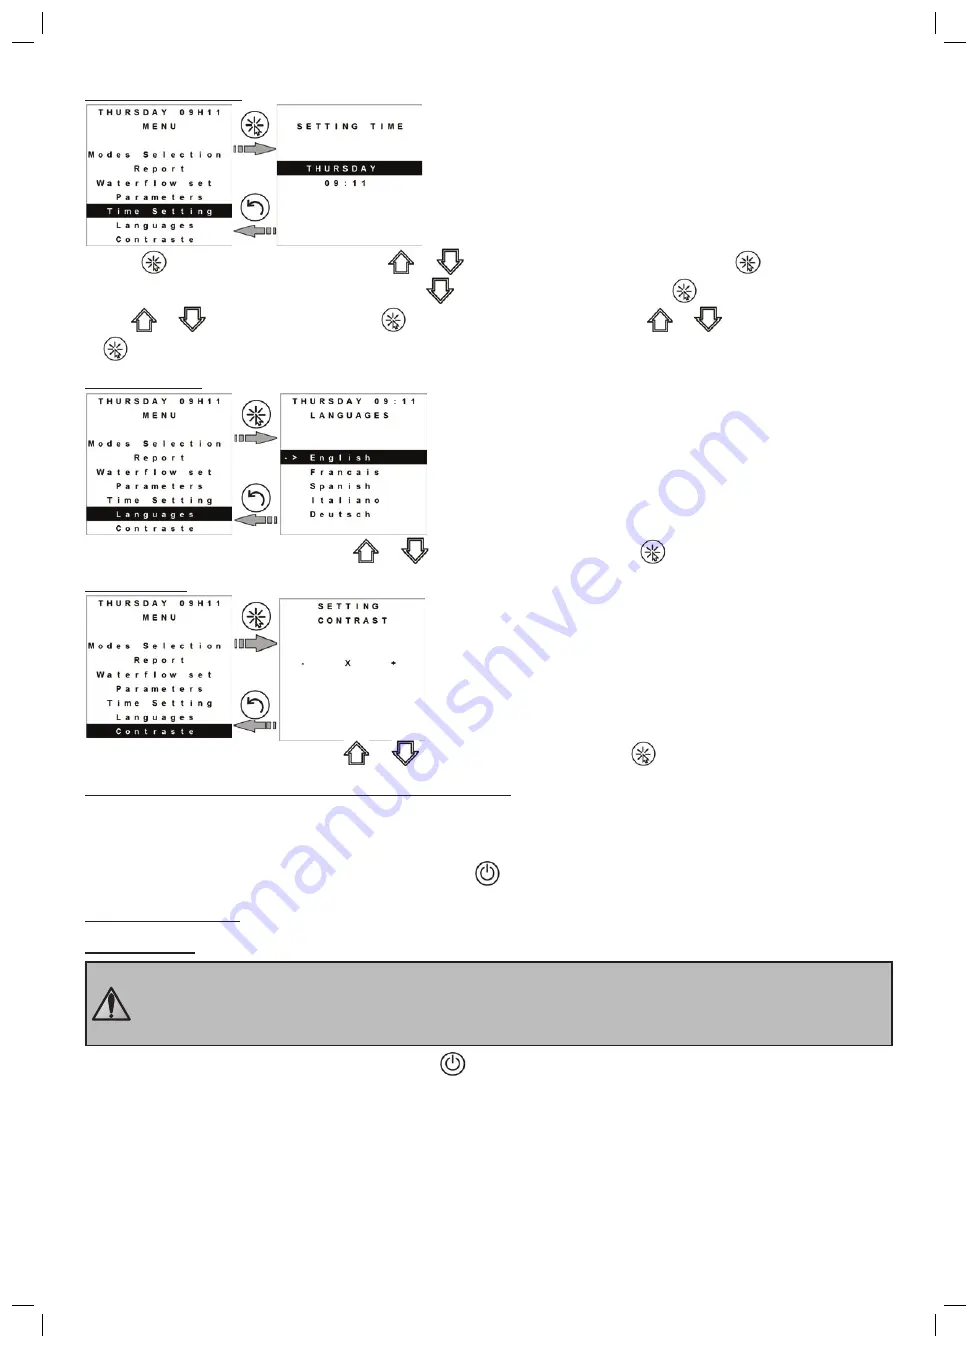
2.3.5 Setting the time

•  Press 

 to enter day selection, using the 

 or 

 keys, select the day, then validate using 

,

•  

Scroll down to the «time» parameter using the 

 key, enter the parameter using 

, first modify the hours using    

the  

 or 

 keys, validate by pressing 

, then change the minutes using the 

 or 

 keys, validate by pressing 

.

2.3.6 Languages

•   Select the chosen language using the 

 or 

 keys, then validate by pressing 

.

2.3.7 Contrast

•   Select the screen contrast using the 

 or 

 keys, then validate by pressing 

.

2.4 Checks to carry out once the appliance is running

The heat pump must stop when: 

•  

the set point temperature on the regulator is set below the water temperature, 

•  

filtering is stopped, or when valves 2 or 3 are closed, 

•  

the heat pump is powered off by pressing 3 seconds on 

.

3. Maintenance

3.1 Wintering

Wintering is imperative, failure to do so exposes the condenser to a risk of freezing, this case is not covered 

by the warranty. 

To avoid condensation damaging the appliance, do not cover it hermetically, a wintering cover is available as 

an option.

•  

Put the regulator in «stand-by» mode by pressing  

 for three seconds, then cut the power supply, 

•  

Open valve 1,

•  

Close valves 2 and 3 open valves 4 and 5 (if present), 

•  

Make sure there is no water flow in the heat pump, 

•  

Drain the water condenser by unscrewing the two pool water intake and discharge couplings behind the heat pump, 

•  

In the event of full pool wintering: screw the two fittings back on a full turn, to avoid foreign bodies from entering the 

condenser, 

•  

In  the  event  of  wintering  the  heat  pump  only:  do  not  screw  the  fittings  back  on,  instead  fit  2  caps  (supplied  see 

appendices) to the condenser water intake and discharge.

•  

Install a micro ventilated wintering cover on the heat pump (accessory available as an option, see appendices).

Содержание ZS500 MD5

Страница 1: ...H0430700 A 2014 05 Instructions for installation and use English More documents on www zodiac poolcare com ...

Страница 2: ... the appliance in order to avoid exposure to dangerous elements If the appliance suffers a malfunction do not try to repair the appliance yourself contact your reseller Before any intervention on the appliance make sure it has been powered off and locked out and that heating priority has been deactivated Before any operations check that the voltage indicated on the plate on the appliance correspon...

Страница 3: ...p the appliance 6 2 3 Menu presentation 6 2 4 Checks to carry out once the appliance is running 9 3 Maintenance 9 3 1 Wintering 9 3 2 Maintenance instructions 10 3 3 Additional recommendations 10 3 4 Recycling 10 4 Troubleshooting 10 4 1 Displays 10 4 2 Appliance malfunctions 11 4 3 FAQ 12 5 Registering the product 13 Available in the appendices at the end of these instructions Electric Diagram Di...

Страница 4: ...pump must be installed at a minimum distance from the pool coping in order to avoid any projections of spray onto the appliance This distance is determined by the electric standards applicable locally In France 3 5 metres the heat pump must not be installed close to a heat source or to a source of inflammable gas close to a road with a risk of water or mud being sprayed close to a gutter that coul...

Страница 5: ... between 9 and 18 mm use the cable gland to pass the power supply cable into the appliance 1 5 2 Connections The electric power supply cable must be isolated from all sharp or hot elements that could damage or crush it With the power off check that the power cable is properly connected to the connection terminal Loose terminals can cause the terminal block to heat and lead to the warranty being vo...

Страница 6: ...r contactor coil for the filter pump B filtering clock C power contactor three or two phased powering the filter pump motor D separate connection cable for the heating priority function E terminal block F fuse G separate connection cable for alarm contact relay H alarm contact relay I remote on off switch J separate connection cable for the remote on off command 2 Use 2 1 Presentation of the regul...

Страница 7: ...nds the start up screen will display for 4 seconds then the home screen displays a two minute count down will start Set the set point temperature Press to increase the temperature by 0 5 C Press to lower the temperature by 0 5 C When the pool reaches the required temperature the heat pump stops automatically 2 3 Menu presentation To access the menu press Menu Description Modes selection Choose the...

Страница 8: ...dify the start up time for the mode using the key validate by pressing Modify the stop time for the mode using the key validate by pressing To create another operating range in another mode press the key then continue in the same way The heat pump will not operate during the empty time ranges 2 3 2 Troubleshooting Sensors Description ST1 Water temperature at intake ST2 Air temperature ST3 Defrosti...

Страница 9: ... for a few minutes after each change in valve position for the appliance to balance 2 3 4 Parameters Parameters Level 1 Description P01 Set point temperature P04 Hysteresis for switching to cold mode according to set point P09 ST1 water intake sensor calibration P10 ST2 air intake sensor calibration P15 Cold mode activation P16 Fixed counter for operating hours P17 Counter with reset of operating ...

Страница 10: ...ce 3 1 Wintering Wintering is imperative failure to do so exposes the condenser to a risk of freezing this case is not covered by the warranty To avoid condensation damaging the appliance do not cover it hermetically a wintering cover is available as an option Put the regulator in stand by mode by pressing for three seconds then cut the power supply Open valve 1 Close valves 2 and 3 open valves 4 ...

Страница 11: ...traces of corrosion or oil stains around the refrigerating components Before any operations on the refrigerating circuit it is imperative to shut down the appliance and to wait a few minutes before fitting temperature or pressure sensors Some equipment such as the compressor and piping can reach temperatures in excess of 100 C and high pressures which can cause serious burns 3 3 2 Repairs All weld...

Страница 12: ...w pressure circuit if the fault remains after acknowledgement Call an approved technician Automatic if less than 4 faults per hour or press on Error 09 High pressure fault on the refrigeration circuit 1 air and water emulsion has entered the appliance 2 bad water flow rate 3 flow controller jammed 4 dirty exchanger 1 check the pool hydraulic circuit 2 increase the flow using the by pass check that...

Страница 13: ...tions and the heat pump sizing The hotter the surrounding air the more the heat pump will be effective Keep the evaporator clean Check that the filtering time is sufficient During the temperature rise phase water circulation must be continuous 24h 24 To maintain the temperature throughout the season switch to automatic circulation at least 12h day the longer this period the more the heat pump will...

Страница 14: ...r product on our website be the first to be informed of new Zodiac products and special offers help us to constantly improve our product quality Europe Rest of the World www zodiac poolcare com Americas www zodiacpoolsystems com Australia Pacific www zodiac com au ...

Страница 15: ...H0430700 A EN 2014 05 1 Electric diagram ZS500 M5 ...

Страница 16: ...P Low pressure controller C1 Filter EI Ignition coil EV Electronic pressure reducing valve F1 F type protection fuse 6 3x32 25A FE Ferrite H Anti freeze resistor condenser HP High pressure controller J1 Flow controller M1 Ventilator motor M2 Compressor motor RV Inversion valve R1 Relay ST1 Water regulation sensor ST2 Anti freeze sensor ST3 Defreeze sensor ST4 Fluid line sensor ST5 Return fitting c...

Страница 17: ... dimensions 1 Grate 2 Display 3 Pool water inlet Ø50 4 Pool water outlet Ø50 5 Evaporator ZS500 Weight Kg M5 60 Contents x1 x2 x2 ZS500 Wintering cap Glue on coupling Ø50 Available accessories Control panel offset kit Wintering cover Technical room kit Pac Net ...

Страница 18: ...ease contact your retailer ZODIAC is a registered trademark of Zodiac International S A S U used under license Votre revendeur your retailer www zodiac poolcare com Zodiac Pool Care Europe BP 90023 49180 St Barthélémy d Anjou cedex S A S U au capital de 1 267 140 SIREN 395 068 679 RCS PARIS ...

Отзывы: