background image

Page

 2 

Zodiac Voyager RE Robotic Pool Cleaners


|

  Owner's Manual

Zodiac

 Voyager RE

 Robotic Pool Cleaners  |  

Owner’s Manual

Page 6

3

 Assembly

Contents

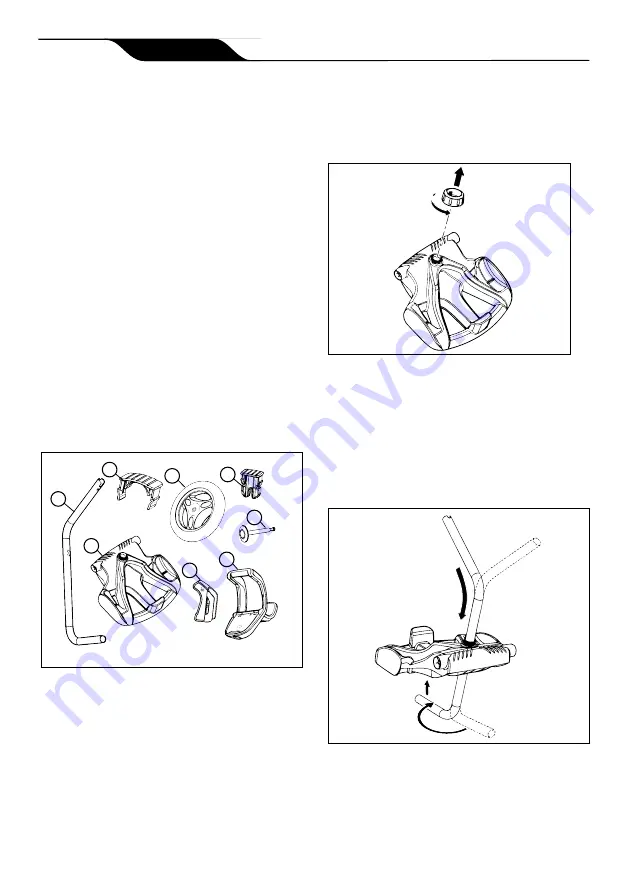
The packaging should contain the following items:

Robotic cleaner and floating cable with swivel

Control Unit

Printed materials

Transport and storage caddy components

 (

see

Figure 1)

a.

handle frame

b. support blocks (x 2)

c.

wheels (x 2)

d. wheel locking clips (x 2)

e.

wheel axle / hubcap (x 2)

f.

base unit

g. cleaner hook
h. caddy handle

x 2

A

B

C

D

x 2

x 2

E

x 2

F

G

H

Figure 1.  Transport Caddy Assembly Components

When unpacking the cleaner and its components:

Check to make sure each component is in the 

box.

Check cleaner and components for damage 

during transport.

If there are any missing parts or damage, 

contact Customer Service at 086 088 7665

Assemble the Transport Caddy

1.

Unscrew the handnut from the base

(Figure 2).

Figure 2.  Remove Handnut from Base Unit

2.

Insert the metal handle frame tubing into

the base with notch end at the top, then

rotate so the bends are away from you.

(Figure 3).

3.

Push base down (Figure 3) so the metal

handle frame is seated in the recess on the

underside of the base.

Figure 3.  Connect Metal Frame to Base Unit

4.

Slide the handnut over the tube and twist to

tighten onto base unit (Figure 4).

Page

 6 

Zodiac Voyager RE Robotic Pool Cleaners


|

  Owner's Manual

Содержание VOYAGER RE4600iQ

Страница 1: ...his manual this product must be serviced by a pool technician who is licensed and qualified in pool equipment by the jurisdiction in which the product will be installed where such state or local requirements exist In the event no such state or local requirement exists the maintainer must be a professional with sufficient experience in pool equipment installation and maintenance so that all of the ...

Страница 2: ...Page 2 Zodiac Voyager RE Robotic Pool Cleaners Owner s Manual Zodiac Voyager RE Robotic Pool Cleaners Owner s Manual Page 2 ...

Страница 3: ...t Cleaning Time 12 Lift System 12 5Installing iAquaLink RE 4600 iQ 13 Download the App 13 Sign Up and Log In 13 Configure the System 13 6 iAquaLink Control DX4050 iQ 14 iAquaLink Control Home Screen 14 Start Stop Cleaning and Adjust Cleaning Time 14 Set Cleaning Mode 14 In App Error Messages and Troubleshooting 15 System Settings 15 7 Maintenance 15 Cord Tangling 15 Clean the Filter Canister 16 St...

Страница 4: ...as to prevent it from being damaged by lawn mowers hedge trim mers and other equipment To reduce the risk of electrical shock do not use the robotic cleaner or Control Unit if the cord is worn or damaged Contact Zodiac Customer Care Service 0860 887 665 immediately for proper servicing and replacement of the damaged cord Double insulation For continued protection against possible electric shock us...

Страница 5: ...rface with a pool brush Ink from the pattern can also rub off during the installation process or when it comes into contact with objects in the pool Zodiac Group SA Pty Ltd is not responsible for and the Limited Warranty does not cover pattern removal abrasion or markings on vinyl liners 2Cleaner Specifications General Specifications The general specifications for the cleaner are as follows Contro...

Страница 6: ...ing the cleaner and its components Check to make sure each component is in the box Check cleaner and components for damage during transport If there are any missing parts or damage contact Customer Service at 086 088 7665 Assemble the Transport Caddy 1 Unscrew the handnut from the base Figure 2 Figure 2 Remove Handnut from Base Unit 2 Insert the metal handle frame tubing into the base with notch e...

Страница 7: ...e to secure wheel Repeat to attach both wheels Figure 5 Figure 5 Snap in Support Blocks and Attach Wheels 7 Slide the Control Unit base caddy handle attachment down over the metal tubing until it snaps into place See Figure 6 Figure 6 Attach Caddy Handle 8 Align cleaner hook pins with the top holes in the handle tube and snap into place Figure 7 Figure 7 Snap Cleaner Hook into Place 9 Align the bo...

Страница 8: ...rdance with SANS10142 1 Also refer to the in stallation instructions relating to the swimming pool equipment for which the cleaner will be an integral part The cleaner is to be supplied through a Residual Current Device RCD with a rated residual operating current of 30mA Do not use an extension cord to connect the Control Unit Do not allow anyone to swim while the cleaner is in the pool The Contro...

Страница 9: ...e Do not leave your cleaner in the pool on a permanent basis At the end of each cycle remove the cleaner from the pool Start at the cleaner head and untangle any coils in the cable before storing the cleaner The robotic cleaner includes a safety feature that automatically stops the cleaner if it is powered on but not submerged in water For pools equipped with a beach area this safety feature is pr...

Страница 10: ...farthest end of your pool from the central point Spread out the floating cable ensuring there are no kinks or coils in the cable Figure 13 Figure 13 Pool Entry Point for Optimal Patterning Max Floating Cable Length caddy control unit cleaner cleaner Recommended entry point Not Recommended WARNING Do not use an extension cord Page 10 Zodiac Voyager RE Robotic Pool Cleaners Owner s Manual 4 Place on...

Страница 11: ...l SOLID paire1d with phone Wi Fi connection status BLINKING connected to router SOLID connected to the internet Floor Walls Waterline 2h 30 min Cleans the floor walls and waterline of the pool Remove cleaner from the pool Button Functions Control Unit The Control Unit can be used to initiate basic cleaning features and to connect the device to home Wi Fi connected models For more information on co...

Страница 12: ...tem is designed to assist in retrieving the robot from the pool Lift System can be activated at any time during or after a cleaning cycle 1 Press on the Control Unit or from the App connected models to begin the automated procedure to bring the cleaner to the wall NOTE To stop the procedure at any time press and release the button again 2 Next Press and HOLD to rotate the cleaner 3 Once the cleane...

Страница 13: ...ownload is complete select the iAquaLink icon on your smart device to open the app Sign Up and Log In Open the iAquaLink app then Sign Up or Log In Complete all required fields in the Account Set Up page and agree to the Terms and Conditions Configure the System 1 On the My Systems page click in the upper right hand corner to add a system 2 Choose Robotic Cleaner from the list and choose your mode...

Страница 14: ... Remote Clean Mode Lift System Start Stop Cleaning and Adjust Cleaning Time The factory default cleaning surface setting is Floor Walls Waterline 1 From the Home screen or the Control Unit press the Start Stop button to begin cleaning 2 The app displays the cycle time in hours and minutes To increase or decrease the cycle time during cleaning press the and buttons Time adjusts up or down in 15 min...

Страница 15: ...e on how to fix the issue 2 Choose Clear Error if you believe you have fixed the problem and want to re try Choose OK if you want to suspend the cleaner in error mode and work on the troubleshooting fix at a later time System Settings Access System Settings by pressing the gear icon in the upper right hand corner of the app screen 7Maintenance WARNING To avoid electric shock and other hazards whic...

Страница 16: ...Unplug power to the cleaner at the Control Unit Figure 17 Unplug 4 Remove the cleaner from the pool and untangle all kinks and coils in the power cable Start at the cleaner head Lay the cable in the sun to loosen any tangling memory Figure 18 Untangle the power cable Clean the Filter Canister The filter canister should be cleaned at the end of each cycle 1 Remove the cleaner from the water using t...

Страница 17: ... and a soft bristle brush Store the Cleaner When Not in Use The cleaner should be cleaned regularly using slightly soapy clean water Do not use solvents such as trichlorethylene or its equivalent Rinse the cleaner generously using clean water Do not let your cleaner dry in direct sunlight near the pool The cleaner should be stored on its caddy so that it dries quickly 1 Disconnect cleaner from the...

Страница 18: ...Worn Brush Indicator To maintain cleaner performance at its best you need to replace the brushes as soon as one of the wear indicators is reached even if the blade wear is not even It is recommended that you replace the brushes when the rubber is worn down to the top of the wear indicator or every two years whichever comes first To replace a worn brush 1 Stand the cleaner on its end in a vertical ...

Страница 19: ...t provided and gently feed it through until the heel comes out at the other side of the slot Figure 29 4 Figure 29 Pull Tabs Through Each Slot 5 Use a pair of scissors to cut the tabs 3 4 inch from the heel so that they are no higher than the cleaning blade Figure 30 Cut Tabs Figure 28 Position the New Brush on Roller Page 19 Zodiac Voyager RE Robotic Pool Cleaners Owner s Manual Owner s Manual ...

Страница 20: ...thoroughly Put it back in the water shaking to release the air bubbles Restart the cycle If this does not resolve the problem contact your local retailer for a diagnostic review or call customer service Pump motor Pump motor consumption Check that no debris or hair is blocking the impeller Clean the filter thoroughly If this does not resolve the problem contact your local retailer for a diagnostic...

Страница 21: ...l box is connected to is not supplying electrical power Check that the outlet to which the control box is connected is receiving electricity Cycle not started Press the Start button to initiate a cleaning cycle Reset needed Disconnect the unit power and reconnect after 20 seconds If the problem is not resolved contact your local retailer to request a diagnostic review or contact Technical Support ...

Страница 22: ...r How It Works Your Smart Device Your Internet Router Cleaner Control Unit Robotic Pool Cleaner Internet How to connect You must connect to the home router network by first establishing a direct connection between the Control Unit and your smart device See Configuring the System IMPORTANT It is recommended to locate the Control Unit as close to the home router as practical Do not use an extension ...

Страница 23: ... is too far from home router Relocate the control box as near to the home router as practical See Install and Submerge the Cleaner Do not use an extension cord Weak Wi Fi signal Check for adequate Wi Fi signal strength With a Windows laptop go to Network Connections in the Control Panel Check Signal Strength meter under Wireless Network Connection icon while standing near the control box With a sm...

Страница 24: ...Page 2 Zodiac Voyager RE Robotic Pool Cleaners Owner s Manual Zodiac Voyager RE Robotic Pool Cleaners Owner s Manual Page 24 ...

Страница 25: ... like us to keep in touch Thank you for completing your warranty registration To serve you better Fluidra will send you information on products current swimming pool legislations and special offers May Fluidra communicate with you Preferred method of communication Please tick the appropriate box Please tick the appropriate box YES NO Email SMS Telephone Please fill out all your details to ensure y...

Страница 26: ...g No 2004 019077 07 5 Kruger Street Denver For full warranty terms and conditions and to register your warranty visit www zodiac co za warranty and complete your details Or scan the QR code to go directly to the registration page Record your equipment details here for quick reference Model No ____________________________________ Serial No ____________________________________ Fluidra Waterlinx Pty ...

Отзывы: